Android 自定义ViewGroup
之前学习总结了如何自定义View,今天来总结下如何自定义ViewGroup。
学习ViewGroup之前,首先我们要先学会了解,什么是ViewGroup,ViewGroup是干什么的,然后我们再去学习如何自定义ViewGroup。
ViewGroup简介
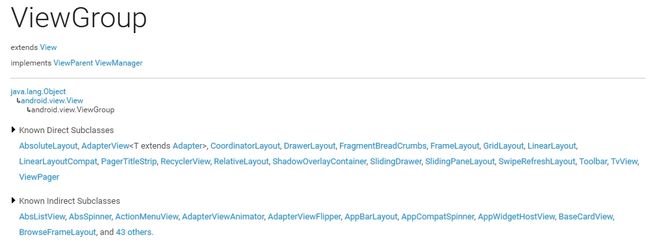
我们首先看一下官方API的介绍:
从API我们可以看出ViewGroup包含如下子类: AbsoluteLayout, AdapterView, CoordinatorLayout, DrawerLayout, FragmentBreadCrumbs, FrameLayout, GridLayout, LinearLayout, LinearLayoutCompat, PagerTitleStrip, RecyclerView, RelativeLayout, ShadowOverlayContainer, SlidingDrawer, SlidingPaneLayout, SwipeRefreshLayout, Toolbar, TvView, ViewPager 。可能大家并不是都认识这些,但标黑的部分一定认识。
ViewGroup就是布局的容器,它内部可以放置很多ChildView。
ViewGroup职责
一、ViewGroup职责
ViewGroup的职责就是存放ChildView,通过xml布局文件中给定的ViewGroup的尺寸以及ChildView的尺寸,计算出ChildView的位置。这是我自己的理解。以下是张鸿洋大神对ViewGroup职责的解释:
ViewGroup相当于一个放置View的容器,并且我们在写布局xml的时候,会告诉容器(凡是以layout为开头的属性,都是为用于告诉容器的),我们的宽度(layout_width)、高度(layout_height)、对齐方式(layout_gravity)等;当然还有margin等;于是乎,ViewGroup的职能为:给childView计算出建议的宽和高和测量模式 ;决定childView的位置;为什么只是建议的宽和高,而不是直接确定呢,别忘了childView宽和高可以设置为wrap_content,这样只有childView才能计算出自己的宽和高。
——【张鸿洋的博客】《Android 手把手教您自定义ViewGroup(一) 》
二、View职责
这里为了更好的理解VIE我Group的职责,我们区别一下View的职责。
View的职责,根据测量模式和ViewGroup给出的建议的宽和高,计算出自己的宽和高;同时还有个更重要的职责是:在ViewGroup为其指定的区域内绘制自己的形态。
——【张鸿洋的博客】《Android 手把手教您自定义ViewGroup(一) 》
二、LayoutParams职责
从API可以看到LayoutParams是ViewGroup中的一个内部类,该类是为该ViewGroup指定其内部的ChildView可以使用哪些属性。还是引用大神的解释:
ViewGroup和LayoutParams之间的关系:大家可以回忆一下,当在LinearLayout中写childView的时候,可以写layout_gravity,layout_weight属性;在RelativeLayout中的childView有layout_centerInParent属性,却没有layout_gravity,layout_weight,这是为什么呢?这是因为每个ViewGroup需要指定一个LayoutParams,用于确定支持childView支持哪些属性,比如LinearLayout指定LinearLayout.LayoutParams等。如果大家去看LinearLayout的源码,会发现其内部定义了LinearLayout.LayoutParams,在此类中,你可以发现weight和gravity的身影。
——【张鸿洋的博客】《Android 手把手教您自定义ViewGroup(一) 》
自定义ViewGroup的创建
1. 定义一个MyViewGroup继承ViewGroup。
2. 就像自定义View一样,我们继承View后必须实现其中的View(Context context, AttributeSet attrs)构造器。自定义ViewGroup也需要实现它的ViewGroup(Context context, AttributeSet attrs)构造器,与xml布局文件建立联系。
3. 重写onMeasure(int widthMeasureSpec, int heightMeasureSpec)方法。该方法是在构造器调用之后创建完ViewGroup之后调用的,通过xml布局文件中提供的尺寸来获取自己的宽和高,然后通过内部调用方法measureChildren(widthMeasureSpec, heightMeasureSpec)来获得xml布局文件中ChildView的尺寸模式以及宽和高。
4. 重写onLayout(boolean changed, int left, int top, int right, int bottom),这个方法提供了5个参数:
- boolean changed:是指提供的size是否是最新的对于当前的View。
- int left:左上角x轴的尺寸。
- int top:左上角y周的尺寸。
- int right:右下角x轴的尺寸。
int bottom:右下角y轴的尺寸。
重写onLayout()方法,在其内部定义ChildView在ViewGroup中的位置。
//步骤一:定义一个MyViewGroup继承ViewGroup
public class MyViewGroup extends ViewGroup {
    private int width;//ViewGroup的宽
    private int height;//ViewGroup的高

    //步骤二:构造器
    public MyViewGroup(Context context) {
        super(context);
    }

    public MyViewGroup(Context context, AttributeSet attrs) {
        super(context, attrs);
    }

    //步骤三:重写onMeasure()方法
    @Override
    protected void onMeasure(int widthMeasureSpec, int heightMeasureSpec) {
        super.onMeasure(widthMeasureSpec, heightMeasureSpec);
        //通过上一层布局获取自己的高度,宽度,以及测量模式
        width = getDefaultSize(getSuggestedMinimumWidth(), widthMeasureSpec);
        height = getDefaultSize(getSuggestedMinimumHeight(), heightMeasureSpec);
        // 计算出所有的childView的宽和高
        measureChildren(widthMeasureSpec, heightMeasureSpec);
    }
    //步骤四:onLayout()方法
    @Override
    protected void onLayout(boolean changed, int l, int t, int r, int b) {
        /* 该ViewGrop中只包含4个ChildView. */
        View child1 = getChildAt(0);//获得第一个子布局
        View child2 = getChildAt(1);//获得第二个子布局
        View child3 = getChildAt(2);//获得第三个子布局
        View child4 = getChildAt(3);//获得第四个子布局
        if (child1 != null) {
            //第一个ChildView位置左上角
            child1.layout(0, 0, child1.getMeasuredWidth(), child1.getMeasuredHeight());
        }
        if (child2 != null) {
            //第二个ChildView位于右上角
            child2.layout(r - child2.getMeasuredWidth(), 0, r, child2.getMeasuredHeight());
        }
        if (child3 != null) {
            //第三个ChildView位于左下角
            child3.layout(0, b - child3.getMeasuredHeight(), child3.getMeasuredWidth(), b);
        }
        if (child4 != null) {
            //第四个ChildView位于右下角
            child4.layout(r - child4.getMeasuredWidth(), b - child4.getMeasuredHeight(), r, b);
        }
    }
}
自定义ViewGroup的使用
我们的自定义的ViewGroup已经创建好了,我们在xml 布局文件中测试一下:
<LinearLayout xmlns:android="http://schemas.android.com/apk/res/android" xmlns:tools="http://schemas.android.com/tools" android:layout_width="match_parent" android:layout_height="match_parent" android:orientation="vertical" tools:context="com.example.administrator.mywidgetdemo.activity.ViewGroupActivity">

    <com.example.administrator.mywidgetdemo.viewgroup.MyViewGroup  android:layout_width="match_parent" android:layout_height="match_parent">

        <ImageView  android:layout_width="100dp" android:layout_height="100dp" android:background="@mipmap/bb"/>
        <ImageView  android:layout_width="200dp" android:layout_height="300dp" android:background="@mipmap/bb"/>
        <ImageView  android:layout_width="200dp" android:layout_height="250dp" android:background="@mipmap/cc"/>
        <ImageView  android:layout_width="100dp" android:layout_height="150dp" android:background="@mipmap/dd"/>


    </com.example.administrator.mywidgetdemo.viewgroup.MyViewGroup>

</LinearLayout>

