Android开发之TableLayout生成边框
Android开发之TableLayout生成边框
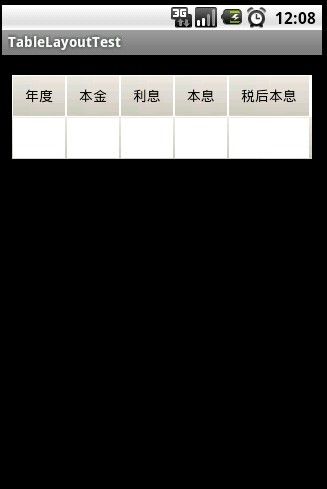
我们先来看个效果图,如下:
在这里,我使用了TableLayout来生成边框效果!众所周知,TabelLayout布局控件是没有边框的,它是由多个TableRow对象组成,每个TableRow可以有0个或多个单元格,每个单元格就是一个View。这些TableRow,单元格不能设置layout_width,宽度默认是fill_parent的,只有高度layout_height可以自定义,默认是wrap_content
Android:shrinkColumns设置可以收缩的列号,android:stretchColumns设置可以伸展的列号。需要注意的是列号从0开始,也可以用”*”表示指定所有的列。TableLayout中的最大列数是所有的位于TableLayout中的TableRow的列数中的最大值,即列数最多的一行有多少列,TableLayout就有多少列。
既然没有边框属性来设置,那么我们怎么才能实现看起来有边框的效果呢?在这里我们可以用多种颜色的重叠来设置。可以给每个TableRow设置一个北京颜色或图片,然后给每个TextView设置其北京颜色,这样两种颜色叠加就产生了上面类似边框的效果!以上效果图的代码如下:
主要是布局文件Main.xml:
<?xml version="1.0" encoding="utf-8"?>
<TableLayout xmlns:android="http://schemas.android.com/apk/res/android"
android:id="@+id/table"
android:layout_width="fill_parent"
android:layout_height="wrap_content"
android:paddingLeft="10px"
android:paddingTop="20px"
android:paddingRight="10px"
android:stretchColumns="*"
>
<TableRow
android:id="@+id/tableRow01"
android:layout_width="fill_parent"
android:layout_height="wrap_content"
android:background="#ffffffff"
>
<TextView
android:layout_width="wrap_content"
android:layout_height="40px"
android:text="年度"
android:gravity="center"
android:layout_margin="1dip"
android:background="@drawable/start"
android:textStyle="bold"
android:textColor="@drawable/black"
/>
<TextView
android:layout_width="wrap_content"
android:layout_height="40px"
android:text="本金"
android:gravity="center"
android:layout_margin="1dip"
android:background="@drawable/start"
android:textStyle="bold"
android:textColor="@drawable/black"
/>
<TextView
android:layout_width="wrap_content"
android:layout_height="40px"
android:text="利息"
android:gravity="center"
android:layout_margin="1dip"
android:background="@drawable/start"
android:textStyle="bold"
android:textColor="@drawable/black"
/>
<TextView
android:layout_width="wrap_content"
android:layout_height="40px"
android:text="本息"
android:gravity="center"
android:layout_margin="1dip"
android:background="@drawable/start"
android:textStyle="bold"
android:textColor="@drawable/black"
/>
<TextView
android:layout_width="wrap_content"
android:layout_height="40px"
android:text="税后本息"
android:gravity="center"
android:layout_margin="1dip"
android:background="@drawable/start"
android:textStyle="bold"
android:textColor="@drawable/black"
/>
</TableRow>
<TableRow
android:id="@+id/tableRow02"
android:layout_width="fill_parent"
android:layout_height="wrap_content"
android:background="@drawable/start"
>
<TextView
android:layout_width="wrap_content"
android:layout_height="40px"
android:gravity="center"
android:background="#ffffffff"
android:layout_margin="1dip"
/>
<TextView
android:layout_width="wrap_content"
android:layout_height="40px"
android:gravity="center"
android:background="#ffffffff"
android:layout_margin="1dip"
/>
<TextView
android:layout_width="wrap_content"
android:layout_height="40px"
android:gravity="center"
android:background="#ffffffff"
android:layout_margin="1dip"
/>
<TextView
android:layout_width="wrap_content"
android:layout_height="40px"
android:gravity="center"
android:background="#ffffffff"
android:layout_margin="1dip"
/>
<TextView
android:layout_width="wrap_content"
android:layout_height="40px"
android:gravity="center"
android:background="#ffffffff"
android:layout_margin="1dip"
/>
</TableRow>
</TableLayout>
在这里我使用了一张图片start.jpg,存放于drawable-mdpi文件中,截图如下:

