android自定义控件(二) 入门,继承View
转载请注明地址:http://blog.csdn.net/ethan_xue/article/details/7313788
ps: 可根据apidemo里LableView,list4,list6学习
文档在dev guide/Framework Topics/User Interface/Building Custom Components
自定义控件的步骤:
1 View的工作原理
2 编写View类
3 为View类增加属性
4 绘制屏幕
5 响应用户消息
6 自定义回调函数
不多说,主要是Canvas, Paint, Path
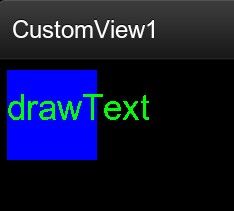
public class CustomView1 extends View {

	private Paint mPaint;
	// private static final String mText = "drawText";
	private String mText = "drawText";

	public CustomView1(Context context, AttributeSet attrs) {
		super(context, attrs);
	}

	@Override
	protected void onDraw(Canvas canvas) {
		super.onDraw(canvas);
		mPaint = new Paint();
		mPaint.setColor(Color.BLUE);
		// FILL填充, STROKE描边,FILL_AND_STROKE填充和描边
		mPaint.setStyle(Style.FILL);
		canvas.drawRect(new Rect(10, 10, 100, 100), mPaint);// 画一个矩形

		mPaint.setColor(Color.GREEN);
		mPaint.setTextSize(35.0f);
		canvas.drawText(mText, 10, 60, mPaint);
	}

}
布局
<?xml version="1.0" encoding="utf-8"?>
<LinearLayout xmlns:android="http://schemas.android.com/apk/res/android"
    android:orientation="vertical"
    android:layout_width="fill_parent"
    android:layout_height="fill_parent"
    >
<ethan.customview1.CustomView1
    android:layout_width="wrap_content"
    android:layout_height="wrap_content"
    />
</LinearLayout>注意,此时,在控件下放一个textView的话,是显示不出来的(TextView放在控件上面可以显示),以后再解决
下载地址 http://download.csdn.net/detail/ethan_xue/4108820
