在Android4.0中Contacts拨号盘界面剖析(源码)
原文地址:http://blog.sina.com.cn/s/blog_9f233c070101b2u1.html
上文已经说过拨号界面的分页是怎么实现的,下面我们分三次来分享拨号页面内的每一个页面的具体实现,我们先从拨号盘开始说起。
上文通过在ViewPager的适配器对象中,发现过一下三行代码
private DialpadFragment mDialpadFragment;
private CallLogFragment mCallLogFragment;
private PhoneFavoriteFragment mPhoneFavoriteFragment;
第一行的DialpadFragment就是拨号盘界面
第二行的CallLogFragment就是通话记录页面
第三行的PhoneFavoriteFragment就是收藏界面
本文主要分享“拨号盘界面”,即DialpadFragment.java
1 拨号盘的显示
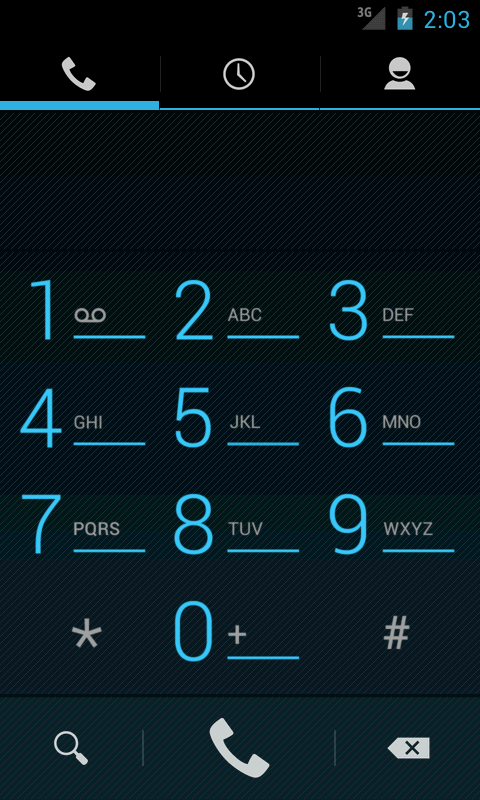
首先我们先来看看拨号盘的显示样式,4.0中拨号盘的默认显示效果如下图
给我的感觉是整个盘面分成四个部分,
第一部分: title即tab相应的图标
第二部分: editText输入部分
第三部分:拨号盘主界面
第四部分:拨号盘底部控制栏
2. 每一部分的具体实现
2.1 title图标:
如果看了上文,我们就会发现,title实际上是ActionBar中添加的一个tab
而在添加tab时,就已经对该tab进行了setIcon()操作,再次就不再过多的描述了,如果有不太明白的,请查看DialtactsActivity.java文件的setupDialer()方法。
2.2 editText输入部分
此时我们应该注意一下,DialpadFragment类的到底是什么东西?
class DialpadFragment extends Fragment
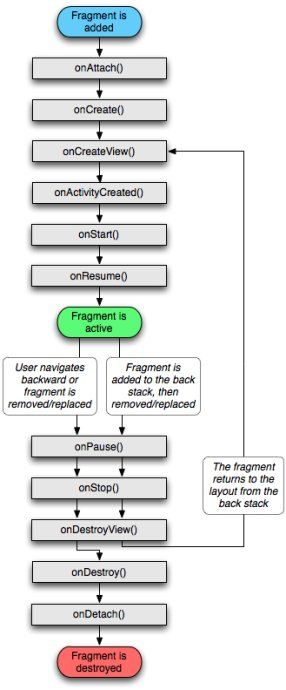
原来是Fragment,下面我转载了一个经典的Fragment生命周期图片,下图2
通过上图可以发现,加载布局主要是在onCreateView方法中实现的,下面我们进入onCreateView方法,看看这个布局界面是怎么出现的。
方法第一句
View fragmentView = inflater.inflate(R.layout.dialpad_fragment, container, false);
来了,原来是dialpad_fragment.xml文件
在该文件中,下面我讲editText的部分截取出来,共大家分析:
<LinearLayout
android:id="@+id/digits_container"
android:layout_width="match_parent"
android:layout_height="0px"
android:layout_weight="0.200"
android:layout_marginTop="@dimen/dialpad_vertical_margin"
android:gravity="center"
android:background="@drawable/dialpad_background" >
<com.android.contacts.dialpad.DigitsEditText
android:id="@+id/digits"
android:layout_width="0dip"
android:layout_weight="1"
android:layout_height="match_parent"
android:layout_alignParentLeft="true"
android:gravity="center"
android:textAppearance="@style/DialtactsDigitsTextAppearance"
android:textColor="?android:attr/textColorPrimary"
android:nextFocusRight="@+id/overflow_menu"
android:background="@android:color/transparent" />
<ImageButton
android:id="@+id/overflow_menu"
android:layout_width="48dip"
android:layout_height="match_parent"
android:layout_alignParentRight="true"
android:src="@drawable/ic_menu_overflow"
android:contentDescription="@*android:string/action_menu_overflow_description"
android:nextFocusLeft="@id/digits"
android:background="?android:attr/selectableItemBackground"/>
</LinearLayout>
我将上面的文件,表示的意义用图的形式画出
图3 输入框示意图
图中的青色区域代表的就是digits_container,黄色区域代表的是digits,即输入框,红色区域代表的是overflow_menu按钮。
我想您看过上面的布局文件,就会问输入框应该是EditText,而上文的为什么是DigitsEditText?
很明显它们之间是继承关系。下面我们来看啊可能这个DigitsEditText有什么特点?、
代码中对其进行了虚拟键盘的设置,焦点的变换,触摸等几个操作。
对此需要说明的一点是,布局文件中明明有overflow_menu,但是为什么没有显示出来呢?
原来是在onCreateView中对其可见性进行了设置,设置代码如下:
final View overflowMenuButton = fragmentView.findViewById(R.id.overflow_menu);
if (overflowMenuButton != null) {
if (ViewConfiguration.get(getActivity()).hasPermanentMenuKey()) {
overflowMenuButton.setVisibility(View.GONE);
} else {
overflowMenuButton.setOnClickListener(this);
}
}
在这句话上有这样一句注释
Soft menu button should appear only when there's no hardware menu button.
说出了该overflow按钮的显示时间,再次不多废话。
2.3 拨号键盘
拨号键盘对应于dialpad.xml的布局文件
该布局采用了典型的table布局,有兴趣的朋友可以看一下
下面紧取一个按键,进行一下细节的描述,就拿1这个按键为例
<ImageButton android:id="@+id/one" style="@style/DialtactsDialpadButtonStyle"
android:src="@drawable/dial_num_1"
android:contentDescription="@string/description_image_button_one" />
首先为该ImageButton设置了一个id ,然后为其设置了style
我们先进入style看看都为ImageButton做了些什么,
<style name="DialtactsDialpadButtonStyle">
<item name="android:layout_width">0dip</item>
<item name="android:layout_height">match_parent</item>
<item name="android:layout_weight">1</item>
<item name="android:background">?android:attr/selectableItemBackground</item>
<item name="android:soundEffectsEnabled">false</item>
</style>
最引人注意的是android:background 和android:soundEffectsEnabled
android:background代表着该ImageButton的背景色
android:soundEffectsEnabled设置点击或触摸时是否有声音效果
回过来,我们再来看看ImageButton的前景
android:src="@drawable/dial_num_1"
很显然,这个一个图片嘛,有啥好看的?您不仅会这样想。
实际上这个是一个图片吗?不是,也是,更确切的说是一个图片组,下面我们来看看这个图片组到底有什么神秘的
<selector xmlns:android="http://schemas.android.com/apk/res/android">
<!-- <item android:state_pressed="true"
android:drawable="@drawable/dial_num_1" />
<item android:state_focused="true"
android:drawable="@drawable/dial_num_1" /> -->
<item
android:drawable="@drawable/dial_num_1_wht" />
</selector>
哈哈,原来是个selector,通过其中的条件可以添加点击,触摸等等效果,这个在我们平时开发的过程中还是比较常用的,朋友们一定要记住哦!
2.4拨号盘底部控制栏
通过dialpad_additional_buttons.xml文件查看到,
三个按钮2个分割线的横向布局排列,这个页面没有什么神秘的地方,就不在浪费笔墨了
有兴趣的朋友一看就明白。
from:http://blog.sina.com.cn/s/blog_7139b0e301012p3l.html


