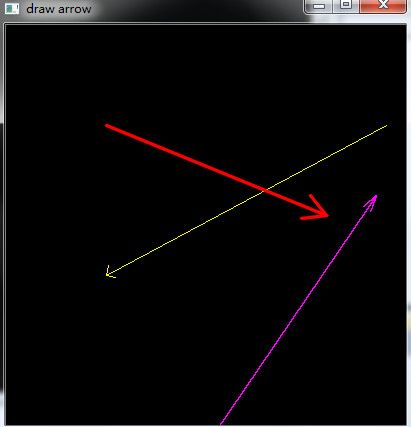
OpenCV画箭头
1:
#include <opencv\highgui.h>
2: #include <iostream>
3: #pragma comment(lib, "opencv_core231d.lib")
4: #pragma comment(lib, "opencv_highgui231d.lib")
5: #pragma comment(lib, "opencv_imgproc231d.lib")
6: using namespace std;
7: using namespace cv;
8:
9: void drawArrow(cv::Mat& img, cv::Point pStart, cv::Point pEnd, int len, int alpha,
10: cv::Scalar& color, int thickness = 1, int lineType = 8);
11:
12: int main()
13: {
14: Mat M(400, 400, CV_8UC3, Scalar(0, 0, 0));
15: Point pStart(380, 100), pEnd(100, 250);
16: Scalar lineColor(0, 255, 255);
17: drawArrow(M, pStart, pEnd, 10, 45, lineColor);
18: pStart = Point(100, 100);
19: pEnd = Point(320, 190);
20: lineColor = Scalar(0, 0, 255);
21: drawArrow(M, pStart, pEnd, 25, 30, lineColor, 2, CV_AA);
22: pStart = Point(200, 420);
23: pEnd = Point(370, 170);
24: lineColor = Scalar(255, 0, 255);
25: drawArrow(M, pStart, pEnd, 17, 15, lineColor, 1, 4);
26: imshow("draw arrow", M);
27: waitKey();
28: return 0;
29: }
30:
31: void drawArrow(cv::Mat& img, cv::Point pStart, cv::Point pEnd, int len, int alpha,
32: cv::Scalar& color, int thickness, int lineType)
33: {
34: const double PI = 3.1415926;
35: Point arrow;
36: //计算 θ 角(最简单的一种情况在下面图示中已经展示,关键在于 atan2 函数,详情见下面)
37: double angle = atan2((double)(pStart.y - pEnd.y), (double)(pStart.x - pEnd.x));
38: line(img, pStart, pEnd, color, thickness, lineType);
39: //计算箭角边的另一端的端点位置(上面的还是下面的要看箭头的指向,也就是pStart和pEnd的位置)
40: arrow.x = pEnd.x + len * cos(angle + PI * alpha / 180);
41: arrow.y = pEnd.y + len * sin(angle + PI * alpha / 180);
42: line(img, pEnd, arrow, color, thickness, lineType);
43: arrow.x = pEnd.x + len * cos(angle - PI * alpha / 180);
44: arrow.y = pEnd.y + len * sin(angle - PI * alpha / 180);
45: line(img, pEnd, arrow, color, thickness, lineType);
46: }
运行结果
原理如图

