Android使用fitsSystemWindows属性实现–状态栏【status_bar】各版本适配方案
Android使用fitsSystemWindows属性实现–状态栏【status_bar】各版本适配方案
首先我们看下qq的status bar在各个android版本系统中适配:
1.Android5.0以上:半透明(APP 的内容不被上拉到状态)

2.Android4.4以上:全透明(APP 的内容不被上拉到状态)

这里我们就按照qq在各个android的版本显示进行适配:
1.Android5.0以上:material design风格,半透明(APP 的内容不被上拉到状态)
2.Android4.4(kitkat)以上至5.0:全透明(APP 的内容不被上拉到状态)
3.Android4.4(kitkat)以下:不占据status bar
主题:
使用Theme.AppCompat.Light.NoActionBar(toolbar的兼容主题):既可以适配使用toolbar(由于google已经不再建议使用action bar了,而是推荐使用toolbar,且toolbar的使用更加的灵活,所以toolbar和actionbar的选择也没什么好纠结的)和不使用toolbar的情况(即自定义topBar布局)。
fitSystemWindows属性:
官方描述:
Boolean internal attribute to adjust view layout based on system windows such as the status bar. If true, adjusts the padding of this view to leave space for the system windows. Will only take effect if this view is in a non-embedded activity.
简单描述:
这个一个boolean值的内部属性,让view可以根据系统窗口(如status bar)来调整自己的布局,如果值为true,就会调整view的paingding属性来给system windows留出空间….
实际效果:
当status bar为透明或半透明时(4.4以上),系统会设置view的paddingTop值为一个适合的值(status bar的高度)让view的内容不被上拉到状态栏,当在不占据status bar的情况下(4.4以下)会设置paddingTop值为0(因为没有占据status bar所以不用留出空间)。
具体适配方案(一边看代码一边解析):
activity_main.xml:
<?xml version="1.0" encoding="utf-8"?>
<LinearLayout xmlns:android="http://schemas.android.com/apk/res/android"
    xmlns:tools="http://schemas.android.com/tools"
    android:layout_width="match_parent"
    android:layout_height="match_parent"
    android:orientation="vertical"
    tools:context=".MainActivity">

    <!--toolbar-->
    <include
        layout="@layout/mytoolbar_layout"
        android:layout_width="match_parent"
        android:layout_height="wrap_content" />
    <TextView
        android:layout_width="match_parent"
        android:layout_height="match_parent"
        android:layout_gravity="center"
        android:gravity="center"
        android:text="ThinkCool" />
</LinearLayout>
这里我们include了一个mytoolbar_layout的布局:
mytoolbar_layout.xml:
<android.support.v7.widget.Toolbar xmlns:android="http://schemas.android.com/apk/res/android"
    xmlns:app="http://schemas.android.com/apk/res-auto"
    xmlns:tools="http://schemas.android.com/tools"
    android:id="@+id/my_toolbar"
    android:layout_width="match_parent"
    android:layout_height="wrap_content"
    android:background="@color/colorPrimary"
    android:fitsSystemWindows="true"
    android:minHeight="?attr/actionBarSize"
    android:theme="@style/ThemeOverlay.AppCompat.Dark.ActionBar"
    app:popupTheme="@style/ThemeOverlay.AppCompat.Light" />
在mytoolbar_layout.xml里:布局一个 android.support.v7.widget.Toolbar(使用支持包里的toolbar可以兼容低版本android系统),并设置minHeight=”?attr/actionBarSize”和fitSystemWindows为true。
MainActivity.java:
package com.thinkcool.statusbaradapt;
import android.os.Bundle;
import android.support.v7.widget.Toolbar;

public class MainActivity extends BaseActivity {
    Toolbar toolbar;

    @Override
    protected void onCreate(Bundle savedInstanceState) {
        super.onCreate(savedInstanceState);
        setContentView(R.layout.activity_main);
        //让toolbar同actionbar一样使用,include自定义的topbar时注释到下面两句
        toolbar = (Toolbar) findViewById(R.id.my_toolbar);
        setSupportActionBar(toolbar);
    }
}
在MainActivity.java里,继承BaseAcitivity(后面描述),实例化toolbar并调用setSupportActionBar,之后就可以让toolbar像action bar一样使用了。
BaseActivity.java:
package com.thinkcool.statusbaradapt;

import android.os.Build;
import android.os.Bundle;
import android.support.v7.app.AppCompatActivity;
import android.view.Window;
import android.view.WindowManager;

public class BaseActivity extends AppCompatActivity {
    @Override
    protected void onCreate(Bundle savedInstanceState) {
        super.onCreate(savedInstanceState);
        if (Build.VERSION.SDK_INT >= Build.VERSION_CODES.KITKAT) {
            Window window = getWindow();
            // Translucent status bar
            window.setFlags(
                    WindowManager.LayoutParams.FLAG_TRANSLUCENT_STATUS,
                    WindowManager.LayoutParams.FLAG_TRANSLUCENT_STATUS);
        }
    }
}
在BaseActivity.java里:我们通过判断当前sdk_int大于4.4(kitkat),则通过代码的形式设置status bar为透明(这里其实可以通过values-v19 的sytle.xml里设置windowTranslucentStatus属性为true来进行设置,但是在某些手机会不起效,所以采用代码的形式进行设置)。还需要注意的是我们这里的AppCompatAcitivity是android.support.v7.app.AppCompatActivity支持包中的AppCompatAcitivity,也是为了在低版本的android系统中兼容toolbar。
AndroidManifest.xml中:使用Theme.AppCompat.Light.NoActionBar主题
....
<application
    android:allowBackup="true"
    android:icon="@mipmap/ic_launcher"
    android:label="@string/app_name"
    android:supportsRtl="true"
    android:theme="Theme.AppCompat.Light.NoActionBar">
...
最后build.gradle中引入v7支持库(需要注意v7版本得大于21):
compile ‘com.android.support:appcompat-v7:23.1.1’
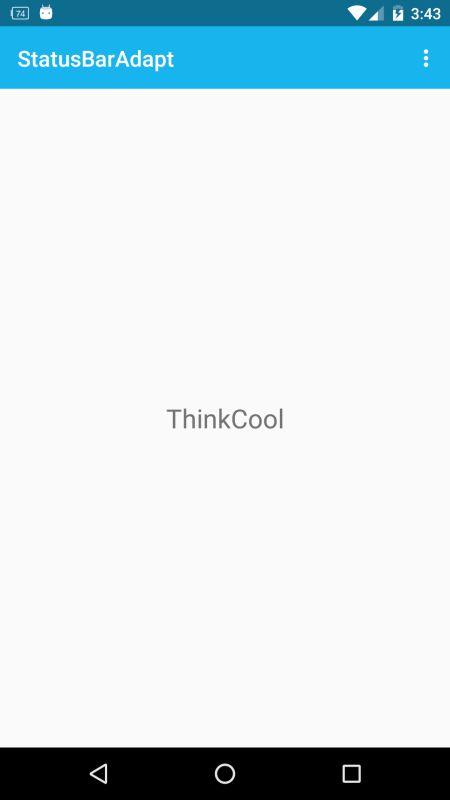
看看效果吧(同qq状态栏效果,依次是:不透明(4.4以下),透明(4.4以上),半透明(5.0以上)):
Android4.4以下:不占据status bar
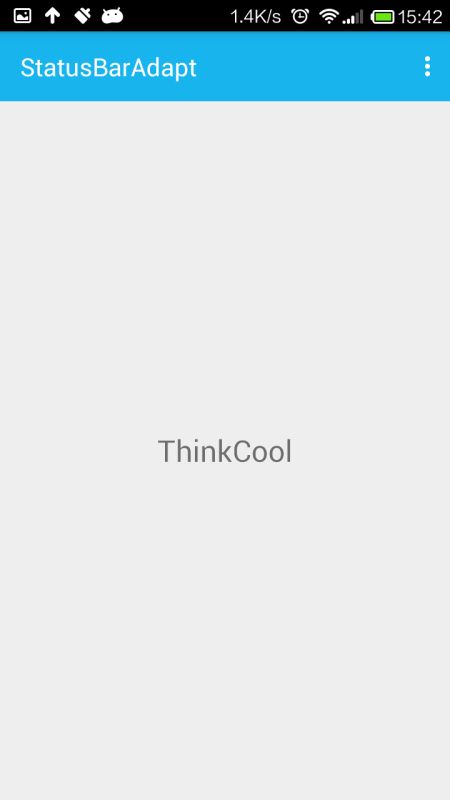
Android4.4以上:全透明(APP 的内容不被上拉到状态)

Android5.0以上:半透明(APP 的内容不被上拉到状态)
这套适配方案的好处:
1.通过include mytoolbar.xml和mytopbar.xml可以方便的在使用toolbar和使用自定义topbar中进行抉择。
2.使用fitSystemWindows属性让系统帮我们自动适配不同情况下的status bar,让我们的view的paddingTop获取到一个合理的值。(还有其他的方案是通过手动设置paddingTop的值来进行适配的:在values-v19里设置paddingTop值为25dp,在values里设置为0dp,但是在某些自定义的rom里status bar的高度是被有修改过的。还有就是通过自定义继承toolbar,在代码里动态获取status bar的高度并设置paddingTop的值,但这样又弄得太麻烦了)。
自定义topBar的情况(因为我们的UI设计师不一定跟得上material design的步伐,而且总是在有着不一样的设计风格,这个时候自定义topbar就最好了如:qq的topbar就是自定义的):
activity_main.xml
<?xml version="1.0" encoding="utf-8"?>
<LinearLayout xmlns:android="http://schemas.android.com/apk/res/android"
    xmlns:tools="http://schemas.android.com/tools"
    android:layout_width="match_parent"
    android:layout_height="match_parent"
    android:orientation="vertical"
    tools:context=".MainActivity">

    <!--toolbar-->
    <!--<include-->
        <!--layout="@layout/mytoolbar_layout"-->
        <!--android:layout_width="match_parent"-->
        <!--android:layout_height="wrap_content" />-->
    <!--自定义topbar-->
    <include
        layout="@layout/mytopbar_layout"
        android:layout_width="match_parent"
        android:layout_height="wrap_content" />

    <TextView
        android:layout_width="match_parent"
        android:layout_height="match_parent"
        android:layout_gravity="center"
        android:gravity="center"
        android:text="ThinkCool" />
</LinearLayout>
在activity_main.xml里:include自定义的mytopbar_layout.
mytopbar_layout.xml:
<?xml version="1.0" encoding="utf-8"?>
<LinearLayout xmlns:android="http://schemas.android.com/apk/res/android"
    android:layout_width="match_parent"
    android:layout_height="wrap_content"
    android:background="@color/colorPrimary"
    android:minHeight="?attr/actionBarSize"
    android:gravity="center"
    android:fitsSystemWindows="true"
    android:orientation="vertical">

    <LinearLayout
        android:layout_width="match_parent"
        android:layout_height="wrap_content"
        android:padding="8dp"
        android:gravity="center"
        android:orientation="horizontal">
        <ImageView
            android:id="@+id/top_left"
            android:layout_width="wrap_content"
            android:layout_height="wrap_content"
            android:src="@drawable/back" />

        <TextView
            android:id="@+id/top_center"
            android:layout_width="wrap_content"
            android:layout_height="wrap_content"
            android:layout_gravity="center"
            android:layout_weight="1"
            android:gravity="center"
            android:text="登陆"
            android:textSize="16sp" />

        <ImageView
            android:id="@+id/top_right"
            android:layout_width="wrap_content"
            android:layout_height="wrap_content"
            android:src="@drawable/add" />
    </LinearLayout>

    <View
        android:layout_width="match_parent"
        android:layout_height="1px"
        android:background="@android:color/darker_gray" />
</LinearLayout>
修改MainActivity.java:package com.thinkcool.statusbaradapt;
import android.os.Bundle;
import android.support.v7.widget.Toolbar;
public class MainActivity extends BaseActivity {
Toolbar toolbar;
@Override
protected void onCreate(Bundle savedInstanceState) {
super.onCreate(savedInstanceState);
setContentView(R.layout.activity_main);
//让toolbar同actionbar一样使用,include自定义的topbar时注释到下面两句
// toolbar = (Toolbar) findViewById(R.id.my_toolbar);
// setSupportActionBar(toolbar);
}
}
MainActivity.java里:我们注释掉了setSupportActionBar(因为这是我们自定义的topbar).
同样看看实现效果吧:
Android4.4以下:不占据status bar

Android4.4以上:全透明(APP 的内容不被上拉到状态)

Android5.0以上:半透明(APP 的内容不被上拉到状态)

最后代码上传gitHub(欢迎fork,加星):
https://github.com/CoolThink/StatusBarAdapt.git
