怎么对MySQL数据库操作大数据?这里有思路
最近学到一招关于使用java代码操作MySQL数据库,对大文本数据(LOB)进行CRUD的技巧,虽然向数据库很少向中存入大文本文件(一般都是存储在硬盘上),但是还是很有必要知道这一技巧的。下面我就来说一说我学到的这个小技巧咯。
CLOB操作
所谓CLOB,一般是指关于文本文件的数据,今天我就拿txt文件来测试吧。
必要的流程如下:
- 在MySQL数据库中建好testclob表
- 向Eclipse中导入相关的jar包
- 写代码进行测试
textblob.sql如下:
create table testclon( id varchar(40) primary key, resume clob );导入相关的符合要求的mysql驱动的jar包。
测试代码如下:
package LOB_Sample;

import java.io.File;
import java.io.FileReader;
import java.io.FileWriter;
import java.io.Reader;
import java.sql.Connection;
import java.sql.PreparedStatement;
import java.sql.ResultSet;

import org.junit.Test;

import utils.JDBCUtils;

public class CLOB {

    @Test
    public void insert() throws Exception {
        Connection conn = null;
        PreparedStatement ps = null;
        ResultSet rs = null;

        try{
            conn = JDBCUtils.getConnection();
            String sql = "insert into testclob(id,resume) values(?,?)";
            ps = conn.prepareStatement(sql);
            ps.setString(1, "1");

            //先获取一个流,用于读取大文本数据
            File file = new File("src/jdbcutils.txt");
            FileReader reader = new FileReader(file);
            ps.setCharacterStream(2, reader, (int)file.length());
            int num = ps.executeUpdate();
            if(num>0){
                System.out.println("大文本数据插入成功!");
            }

        }catch(Exception e){
            throw new RuntimeException(e);
        }finally{
            //最重要的一步,用完资源一定要实现资源的释放
            JDBCUtils.release(conn, ps, rs);
        }

    }

    @Test
    public void read() throws Exception {
        Connection conn = null;
        PreparedStatement pst = null;
        ResultSet rs = null;

        try{
            conn = JDBCUtils.getConnection();
            String sql = "select * from testclob where id ='1'";
            pst = conn.prepareStatement(sql);
            rs = pst.executeQuery();
            if(rs.next()){
                Reader reader = rs.getCharacterStream("resume");
                FileWriter writer = new FileWriter("src/result.txt");
                try{
                    int len = 0;
                    char[] buffer = new char[1024];
                    while((len = reader.read(buffer))>0){
                        writer.write(buffer, 0, len);
                    }
                }finally{
                    reader.close();
                    writer.close();
                }

            }

        }catch(Exception e){
            throw new RuntimeException(e);
        }finally{
            JDBCUtils.release(conn, pst, rs);
        }

    }

}
测试结果简单,就不贴图了。
小总结:
- 对于clob类型的数据,存进去的时候需要借助于一个流对象,先将数据转换成二进制,才能进行存储。
- 读取clob文件的时候要使用
rs.getCharacterStream("resume");,记忆方式是“怎么存进去,怎么取出来”所以就需要以流的形式获得了。 - 最后使用File的原因是,流操作需要知道流的长度信息,所以使用到了File。
BLOB操作
对于图片数据(BLOB),我们同样可以使用相似的代码进行操作。流程如下:
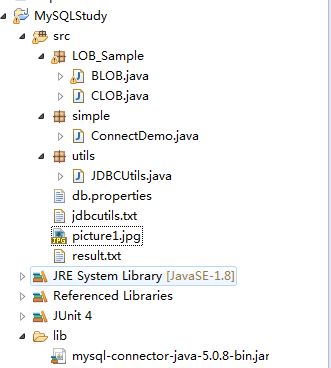
项目目录如下:

- 先在数据库中创建一个表的实例,testblob.sql
- 导入相关的jar包驱动
- 书写代码进行测试
要插入的图片如下:
数据库的建表语句如下:
create table testblob( id varchar(40) primary key, image blob );导入相关的jar包,我的工程的jar包文件名称为mysql-connector-java-5.0.8-bin.jar
具体的操作代码如下:
package LOB_Sample;

import java.io.File;
import java.io.FileInputStream;
import java.io.FileOutputStream;
import java.io.InputStream;
import java.sql.Connection;
import java.sql.PreparedStatement;
import java.sql.ResultSet;

import org.junit.Test;

import utils.JDBCUtils;

public class BLOB {

    @Test
    public void insert() throws Exception {
        Connection conn = null;
        PreparedStatement pst = null;
        ResultSet rs = null;

        try{
            conn = JDBCUtils.getConnection();
            String sql = "insert into testblob values(?,?)";
            pst = conn.prepareStatement(sql);
            pst.setString(1, "图片一");


            File file = new File("src/picture1.jpg");
            FileInputStream fis = new FileInputStream(file);
            pst.setBinaryStream(2, fis, (int)file.length());

            int flag = pst.executeUpdate();
            if(flag > 0 ){
                System.out.println("图片插入数据库成功!!!");
            }else{
                System.out.println("对不起,图片插入数据库失败!!!");
            }

        }catch(Exception e){
            throw new RuntimeException(e);
        }finally{
            JDBCUtils.release(conn, pst, rs);
        }
    }

    @Test
    public void read() throws Exception {
        Connection conn = null;
        PreparedStatement pst = null;
        ResultSet rs = null;

        try{
            conn = JDBCUtils.getConnection();
            String sql = "select image from testblob where id ='图片一'";

            pst = conn.prepareStatement(sql);

            rs = pst.executeQuery();
            if(rs.next()){
                FileOutputStream fos =null;
                InputStream in = null;
                try{
                    File file = new File("src/new.jpg");
                    fos = new FileOutputStream("src/newPicture.jpg");
                    in = rs.getBinaryStream("image");

                    int len = 0;
                    byte [] buffer = new byte[1024];
                    while((len=in.read(buffer))>0){
                        fos.write(buffer,0,len);
                    }

                }catch(Exception e){
                    throw new RuntimeException(e);
                }finally{
                    fos.close();
                    in.close();
                }


            }


        }catch(Exception e){
            throw new RuntimeException(e);
        }finally{
            JDBCUtils.release(conn, pst, rs);
        }
    }

}
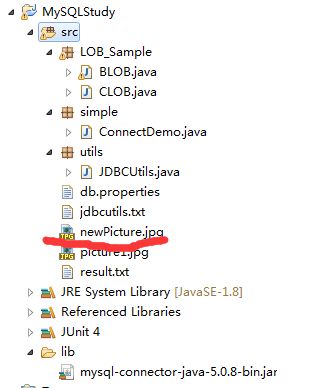
经JUnit测试,可以获得正确的图片文件。
需要注意的是,代码中用到的JDBCUtils工具类是自己写的一个获得数据库连接的工具类,同样也是我clob测试获得的那个文件。其具体内容如下:
package utils;

import java.io.IOException;
import java.sql.Connection;
import java.sql.DriverManager;
import java.sql.PreparedStatement;
import java.sql.ResultSet;
import java.sql.SQLException;
import java.util.Properties;

/** * MySQL数据库工具类 * @author Summer * */
public class JDBCUtils {

    //创建一个配置文件,用于读取相应配置文件中保存的数据信息
    private static Properties config = new Properties();

    /* * 为了只加载一次驱动程序,因此在静态代码块中进行声明,这样驱动就只会加载一次 */
    static{

        try {
            config.load(JDBCUtils.class.getClassLoader().getResourceAsStream("db.properties"));
// Class.forName("com.mysql.jdbc.Driver");
            Class.forName(config.getProperty("DRIVER"));

        } catch (ClassNotFoundException | IOException e) {
            // TODO Auto-generated catch block
            throw new ExceptionInInitializerError();
        }
    }


    /** * 返回数据库连接对象 * @return */
    public static Connection getConnection(){

        Connection  conn = null;

        try {
            conn =  DriverManager.getConnection(config.getProperty("URL"),
                    config.getProperty("USER"),config.getProperty("PASSWORD"));
        } catch (SQLException e) {
            // TODO Auto-generated catch block
            e.printStackTrace();
        }

        return conn;
    }


    /** * 释放数据库链接资源 * @param conn * @param st * @param rs */
    public static void release(Connection conn,PreparedStatement pst, ResultSet rs){
        /* * 释放数据库连接资源的时候注意释放的顺序,先申请的资源后释放 */

        //释放结果集对象
        if(rs!=null){
            try {
                rs.close();
            } catch (SQLException e) {
                // TODO Auto-generated catch block
                rs=null;
                e.printStackTrace();
            }
        }

        //释放查询对象
        if(pst!=null){
            try {
                pst.close();
            } catch (SQLException e) {
                // TODO Auto-generated catch block
                pst=null;
                e.printStackTrace();
            }
        }

        //释放数据库连接
        if(conn!=null){
            try {
                conn.close();
            } catch (SQLException e) {
                // TODO Auto-generated catch block
                conn=null;
                e.printStackTrace();
            }
        }
    }


}

//而这里面需要的配置信息在db.properties文件中,其实就是DRIVER,URL,USER,PASSWORD四个数据库连接必备信息,也是很简单的数据,故就不在贴出。
总结
- 对于数据库的JDBC操作,一定要记得释放数据库连接资源,否则会有意想不到的错误。
- 存储大文本数据的时候,记得方式的前后一致性,即PreparedStatement与ResultSet操作的一致性
- 应该使用PreparedStatement来防止SQL注入(原因是其会先进行检测)
好了,大致的操作就是这样了,希望此篇拙文能给广大博友些许帮助。如果有错误的地方,还望指出,不胜感激!

