在iOS上使用ffmepg
说明,我在网上大量的找文章看如何把ffmpeg移植到iOS上,结果总是问题多多,而ffmpeg的帮助也就那么点,真是很头痛, 花了两个星期,总算是把这个ffmpeg给出来。所以,我完全感受到作为新手的那种迷茫与无助,决心把自己的经验写下来,让更多人可以少走弯路。对给予我无私的帮助的西安“我不知我是谁”,以及”随风vs天下”网友表示极大的感谢.
如需转载,请保留当前网址,至少对我费劲把这些写下来并分享表示尊重。
步骤如下:
1从https://github.com/yuvi/gas-preprocessor下载最新的gas-preprocessor.pl文件,并把它置于$PATH所对应的文件夹下,如usr/sbin, 并添给其添加执行权限, 这里可以直接给予最高权限 chmod777 gas-preprocessor.pl
2从ffmpeg的官网下载最新代码http://ffmpeg.org/download.html, 如当前最新的为0.10
在这里任选一个下载
3下载iFrameExtractor这个项目从gitclone git://github.com/lajos/iFrameExtractor.git, 有可能不能下载, 因为国内公司一般都做了限制, 可以在网上去搜, 很多这个工程, 差别不大,不影响使用ffmpeg.
然后把下载下来的ffmpeg放在iFrameExtractor项目的文件夹下,如下结构:
4打开terminal, cd到ffmpeg-0.10文件夹下面,执行一下makeclean, 清除之前生成的库文件。
5如果要生成模拟器可以使用的库文件.
环境为:Mac Lion 10.7.2, XCode:4.2.1,
模拟器(运行时,我暂时以5.0的模拟器测试)
SDK:/Developer/Platforms/iPhoneSimulator.platform/Developer/SDKs/iPhoneSimulator5.0.sdk
SDK:/Developer/Platforms/iPhoneSimulator.platform/Developer/SDKs/iPhoneSimulator4.3.sdk
则用如下命令
./configure --disable-doc --disable-ffmpeg --disable-ffplay --disable-ffserver --disable-avfilter --disable-debug --disable-encoders --enable-cross-compile --disable-decoders --disable-armv5te--enable-decoder=h264 --enable-pic --cc=/Developer/Platforms/iPhoneSimulator.platform/Developer/usr/bin/gcc--as='gas-preprocessor/gas-preprocessor.pl/Developer/Platforms/iPhoneSimulator.platform/Developer/usr/bin/gcc'--extra-ldflags=-L/Developer/Platforms/iPhoneSimulator.platform/Developer/SDKs/iPhoneSimulator4.3.sdk/usr/lib/system--sysroot=/Developer/Platforms/iPhoneSimulator.platform/Developer/SDKs/iPhoneSimulator4.3.sdk--target-os=darwin --arch=i386 --cpu=i386 --extra-cflags='-arch i386'--extra-ldflags='-arch i386' --disable-asm
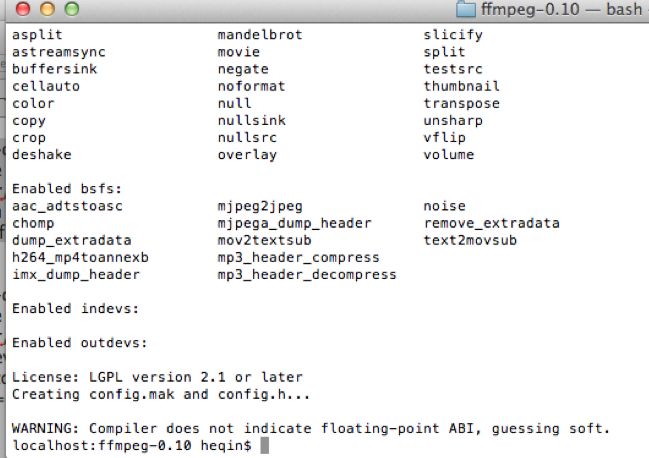
这个命令执行完后,应当是不会报错,类似于下图:
6执行make命令。(有时会有错,建议多试两次,无错的情况,应该类似于下图)
这个时候,可以去到这个ffmepg文件夹下查看libavutil/libavutil.a,libswscale/ libswscale.a,libavcodec/libavcodec.a,libavformat/libavformat.a文件应该都已经生成。
7打开下载后的iFrameExtracto项目,
设置Project中的build setting中的Header Search Paths为当前位置的./ffmpeg-0.10,如下图:
再设置Target中的build setting的Header Search Paths为当前位置的./ffmpeg-0.10。如下图:
这里先暂时不设置Target下的Libaray Search Paths,把其中的Paths点击全部删除掉。(因为呆会加上这些库文件后,这个Libarary Search Paths会自动填充)
8删除掉这个项目之前的一些库文件引用, (包括在项目工程下的这些库文件,以及在Target右边的库文件引用)
9点击Target的Build Phases中的“LinkBinary With Libaries”下找到并加入这几个库文件,加入完成后,可以去Target下的Build Settings下的“Library Search Paths”中已经自动填充了这几个库文件的路径,并保证已经加入了库libbz2.1.0.dylib
然后编译运行,iFrameExtractor应该是运行到模拟器上了。
下面进行真机ffmpeg的编译
5 (从上面第5步开始不同)
环境为:Mac Lion 10.7.2, XCode:4.2.1,
XCode中的真机 SDK版本为SDK:/Developer/Platforms/iPhoneOS.platform/Developer/SDKs/iPhoneOS5.0.sdk
真机,iTouch 4(SDK 5.0.1 installed )
同样先进行make clean清除已有的库文件
执行
./configure --disable-doc --disable-ffmpeg--disable-ffplay --disable-ffserver --disable-avfilter --disable-debug--disable-decoders --enable-cross-compile --disable-encoders --disable-armv5te--enable-decoder=h264 --enable-pic--cc=/Developer/Platforms/iPhoneOS.platform/Developer/usr/bin/gcc--as='gas-preprocessor/gas-preprocessor.pl/Developer/Platforms/iPhoneOS.platform/Developer/usr/bin/gcc'--extra-ldflags='-arch armv7 -isysroot/Developer/Platforms/iPhoneOS.platform/Developer/SDKs/iPhoneOS5.0.sdk'--sysroot=/Developer/Platforms/iPhoneOS.platform/Developer/SDKs/iPhoneOS5.0.sdk--target-os=darwin --arch=arm --cpu=cortex-a8 --extra-cflags='-arch armv7'
执行完毕后,截图如下:(没什么错误的情况下)
6.执行make时报错, error:invalid operand in inline asm: 'adds $1, ${2:R}, ${2:Q}, lsr #31错误如下:
在网上查了一下,说是如果你的项目中不需要asm 支持的话,就可以把asm给禁止掉,于是乎,在./configure末尾加入了--disable-asm变成了如下:
./configure --disable-doc --disable-ffmpeg--disable-ffplay --disable-ffserver --disable-avfilter --disable-debug--disable-decoders --enable-cross-compile --disable-encoders --disable-armv5te--enable-decoder=h264 --enable-pic--cc=/Developer/Platforms/iPhoneOS.platform/Developer/usr/bin/gcc--as='gas-preprocessor/gas-preprocessor.pl/Developer/Platforms/iPhoneOS.platform/Developer/usr/bin/gcc'--extra-ldflags='-arch armv7 -isysroot/Developer/Platforms/iPhoneOS.platform/Developer/SDKs/iPhoneOS5.0.sdk'--sysroot=/Developer/Platforms/iPhoneOS.platform/Developer/SDKs/iPhoneOS5.0.sdk--target-os=darwin --arch=arm --cpu=cortex-a8 --extra-cflags='-arch armv7'--disable-asm
配置无错,然后make,编译成功, 如下图:
到相应的文件夹下的确可以看到新生成的库文件
然后后面的步聚与前面模拟器上的一样,最后就运行到你的手机上了。
上面真机方法适用于ios 4, ios5版本。
用下面这个命令可以适用于ios6系统上,已测试, iphone4, (ios 6)安装正常
./configure --disable-doc --disable-ffmpeg --disable-ffplay --disable-ffserver --disable-avfilter --disable-debug --disable-decoders --enable-cross-compile --disable-encoders --disable-armv5te --enable-decoder=h264 --enable-pic --cc=/Applications/Xcode.app/Contents/Developer/Platforms/iPhoneOS.platform/Developer/usr/bin/gcc --as='gas-preprocessor/gas-preprocessor.pl /Applications/Xcode.app/Contents/Developer/Platforms/iPhoneOS.platform/Developer/usr/bin/gcc' --extra-ldflags='-arch armv7 -isysroot /Applications/Xcode.app/Contents/Developer/Platforms/iPhoneOS.platform/Developer/SDKs/iPhoneOS6.0.sdk' --sysroot=/Applications/Xcode.app/Contents/Developer/Platforms/iPhoneOS.platform/Developer/SDKs/iPhoneOS6.0.sdk --target-os=darwin --arch=arm --cpu=cortex-a8 --extra-cflags='-arch armv7' --disable-asm


