Android 重力感应获取手机运动方向和角度
最近项目里使用到了android中重力感应使用,现分享给大家。
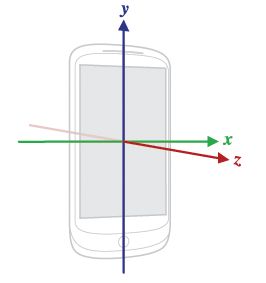
重力感应坐标是相对于设备而言,而不是空间坐标,如图
代码如下;
package com.pioneersoft.temp;

import android.app.Activity;
import android.content.Context;
import android.content.Intent;
import android.hardware.Sensor;
import android.hardware.SensorEvent;
import android.hardware.SensorEventListener;
import android.hardware.SensorManager;
import android.os.Bundle;
import android.util.Log;
import android.widget.Toast;

public class TempActivity extends Activity {

	 //摇晃速度临界值
	 private static final int SPEED_SHRESHOLD = 600;
	 //两次检测的时间间隔
	 private static final int UPTATE_INTERVAL_TIME = 200;
	//上次检测时间
	 private long lastUpdateTime;

	 private SensorManager sensorMag;
	 private Sensor gravitySensor;
	 //保存上一次记录
     float lastX = 0;
     float lastY = 0;
     float lastZ = 0;

    /** Called when the activity is first created. */
    @Override
    public void onCreate(Bundle savedInstanceState) {
        super.onCreate(savedInstanceState);

		initGravitySensor();
    }
   /**
    * 初始化传感器
    */
    private void initGravitySensor(){

    	sensorMag=(SensorManager)getSystemService(Context.SENSOR_SERVICE);
    	gravitySensor = sensorMag.getDefaultSensor(Sensor.TYPE_ACCELEROMETER);

    }

    @Override
    protected void onPause() {
    	sensorMag.unregisterListener(sensorLis);
    	super.onPause();
    }

    @Override
    protected void onResume() {
    	sensorMag.registerListener(sensorLis, gravitySensor, SensorManager.SENSOR_DELAY_UI);
    	super.onResume();
    }

    float tMax=1.0f;
    private SensorEventListener sensorLis = new SensorEventListener() {

		@Override
		public void onAccuracyChanged(Sensor sensor, int accuracy) {

		}

		@Override
		public void onSensorChanged(SensorEvent event) {

			if (event.sensor.getType() != Sensor.TYPE_ACCELEROMETER) {
	            return;
	        }
			 //现在检测时间
			  long currentUpdateTime = System.currentTimeMillis();
			  //两次检测的时间间隔
			  long timeInterval = currentUpdateTime - lastUpdateTime;
			  //判断是否达到了检测时间间隔
			  if(timeInterval < UPTATE_INTERVAL_TIME)
			   return;
			  //现在的时间变成last时间
			  lastUpdateTime = currentUpdateTime;
			//获取加速度数值,以下三个值为重力分量在设备坐标的分量大小
			 float x = event.values[SensorManager.DATA_X];

             float y = event.values[SensorManager.DATA_Y];

             float z = event.values[SensorManager.DATA_Z];


          //   Log.e("msg", "x= "+x+" y= "+y);
         //    Log.e("msg", "x= "+x+" y= "+y+" z= "+z);

             float absx = Math.abs(x);
             float absy = Math.abs(y);
             float absz = Math.abs(z);

			if (absx > absy && absx > absz) {

				if (x > tMax) {

					Log.e("origen", "turn left");
				} else if(x<-tMax){

					Log.e("origen", "turn right");
				}

			}
			else if (absy > absx && absy > absz) {

				if (y > tMax) {

					Log.e("origen", "turn up");
				} else if(y<-tMax){

					Log.e("origen", "turn down");
				}
			}

			else if (absz > absx && absz > absy) {
				if (z > 0) {
					Log.e("origen", "screen up");
				} else {
					Log.e("origen", "screen down");
				}
			}
			else {

				Log.e("origen", "unknow action");
			}

			  //获得x,y,z的变化值
			  float deltaX = x - lastX;
			  float deltaY = y - lastY;
			  float deltaZ = z - lastZ;
			  //备份本次坐标
			  lastX = x;
			  lastY = y;
			  lastZ = z;
			  //计算移动速度
			  double speed = Math.sqrt(deltaX*deltaX + deltaY*deltaY + deltaZ*deltaZ)/timeInterval * 10000;
			  // Log.e("msg", "speed= "+speed);

			  if(speed >= SPEED_SHRESHOLD)
				 Toast.makeText(TempActivity.this, "onshake", 200).show();

		}
    };


}
需要注意的是,对手机的移动操作实现对于手机屏幕朝向为标准,例如手机屏幕向左,此时认为手机向左移动。
以上是手机为纵向屏幕时的坐标,如果当前手机是横向屏幕: x>0 说明当前手机下翻 x<0上翻 y>0 说明当前手机右翻 y<0左翻 z轴坐标不变。
下面说一下角度获取,
虽然可以使用ORIENTATION去获取,但是那个也不太好用,因为它是以向北为标准而计算的
Sensor Event 所提供的加速度数值,是设备以地球为参照物的加速度减去重力加速度的叠加后的值。我是这样理解的:当以重力加速度g向地面作自由落体运动时,手机处于失重状态,
g-sensor以这种状态作为加速度的0;而当手机处于静止状态(相对于地面)时,为了抵御自由落体运动的趋势,它有一个反向(向上)的g的加速度。
因此,得出一个结论:当设备处于静止或者匀速运动状态时,它有一个垂直地面向上的g的加速度,这个g投影到设备坐标系的x、y、z轴上,
就是SensorEvent 提供给我们的3个分量的数值。在“设备处于静止或者匀速运动状态”的假设的前提下,可以根据SensorEvent所提供的3个加速度分量计算出设备相对于地面的方向
前面所提到的“设备的方向”是一个含糊的说法。这里我们精确地描述设备方向为:以垂直于地面的方向为正方向,用设备坐标系x、y、z轴与正方向轴之间的夹角Ax、Ay、Az
来描述设备的方向,如下图所示。可以看出,设备还有一个自由度,即:绕着正方向轴旋转,Ax、Ay、Az不变。但Ax、Ay、Az的约束条件,
对于描述设备相对于正方向轴的相对位置已经足够了。如果需要完全约束设备相对于地面的位置,除了正方向轴外,还需要引入另一个参照轴,
例如连接地球南、北极的地轴(如果设备上有地磁强度Sensor,则可满足该约束条件)
Ax、Ay、Az的范围为[0, 2*PI)。例如,当Ay=0时,手机y轴竖直向上;Ay=PI时,手机y轴向下;Ay=PI/2时,手机水平、屏幕向上;Ay=3*PI/2时,手机水平、屏幕向下
根据3D矢量代数的法则,可知:
Gx=g*cos(Ax)
Gy=g*cos(Ay)
Gz=g*cos(Az)
g^2=Gz^2+Gy^2+Gz^2
因此,根据Gx、Gy、Gz,可以计算出Ax、Ay、Az
在x-y平面上的2D简化
当Ax、Ay确定时,Az有两种可能的值,二者相差PI,确定了设备屏幕的朝向是向上还是向下。大多数情况下,我们只关心Ax、Ay(因为程序UI位于x-y平面?),而忽略Az,
例如,Android的屏幕自动旋转功能,不管使用者是低着头看屏幕(屏幕朝上)、还是躺在床上看(屏幕朝下),UI始终是底边最接近地心的方向
那么我们设Gx与Gy的矢量和为g'(即:g在x-y平面上的投影),将计算简化到x-y 2D平面上。记y轴相对于g'的偏角为A,以A来描述设备的方向。
以逆时针方向为正,A的范围为[0, 2*PI)
有:
g'^2=Gx^2+Gy^2
Gy=g'*cos(A)
Gx=g'*sin(A)
则:
g'=sqrt(Gx^2+Gy^2)
A=arccos(Gy/g')
由于arccos函数值范围为[0, PI];而A>PI时,Gx=g'*sin(A)<0,因此,根据Gx的符号分别求A的值为:
当Gx>=0时,A=arccos(Gy/g')
当Gx<0时,A=2*PI-arccos(Gy/g')
注意:由于cos函数曲线关于直线x=n*PI 对称,因此arccos函数的曲线如果在y轴方向[0, 2*PI]范围内补全的话,则关于直线y=PI对称,因此有上面当Gx<0时的算法
考虑应用程序的屏幕旋转
前面计算出了Android设备的“物理屏幕”相对于地面的旋转角度,而应用程序的UI又相对于“物理屏幕”存在0、90、180、270度4种可能的旋转角度,要综合考虑进来。也就是说:
UI相对于地面的旋转角度=物理屏幕相对于地面的旋转角度-UI相对于物理屏幕的旋转角度
Android应用获取屏幕旋转角度的方法为:
int rotation = activity.getWindowManager().getDefaultDisplay().getRotation();
int degree= 90 * rotation;
float rad = (float)Math.PI / 2 * rotation;
注册sensor
 @Override
  protected void onPause() {
         sm.unregisterListener(this);
         super.onPause();
  }

   @Override
  protected void onResume() {
       sm.registerListener(this, sm.getDefaultSensor(Sensor.TYPE_ACCELEROMETER), SensorManager.SENSOR_DELAY_UI);
       super.onResume();
 }
计算角度:
@Override
    public void onSensorChanged(SensorEvent event) {
         if (Sensor.TYPE_ACCELEROMETER != event.sensor.getType()) {
                return;
            }

            float[] values = event.values;
            float ax = values[0];
            float ay = values[1];
            double g = Math.sqrt(ax * ax + ay * ay);
            double cos = ay / g;

            if (cos > 1) {
                cos = 1;
            } else if (cos < -1) {
                cos = -1;
            }

            double rad = Math.acos(cos);    //0-180
            if (ax < 0) {        //rad>180
                rad = 2 * Math.PI - rad;
            }

            int uiRot = getWindowManager().getDefaultDisplay().getRotation();
            double uiRad = Math.PI / 2 * uiRot; ;
            rad -= uiRad;
            gsView.setRotation(rad);
    }
根据旋转角度绘制图片:
  public class GSensitiveView extends ImageView {

    private Bitmap image;
    private double rotation;
    private Paint paint;

    public GSensitiveView(Context context) {
        super(context);
        BitmapDrawable drawble = (BitmapDrawable) context.getResources().getDrawable(R.drawable.ch_playfun);
        image = drawble.getBitmap();

        paint = new Paint();
    }

    @Override
    protected void onDraw(Canvas canvas) {
        // super.onDraw(canvas);

        double w = image.getWidth();
        double h = image.getHeight();

        Rect rect = new Rect();
        getDrawingRect(rect);

        int degrees = (int) (180 * rotation / Math.PI);
        canvas.rotate(degrees, rect.width() / 2, rect.height() / 2);
        canvas.drawBitmap(image, //
                (float) ((rect.width() - w) / 2),//
                (float) ((rect.height() - h) / 2),//
                paint);
    }
    public void setRotation(double rad) {
        rotation = rad;
        invalidate();
    }
}
