Android Fastboot
Introduction
Fastboot is the name of a tool used to manipulate the flash partitions of the Android developer phone. It can also boot the phone using a kernel image or root filesystem image which reside on the host machine rather than in the phone flash. In order to use it, it is important to understand the flash partition layout for the ADP1.
The fastboot program works in conjunction with firmware on the phone to read and write the flash partitions. It needs the same USB device setup between the host and the target phone as adb.
ADP1/G1 Flash partitions
Flash partitions on the ADP1
| Partition name | Device | Size | Contents/Notes |
|---|---|---|---|
| splash1 | <none> | 307200 bytes | splash screen image. |
| misc | /dev/mtd/mtd0 | 262k | misc - has apparently some flags used for controlling device mode |
| recovery | /dev/mtd/mtd1 | 5.2M | kernel, initrd with rootfs (for alternate boot) |
| boot | /dev/mtd/mtd2 | 2.6M | kernel, initrd with rootfs (for default boot) |
| system | /dev/mtd/mtd3 | 70M | yaffs2 file system, mounted read-only at /system - has the bulk of the Android system, including system libraries, Dalvik and pre-installed applications. |
| cache | /dev/mtd/mtd4 | 70M | yaffs2 file system, mounted at /cache - only used on G1 for over-the-air updates. This partition can be used to store temporary data. |
| userdata | /dev/mtd/mtd5 | 78M | yaffs2 file system, mounted at /data - contains user-installed applications and data, including customization data |
To see details about the memory sizes of the flash partitions, in Linux (adb shell) do: 'cat /proc/mtd'. This should show something like the following:
# cat /proc/mtd
dev:    size   erasesize  name
mtd0: 00040000 00020000 "misc"
mtd1: 00500000 00020000 "recovery"
mtd2: 00280000 00020000 "boot"
mtd3: 04380000 00020000 "system"
mtd4: 04380000 00020000 "cache"
mtd5: 04ac0000 00020000 "userdata"
mtd6: 10000000 00020000 "msm_nand"
Note that these are reported during bootup. dmesg reports: from dmesg:
<5>[    5.301696] Creating 6 MTD partitions on "msm_nand":
<5>[    5.301727] 0x0000024c0000-0x000002500000 : "misc"
<5>[    5.302947] 0x0000026c0000-0x000002bc0000 : "recovery"
<5>[    5.303710] 0x000002bc0000-0x000002e40000 : "boot"
<5>[    5.304504] 0x000002e40000-0x0000071c0000 : "system"
<5>[    5.305328] 0x0000071c0000-0x00000b540000 : "cache"
<5>[    5.306091] 0x00000b540000-0x000010000000 : "userdata"
The last mtd partition recognized by Linux (mtd6) is called "msm_nand" and appears to represent the whole flash part, of 256M. See http://www.telesphoreo.org/pipermail/g1-hackers/2008-December/000091.html
Special boot mode
To use fastboot, you have to reboot the phone into the special 'fastboot' mode. Do this by turning off the phone, then booting the phone, holding down the camera button on the side of the phone, while pressing the power button.
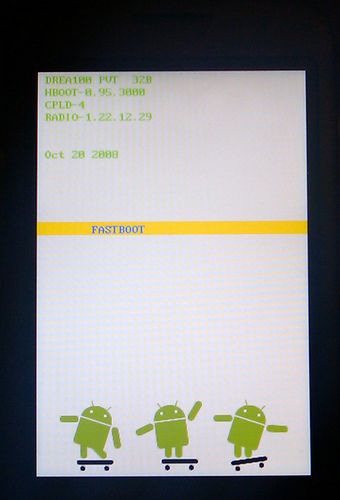
You can tell you are in 'fastboot' mode when you see a screen with drawings of 3 Androids riding skateboards, on a white background.
The yellow line in the middle of the screen will say "Serial0" until you plug in the USB cable, and press the "back" key. Once you do this, after a few seconds the yellow line will switch to saying "FASTBOOT".
At this point you are ready to send commands and/or data to the phone using the fastboot program on your host.
Note: to get out of 'fastboot' mode on the phone, without using the fastboot program on the host, you can press the 'call/dial', 'menu' and 'hang-up/power' keys simultaneously.
Commands
The fastboot command line usage is:
$ fastboot -h
usage: fastboot [ <option> ] <command>

commands:
  update <filename>                        reflash device from update.zip
  flashall                                 flash boot + recovery + system
  flash <partition> [ <filename> ]         write a file to a flash partition
  erase <partition>                        erase a flash partition
  getvar <variable>                        display a bootloader variable
  boot <kernel> [ <ramdisk> ]              download and boot kernel
  flash:raw boot <kernel> [ <ramdisk> ]    create bootimage and flash it
  devices                                  list all connected devices
  reboot                                   reboot device normally
  reboot-bootloader                        reboot device into bootloader

options:
  -w                                       erase userdata and cache
  -s <serial number>                       specify device serial number
  -p <product>                             specify product name
  -c <cmdline>                             override kernel commandline
  -i <vendor id>                           specify a custom USB vendor id
Erase an individual partition
To erase an individual partition, use:
- fastboot erase <partition>
Ex: fastboot erase cache
Write to an individual partition
To write an image file to an individual partition, use:
- fastboot flash <partition> [ <filename> ]
If writing to the 'splash1' partition, the file needs to be an image file in a special format. See G1 Splash Image for details.
If writing to the 'recovery' or 'boot' partitions, the file consists of a Linux kernel and initrd file system image. This can be created with the 'mkbootimg' program.
If writing to the 'system', 'cache', or 'userdata' partitions, the file is a file system image formatted in yaffs2 format.
FIXTHIS - document how to create one of these.
To boot with a host-side kernel image (and rootfs image)
This command allows you to download a kernel image (and optional root filesystem image) and boot the phone with those, instead of using the kernel and rootfs in the boot flash partition. It is very useful while developing a kernel or modifying the rootfs.
- fastboot boot <kernel> [ <ramdisk> ]
Ex: fastboot boot linux-2.6/arch/arm/boot/zImage root-image/recovery.img-ramdisk.cpio.gz
Reboot the phone
To reboot the phone, using the kernel and rootfs in the 'boot' partition:
- fastboot reboot
Resources
Source code for the 'fastboot' command
- It's located in system/core/fastboot
- Online, see: http://android.git.kernel.org/?p=platform/system/core.git;a=tree;f=fastboot
Cheat sheet
There is a good cheat sheet at: http://andblogs.net/fastboot/
Downloadable binary
You can download a binary of 'fastboot' for the ADP1 platform from: http://www.htc.com/www/support/android/adp.html (see the table about the 1/4 down the page)
Specific Tasks
Replacing the splash screen
To replace the splash screen on the ADP1, you can use fastboot to write a new splash image into the splash1 partition. The image must be in a special format which can be directly used by the screen hardware.
See http://www.gotontheinter.net/logo.rle for details.
