UI--从学习styleable自定义view属性到一点儿更有意思的尝试
《代码里的世界》 —UI篇
用文字札记描绘自己 android学习之路
转载请保留出处 by Qiao
http://blog.csdn.net/qiaoidea/article/details/45599593
【导航】
- 多行文本折叠展开 自定义布局View实现多行文本折叠和展开
1.概述
前面封装view的时候用到了自定义属性,觉得有必要单独讲一下这部分,但是呢,又不想向其他文章一样千篇一律地写这些东西。所以呢,后便会加一些临时的发散思维,引用点有意思的东西。分享东西嘛,随性点儿。
回归正题,我们想在view中使用自定义属性要怎么做呢?
其实有如下几点:
- declare-styleable 在res/values目录下新建xml文件 自定义你的属性
- AttributeSet和TypedArray 在view中获取这些属性对应的值,设置绑定到view上
xmlns申明与引用 在你要使用的地方引入命名空间并使用这些属性,赋值
然后我们来尝试通过这些步骤做些自定义view,同时呢,我期望能方便快捷的绑定一些事件,执行相应操作。尝试来做一下。
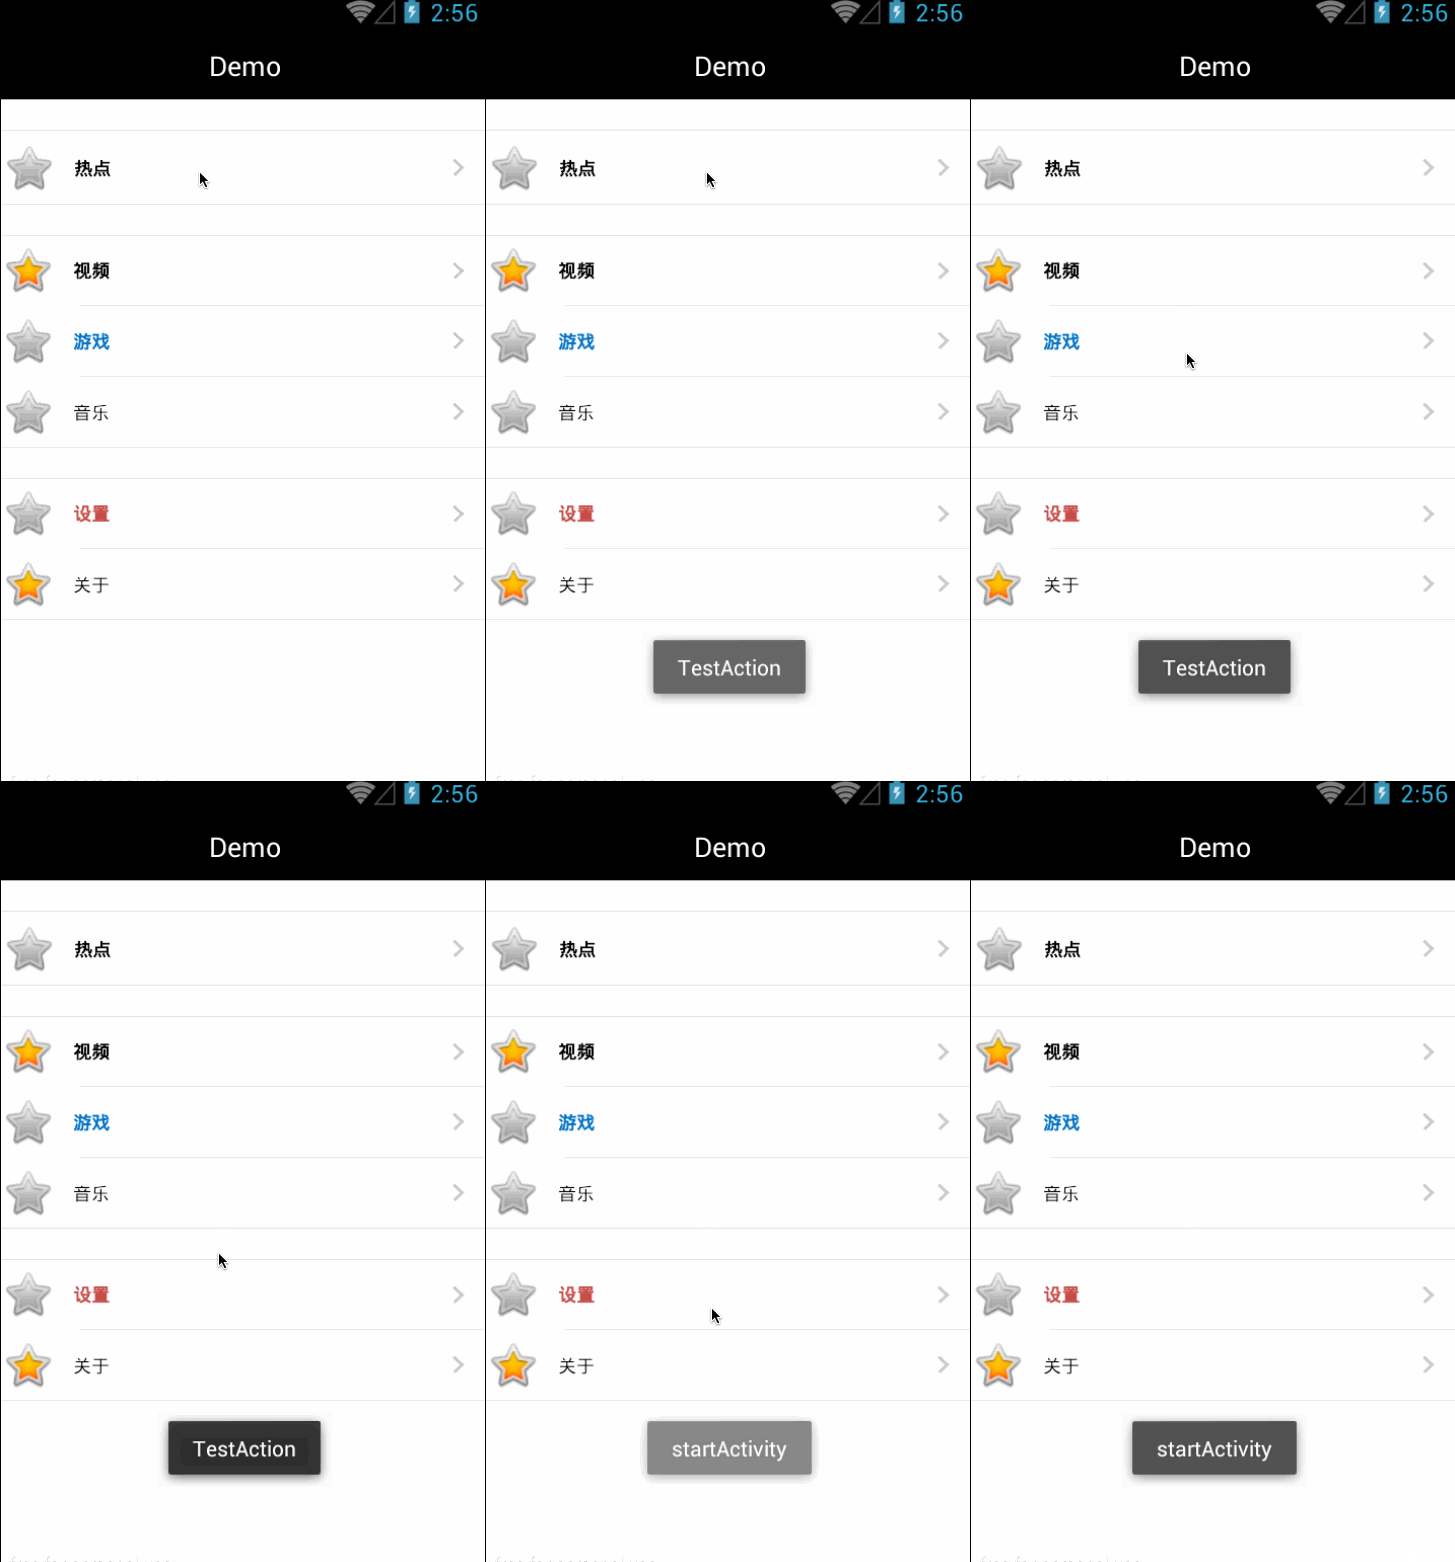
xml直接定义view和点击事件的demo

2.实践
其实自定义view的属性算是比较常见的,想来想去却没想到什么比较好写的view。就拿最常见的设置选项来说吧,我希望直接通过简单的xml配置就可以设置其字体大小颜色内容,图标和点击触发的事件。
2.1定义属性
在res/values目录下新建一个attrs.xml的文件,利用declare-styleable定义我们的属性样式。
<?xml version="1.0" encoding="utf-8"?>
<resources>
    <declare-styleable name="RowItem"><!-- 样式名为RowItem-->
        <attr name="textSize" format="dimension"/>
        <attr name="textColor" format="color"/>
        <attr name="text" format="string" />

        <attr name="textStyle"> <!-- text样式(粗体/斜体)-->
            <flag name="blod" value="1"/>
            <flag name="italic" value="2"/>
        </attr>

        <attr name="icon" format="reference"/>

        <attr name="position" > <!-- 该行所处位置-->
            <enum name="single" value="-1"/>
            <enum name="top" value="0"/>
            <enum name="middle" value="1"/>
            <enum name="bottom" value="2"/>
        </attr>
        <attr name="action" format="string" /><!-- 执行动作-->
    </declare-styleable>
</resources>
简单讲解下其中,
- 标签declare-styleable的name属性 :代表了接下来定义的属性的所属控件(只是用来区分不同declare-styleable的代号而且,不一定非要和属性相关的控件的名称一致)
标签attr就是用来的定义具体的属性,name代表属性名,format代表属性的类型。
Attrs.xml文件中属性类型format值的格式
引用型reference
定义:
< attr name = “background” format = “reference” />
使用:
tools:background = “@drawable/图片ID”颜色型color
定义:
< attr name = “textColor” format = “color” />
使用:
tools:textColor = “#ffffff”布尔型boolean
定义:
< attr name = “focusable” format = “boolean” />
使用:tools: focusable = “true”尺寸型dimension
定义:
< attr name = “layout_width” format = “dimension” />
使用:
tools: layout_width = “42dip”浮点型float
定义:
< attr name = “fromAlpha” format = “float” />
使用:tools: fromAlpha = “1.0”整型integer
定义:
< attr name = “frameDuration” format = “integer” />
使用:
tools: frameDuration = “100”字符串string
定义:
< attr name = “apiKey” format = “string” />
使用:
tools: apiKey = “dsegergegasefwg”百分数fraction
定义:
< attr name = “pivotX” format = “fraction” />
使用:
tools: pivotx = “200%”枚举型enum:
定义:
< attr name=”orientation”>
< enum name=”horizontal” value=”0” />
< enum name=”vertical” value=”1” />
< /attr>
使用:
android:orientation = “vertical”标志位、位或运算,格式如下:
定义:
< attr name=”windowSoftInputMode”>
< flag name = “stateUnspecified” value = “0” />
< flag name = “stateUnchanged” value = “1” />
< flag name = “adjustUnspecified” value = “0x00” />
< flag name = “adjustResize” value = “0x10” />
< /attr>
使用:
android:windowSoftInputMode = “stateUnspecified | stateUnchanged | stateHidden”>属性定义可以指定多种类型:
定义:
< attr name = “background” format = “reference|color” />
使用:
android:background = “@drawable/图片ID|#00FF00”
2.2 View中使用自定义属性
View的默认构造方法里有 XXX(Context context, AttributeSet attrs) ,而这个 AttributeSet 参数即为属性集合,我们可以利用 TypedArray 来获取我们想要的属性。
可以看我这里自定义的View类RowItem,它获取自定义属性的方法为initWithAttrs。它通过这个方法获取最终的属性值的过程:
protected void initWithAttrs(Context context, AttributeSet attrs) {
        TypedArray a = context.obtainStyledAttributes(attrs,
                R.styleable.RowItem);
        textColor = a.getColor(R.styleable.RowItem_textColor,
                defaultTextColor);
        textStyle = a.getColor(R.styleable.RowItem_textStyle,
                -1);
        textSize = a.getDimensionPixelSize(R.styleable.RowItem_textSize, defaultTextSize);
        text = a.getString(R.styleable.RowItem_text);
        icon = a.getDrawable(R.styleable.RowItem_icon);
        position = a.getInt(R.styleable.RowItem_position, defaultPosition);
        if(icon == null){
            icon = getResources().getDrawable(defaultIconId);
        }
        action = a.getString(R.styleable.RowItem_action);
        a.recycle();
        initViews();//利用属性值设置绑定View
    }
先通过context.obtainStyledAttributes()方法将attrs.xml中定义的属性与AttributeSet 关联起来并映射到 TypedArray a,然后通过 a.getXXX()来获取相应属性,第二个参数为取不到时的默认值。最后用a.recycle()来回收释放。
详细讲下怎个自定义View。转回我们的自定义RowItem内部,来看一下View的实现。先定义了一个ImageVIew和TextView,然后定义对应的属性和默认值:
public class RowItem extends FrameLayout{
    protected ImageView iconView;
    protected TextView contentView;
    /** *对应自定义属性 */
    protected int textColor;
    protected int textStyle;
    protected float textSize;
    protected String text;
    protected int position;
    protected Drawable icon;
    protected String action;

    /** *默认属性属性 */
    public int defaultTextColor = Color.BLACK;
    public int defaultTextSize = 12;
    public int defaultPosition = -1;
    private int defaultIconId = R.drawable.ic_launcher;

    //构造方法
    public RowItem(Context context) {
        super(context);
        initWithAttrs(context,null);//null则用默认属性值初始化
    }
    //带AttributeSet 的构造方法
    public RowItem(Context context,  AttributeSet attrs) {
        super(context, attrs);
        initWithAttrs(context,attrs);//初始化自定义属性
        bindListener();
    }

    //...其他代码
可以看到,两个构造方法都使用了initWithAttrs()方法,设置绑定属性值,第一个构造方法中attrs为null则意味着使用默认值。在初始化了view的属性值之后,在方法最后一段,调用了initViews()来初始化view:
//利用获取的属性值来设置view
protected void initViews(){
        View root = LayoutInflater.from(getContext()).inflate(R.layout.row_item, RowItem.this);
        iconView = (ImageView) findViewById(R.id.item_image);
        contentView = (TextView) findViewById(R.id.item_tv);

        iconView.setImageDrawable(icon);
        if(!TextUtils.isEmpty(text))
            contentView.setText(text);
        contentView.setTextSize(TypedValue.COMPLEX_UNIT_PX,textSize);
        contentView.setTextColor(textColor);
        contentView.setTypeface(null, textStyle);
        root.setBackgroundResource(getBackGroundResource(position));
    }

    /** *根据当前rowItem位置来返回相应的背景(其实我们可以直接在xml中设置rowitem背景,这里只是用于演示使用枚举型常量定义的属性) */
    private int getBackGroundResource(int position2) {
        switch(position){
        case 0:
            return R.drawable.top_item_click_bg;
        case 1:
            return R.drawable.middle_item_click_bg;
        case 2:
            return R.drawable.bottom_item_click_bg;
        default:
            return R.drawable.single_item_click_bg;
        }
    }
整个自定义view的过程就讲完了。另外,细心地朋友会发现在第二个构造方法中使用了bindListener()来绑定点击事件,这里用的的是view的属性参数action,当用户点击这个view之后我们根据action来映射执行相应动作。它具体干嘛了我们后边再说,这里先继续将我们的自定义view RowItem。
2.3在layout的xml文件中使用自定义属性设置属性值
使用的时候,直接在xml中引入这个view,不过在此之前,要先引入命名空间。xmlns表示xml 的 namespace。后边跟的名字可以自定,以便后便使用。这里使用demo
自动引用 使用res-auto
xmlns:demo=”http://schemas.android.com/apk/res-auto”
引用指定包名
xmlns:demo=”http://schemas.android.com/apk/res/com.qiao.demo”
然后我们就可以引入自定义属性了
<!--使用 demo开头的即为自定义属性,-->
<com.qiao.demo.RowItem android:layout_width="match_parent" android:layout_height="wrap_content" android:layout_marginTop="20dip" demo:position="single" <!- 其中 申明为enum枚举类可以选一-->
    demo:text="测试选项"
    demo:textSize="12dip"
    demo:textStyle="blod|italic" <!- 而使用flag位的可以组合使用-->
    demo:icon="@android:drawable/btn_star"
    app:action="TestAction"/>
在activity里边就可以直接使用像使用TextView之类的空间一样使用 RowItem 了,当然也可以获取和设置相应属性了。到这里我们的自定义view也Ok了。然后呢,我们也可以直接通过setOnClickListener来设置绑定Rowitem点击事件。
但追求更简单的我们,当然期望直接指定view的点击处理方法的函数了。
3.有意思的尝试
前面预留了一个action属性值,当然,意味着我们想直接在xml中指定我们的自定义view点击后想要执行的操作方法了。这里呢,我们尝试使用反射来找到类里边预定义好的处理方法,而具体执行什么处理方法,在于我们action里边的关键字。
说的很抽象,不要紧,我们看那段bindLinstener()的代码。
3.1尝试bindLinstener()
private void bindListener() {
        if(TextUtils.isEmpty(action)) return; //如果没有执行动作则返回,否则设置点击事件
        setOnClickListener(new OnClickListener() {
            private Method mHandler; //Method处理方法

            @Override
            public void onClick(View v) {
                if (mHandler == null) {
                    try {
                        /** * 尝试从context中获取包含关键字为 action()参数为View的方法 * 这里的context就是添加整个自定义view的activity,所以 * 我们要获取Method方法其实就是 * 在activity中找到action(View view)这样的public方法 * 不清楚的可以查阅class的getMethod方法 */
                        mHandler = getContext().getClass().getMethod(action,
                                View.class);
                    } catch (NoSuchMethodException e) {
                        //处理异常
                    }
                }

                try {
                    //传入参数RowItem.this,执行这个方法
                    mHandler.invoke(getContext(), RowItem.this);
                } catch (IllegalAccessException e) {
                        //处理异常
                } catch (InvocationTargetException e) {
                        //处理异常
                }
            }
        });
} 这里使用了java映射,有疑问的朋友自行谷歌/百度。简明扼要说下,如果action的值不为空,(比如为 clickAction),那么我们会在activity中查找 public XX clickAction(View view)这个方法,然后执行这个方法。
这个过程是,首先实例化一个类,取得方法getMethod,然后执行invoke()。
然后,在我们的activity中定义相应的public 执行方法比如
public class MainActivity extends Activity {
    //其他代码

    public void TestAction(View view){
        Toast.makeText(getApplicationContext(), "TestAction", Toast.LENGTH_SHORT).show();
    }
}
然后,我们就可以在xml的view中使用action属性设置处理点击事件的方法
demo:action=”TestAction”/>
整段代码
<com.qiao.demo.RowItem android:layout_width="match_parent" android:layout_height="wrap_content" android:layout_marginTop="20dip" demo:position="single" demo:text="测试选项" demo:textSize="12dip" demo:textStyle="blod|italic" demo:icon="@android:drawable/btn_star" demo:action="TestAction"/> 最后,运行测试。点击该item,弹出Toast,大功告成。
这里只举了一个例子一个方法来绑定action。当我们有很多个rowitem时候,每个item点击执行不同的动作,然后这些item又有各种变化可能,我们就不放采用这种方式,简单快速的绑定方法和事件,省去多余的findView等繁琐操作。
3.2回头看android本身提供方法
透露一下,其实这种用法android本身就有提供,每个view都可以在xml设置onClick参数,它对应的属性也是点击执行相应动作。
android:onClick=”TestAction”
适用于所有view,就比如TextView
<TextView android:id="@+id/textView1" android:layout_width="wrap_content" android:layout_height="wrap_content" android:text="测试点击事件" android:onClick="TestAction"/> 然后同样在 activity重定义public void TestAction(View view)方法,运行,点击textView,是不是也同样弹出了toast?
我们来看View内部这部分实现:
case R.styleable.View_onClick:
                    if (context.isRestricted()) {
                        throw new IllegalStateException("The android:onClick attribute cannot "
                                + "be used within a restricted context");
                    }

                    final String handlerName = a.getString(attr);
                    if (handlerName != null) {
                        setOnClickListener(new OnClickListener() {
                            private Method mHandler;

                            public void onClick(View v) {
                                if (mHandler == null) {
                                    try {
                                        mHandler = getContext().getClass().getMethod(handlerName,
                                                View.class);
                                    } catch (NoSuchMethodException e) {
                                        int id = getId();
                                        String idText = id == NO_ID ? "" : " with id '"
                                                + getContext().getResources().getResourceEntryName(
                                                    id) + "'";
                                        throw new IllegalStateException("Could not find a method " +
                                                handlerName + "(View) in the activity "
                                                + getContext().getClass() + " for onClick handler"
                                                + " on view " + View.this.getClass() + idText, e);
                                    }
                                }

                                try {
                                    mHandler.invoke(getContext(), View.this);
                                } catch (IllegalAccessException e) {
                                    throw new IllegalStateException("Could not execute non "
                                            + "public method of the activity", e);
                                } catch (InvocationTargetException e) {
                                    throw new IllegalStateException("Could not execute "
                                            + "method of the activity", e);
                                }
                            }
                        });
                    }
                    break;
哈哈,其实就是我前面讲的那部分通过自定义view属性并绑定事件。
但实际开发中,通常我们会封装好一个类,专门负责相关处理逻辑,然后给外部调用。这样是为了使业务逻辑跟界面UI层剥离开来,达到松耦合,以便于后边维护和变更。
那么,如果我期望将处理点击事件的逻辑单独包装成一个hanlderAction(处理事件类),然后在这个view中通过action参数来调用对应方法,又该怎么实现呢?
- 静态方法
一般不需要传参或者只用来变更一个属性值等可以使用静态方法类,执行处理相关逻辑。为了避免每次都通过映射去查找这个静态方法,这里使用了一个map记录保存之前调用过的方法,提高效率。
public class TestActionInvoker {
    private static Map<String, Method> methodMap = new HashMap<String, Method>();

    public static void tryInvoke(String method){
        Method mHandler = methodMap.get(method);
        if (mHandler == null) {
            try {
                mHandler = TestActionInvoker.class.getMethod(method);
            } catch (NoSuchMethodException e) {
                Log.e("NoSuchMethodException", "Could not find a method " +
                        method + " in the class "
                        + TestActionInvoker.class + " for onClick handler"
                        + " on view ");
            }
        }

        try {
            mHandler.invoke(TestActionInvoker.class);
        } catch (IllegalAccessException e) {
            Log.e("IllegalAccessException", "Could not execute non "
                    + "public method of the class");
        } catch (InvocationTargetException e) {
            Log.e("InvocationTargetException", "Could not execute "
                    + "method of the class");
        }
    }

    public static void TestAction(){
        Log.i("TestAction", "myInvoker");//这里只是简单的打印日志
    }
}- 使用类的静态对象,调用含参方法
“` java
public class ActionInvoker {
private static ActionInvoker instance;
private static Map
3.1一些更有意思的讲述
上边这些具体有甚用处呢,且听我后边慢慢为你道来。
通常有些页面的配置菜单会发生频繁变更,有时候是一级菜单有时候是二级菜单,而且样式不便,对应的位置和执行动作也会变化。这样就给开发带来不少麻烦。所以呢,我们可以简单的封装,然后定义一个属性对象,直接使用数组列表来初始化这么一个页面,当然前提是自己有另外封装了处理逻辑。举个伪代码小例子。
//属性对象类
ItemAttrs{
    attr1;
    attr2;
    attr3;
}

//在界面定义个List
List<ItemAttrs> list;

//按照list产生界面
new RowItem();
rowitem.bind(lit.get(i)) //绑定到rowitem相关属性,产生界面和点击事件

//处理逻辑类
ItemAttrs{
    action1();
    action2();
    action3();
}
这样你的界面就完全由list来控制,这个界面可以是在打包配置的一个xml里,也可以是有在线获取的json产生。你完全可以用你最方便的场景动态产生这个界面。
最后,附上前面所讲的示例源码:
点击下载示例源码