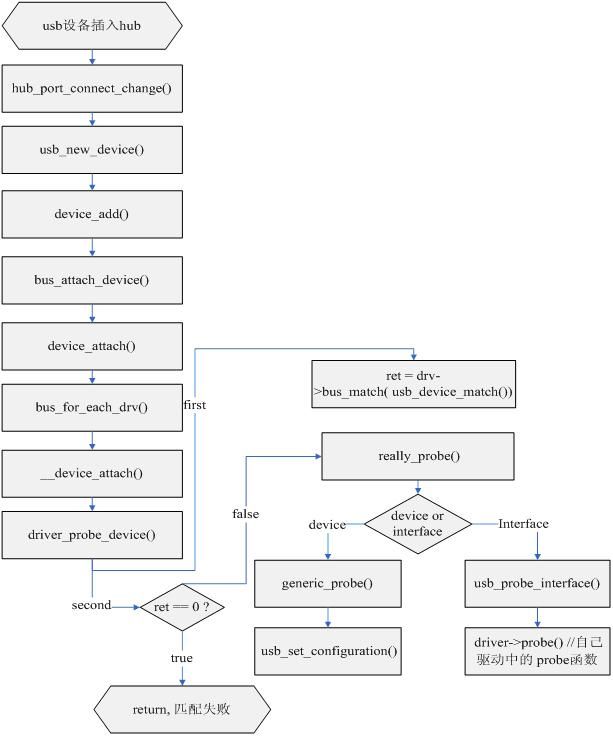
usb设备的probe全过程
http://blog.csdn.net/aaronychen/archive/2008/03/17/2192147.aspx
本文将详细讲述2.6.22下的一个USB设备插上linux系统的PC后是如何一步一步调到我们的usb设备驱动的probe函数的, 我们知道我们的USB驱动的probe函数中的一个参数是interface结构, 因此一般来说, 一个USB设备中的任何一个接口都应该有对应的一个驱动程序,当然也有例外(如cdc-acm).
我们知道USB设备都是通过插入上层HUB的一个Port来连入系统并进而被系统发现的, 当USB设备插入一个HUB时,该HUB的那个port的状态就会改变, 从而系统就会知道这个改变, 此时会调用hub_port_connect_change() /*driver/usb/core/hub.c*/
static void hub_connect_change(struct usb_hub *hub, int portl, u16 portstatus, u16 portchange)
{
….
usb_new_device(udev);
…
}
该函数创建一个usb_device的对象udev, 并初始化它,接着调用usb_new_device()来获取这个usb设备的各种描述符并为每个interface找到对用的driver.
int usb_new_device(struct usb_device *udev)
{
….
err = usb_get_configuration(udev);
….
device_add(&udev->dev);
}
该函数首先调用usb_get_configuration()来获取设备的各种描述符(设备描述符,配置描述符等),接着调用device_add()来把这个USB设备添加到USB系统中去, 也就是在这个过程中系统回去为这个设备找到相应的驱动. 在2.6的早期的一些版本中在分析配置描述符后得到interface的同时把interface作为设备来调用device_add()的
int device_add(struct device *dev)
{
….
if((error = bus_add_device(dev)))
…
bus_attach_device(dev);
…
}
这个函数是个通用的设备管理函数,它会为每个设备调用bus_add_device来把这个设备添加到相应bus的设备列表中去. 接着调用bus_attach_device()来匹配对应的驱动程序, 对于USB设备来说第一次调用bus_attach_device()时的参数dev代表的是整个usb设备(以后usb设备中的interface也会作为设备调用这个函数).
int bus_attach_device(struct device *dev)
{
…
ret = device_attach(dev);
…
}
这个函数就是用来为设备找到相应的设备驱动程序的(通过调用device_attach()实现).
int device_attach(struct device *dev)
{
…
ret = bus_for_each_drv(dev->bus, NULL, dev, __device_attach);
…
}
该函数调用bus_for_each_drv()来从总线上已注册的所有驱动中找出匹配的驱动程序.
int bus_for_each_drv(struct bus_type *bus,
struct device_driver *start,
void *data,
int (*fn)(struct device_driver *, void *))
{
….
while((drv = next_driver(&i)) && !error)
error = fn(drv, data); //返回0将继续搜索,返回错误值将停止搜索.
…
}
该函数遍历bus上的所有驱动程序,并为每个驱动调用fn()来查看是否匹配. 这里的fn就是__device_attach.
static int __device_attach(struct device_driver *drv, void *data)
{
struct device *dev = data;
return driver_probe_device(drv, dev);
}
int driver_probe_device(struct device *drv, struct device *dev)
{
…
if(drv->bus->match && !drv->bus_match(dev, drv))
…
ret = really_probe(dev, drv);
}
对于usb驱动来说,我们通过usb_registe()r来注册我们的驱动程序,这个函数会为我们的驱动程序对象(usb_driver)中的bus指定为usb_bus_type:
Struct bus_type usb_bus_type = {
…
.match = usb_device_match,
….
}
因此对于usb驱动会首先调用usb_device_match().
static int usb_device_match(struct device *dev, struct device_driver *drv)
{
if(is_usb_device(dev)) { /*dev代表整个usb设备*/
….
}
else /*dev代表一个usb设备interface*/
{
…
usb_match_id();
…
usb_match_dynamic_id();
…
}
}
这个函数只是做一些粗略的匹配, 如果匹配成功则返回1,然后由really_probe来做进一步的匹配, 如果匹配失败则返回0, 并且really_probe也不会在执行. 这个函数的调用保证了dev, drv要么都是设备级别的(即dev代表usb设备,drv代表usb设备驱动), 要么都是接口级别的(即dev代表usb设备的一个interface,drv代表usb接口驱动).
static int really_probe(struct device *dev, struct device_driver *drv)
{
…
dev->driver = drv; //先赋值,以后的probe过程中会用到
else if(drv->probe)
ret = drv->probe(dev);
…
probe_failed:
dev->drvier = NULL; //probe失败, 重设它
…
}
对于usb来说这个函数的调用有2种分支, 1: dev,drv代表的是设备级别的, 2 dev,drv代表的是接口级别的. 其他情况组合在usb_device_match中被过滤掉了,
分支1: dev,drv代表的是设备级别:
此时的drv肯定是usb_generic_driver. 因为在当前的usb系统中只有这个driver是代表整个设备的驱动,它是在usb_init中被注册的, 而我们通常写的usb驱动都是代表一个interface的.
struct usb_device_driver usb_generic_driver = {
…
.probe = generic_probe,
…
}
因此,此时的drv->probe将调用generic_probe().
static int generic_probe(struct usb_device *udev)
{
…
c = choose_configuration(dev);
if(c >= 0) {
err = usb_set_configuration(udev, c); //设置配置,并注册interface.
…
}
…
}
该函数为这个usb设备选择一个合适的配置,并注册这个配置下面的interface.
int usb_set_configuration(struct usb_device *dev, int configuration)
{
…
for(I = 0; I < nintf; i++) {
struct usb_interface *intf = cp->interface[i];
…
device_add(&intf->dev);
…
}
…
}
该函数比较重要, 但我们只关心probe过程因此省掉了很多东西. 它为当前配置下的每个interface调用device_add()函数, 根据前面的分析可知, 这个过程将会走到接下来我们要分析的分支2.
分支2: dev,drv代表的是interface级别:
此时的dev代表着一个interface, 而drv就代表了我们自己的usb驱动. 但是我们应当看到drv是device_driver类型, 而我们写的usb驱动的类型一般是usb_driver, 因此这里的probe和我们自己写的probe显然不是同一个. 实际上这里的drv是我们的驱动对象里内嵌的一个子对象(因为linux下所以的驱动都必须用device_driver来代表,). 那这个子对象的probe函数是在哪里赋值的呢? 这就要看usb_register函数了,
跟踪这个函数我们可以看到这里的probe函数实际上是usb_probe_interface(所有的usb interface驱动都是一样的).
static int usb_probe_interface(struct device *dev)
{
struct driver = to_usb_driver(dev->driver); //dev->driver 在really_probe中设置.
…
error = driver->probe(intf, id); //这个就是我们自己写的probe函数了.
…
}
driver->probe(intf, id); 这就调用到我们自己写的代码里面了,
整个流程大概就是这样:
