AM335X StarterWare Environment Setup
Contents[hide]
|
Introduction
This chapter details the settings required for IDE/tools supported by StarterWare. This chapter tries to cover some typical steps to be followed while starting to build and/or load and execute libraries/applications packaged inside StarterWare.
TMS470 from CCS project
This section explains how to import a CCS project which is created earlier and how to build it (TMS470vX.X.X is the ARM compiler used in CCS).
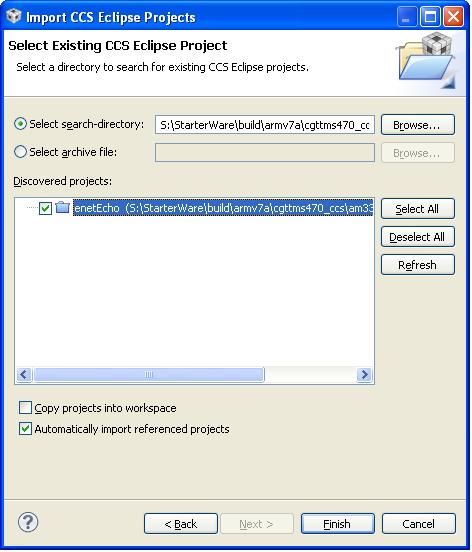
Importing a CCS Project from the StarterWare Release package
- Launch the CCSv5 IDE.
- Confirm that the "CCS Edit" perspective is open. If not, travel to: 'Menu -> Window -> Open Perspective -> Other' and open CCS Edit perspective.
- Importing the Project:
- Travel to 'File -> Import'.
- In the window which pops up, go to 'Code Composer Studio -> Existing CCS/CCE Eclipse Projects' and click Next.

- In the current window, browse to the path of the required CCS project. All the valid CCS projects under the specified directory will be listed in the 'Discovered Projects' sub-window. Check in the check-box of the required project. Then click 'Finish'.The required project will now be imported to the CCS Workspace.
Building the CCS Project
- Building a CCS Project of an application requires that the associated libraries also be available. Therefore, the libraries which are compulsorily needed (drivers, system configuration and platform) should be imported to the CCS Workspace and built before compiling the application. Others libraries like utils, mmcsdlib, usblib, grlib and nandlib should be imported and built if they are used by the application.
- To build a project, right click on the project name and then select 'Build Project'. The project gets built. This step applies to library project and application project alike.
- It is advisable that the libraries and application be built in the same build configuration, either Debug or Release.
- The executable (ELF and binary image) will be generated in the corresponding location in binary directory. For example, on building the 'enetEcho' project present in 'build/armv7a/cgttms470_ccs/am335x/evmAM335x/enet_echo', the executable are generated in 'binary/armv7a/cgttms470_ccs/am335x/evmAM335x/enet_echo'.
GCC from Command Line in Linux/Cygwin
Exporting LIB_PATH
~/StarterWare$ export LIB_PATH=/opt/toolchain/CodeSourcery-arm-2009q1-161
Building An Application
1. Build/Clean all example applications for TI AM335x EVM:
                       ~/StarterWare/build/armv7a/gcc/am335x/evmAM335x$ make

                       ~/StarterWare/build/armv7a/gcc/am335x/evmAM335x$ make clean+
2. Build/Clean UART example application:
                       ~/StarterWare/build/armv7a/gcc/am335x/evmAM335x/uart$ make

                       ~/StarterWare/build/armv7a/gcc/am335x/evmAM335x/uart$ make clean+
Building The Bootloader
For building bootloader, the boot mode can be specified. If no boot mode is specified, default will be MMCSD. Other boot modes are SPI, NAND and UART.
Building the Bootloader for NAND boot mode:
~/StarterWare/build/armv7a/gcc/am335x/evmAM335x/bootloader$ make BOOT=NAND
Debugging on EVM AM335x using CCSv5
CCSv5 can be used to connect to the target (EVM), load executable binaries and debug.
To connect CCS to the target, one needs to have a target configuration file corresponding to the Emulator and the Device (SoC) that will be used. Launching this file is a prerequisite step to be carried out. This will help to load an executable onto the Target, execute it and debug the code.
Creating the Target Configuration, if it does not already exist.
- Launch CCSv5 IDE.
- To open Target Configuration window, go to 'View -> Target Configurations' in the Menu bar.
- Now to create a new target configuration, right-click on 'User Defined' and select 'New Target Configuration'.
- Assign an appropriate name for the Target Configuration file and save it in the required location.
- Now the Emulator and the Device (SoC) has to be chosen for the Target Configuration file (<TargConfName>.ccxml)
- To select the Emulator, go to 'Basic -> General Setup -> Connection '. If Spectrum Digital's XDS510 USB Emulator will be used, then select 'Spectrum Digital XDS510USB Emulator'. In a nutshell, select the option depending upon the Emulator used.
- To select the Device, go to 'Basic -> General Setup -> Board or Device' and select 'AM335x'. Now click on Save.
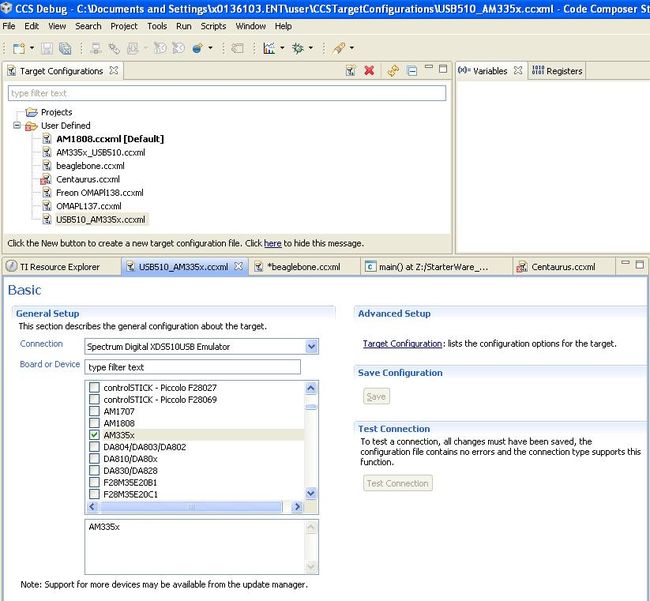
- Now the Initialization Script which is the GEL File has to be specified.
- Go to 'Basic -> Advanced Setup -> Target Configuration'. Here click on 'Spectrum Digital XDS510USB Emulator_0 -> AM335x_0 -> IcePick_D_0 -> DAP -> CS_DAP_DebugSS -> ModenaSS -> CortexA8'.
- Now the path to the GEL file has to be specified. For this click Browse present beside to 'Target Configuration -> Cpu Properties -> Initialization script'. On the window which opens, select the required GEL file and click 'Open'. The GEL file to be used is 'tools/gel/AM335x.gel' of the StarterWare package.
- Now click on 'Save'. The Target Configuration file is now ready to be launched.
Launching the Target Configuration
- In the Target Configuration window, right click on the target configuration file and select 'Launch Selected Configuration'. This will launch the Target Configuration and will succeed provided the Emulator is attached to the host PC.
Connecting to the Target
- Now the Target (a core in a multi-core SoC) has to be connected to CCS so that the executable that will be loaded later executes on this Target. The target in context is 'CortexA8'. In the Debug window ( View -> Debug ), right-click on 'CortexA8' and select 'Connect Target'. The target gets connected. This step succeeds only when the Device is attached to the Emulator and it is powered ON.
- The GEL file specified earlier has some initialization functions which does system level configurations such as clock configuration and pin multiplexing for the target. This is essential in the absence of a bootloader. These initialization functions can be invoked by selecting them in 'Scripts' in the Menu bar. Select the script named 'AM335x_EVM_Initialization' and it gets executed. No other functions need to be executed.
Loading an executable
- An ELF executable can now be loaded. Travel to 'Run -> Load -> Load Program' to load the required executable.
Debugging on BeagleBone board using CCSv5
CCSv5 can also be used to load and run ELF executable (.out) on BeagleBone board. Similar to EVM AM335x, connecting CCS to BeagleBone board also requires that the respective Target Configuration File be present and is launched. The steps are mentioned below.
Creating the Target Configuration, if it does not already exist.
- Launch CCSv5 IDE.
- To open Target Configuration window, go to 'View -> Target Configurations' in the Menu bar.
- Now to create a new target configuration, right-click on 'User Defined' and select 'New Target Configuration'.
- Assign an appropriate name for the Target Configuration file and save it in the required location.
- Now the Emulator and the Device (SoC) has to be chosen for the Target Configuration file (<TargConfName>.ccxml).
- To select the Emulator, go to 'Basic -> General Setup -> Connection '. If XDS100v2 USB Emulator will be used, then select 'Texas Instruments XDS100v2 USB Emulator'. In a nutshell, select the option depending upon the Emulator used.
- To select the Device, go to 'Basic -> General Setup -> Board or Device' and select 'AM335x'. Now click on Save.
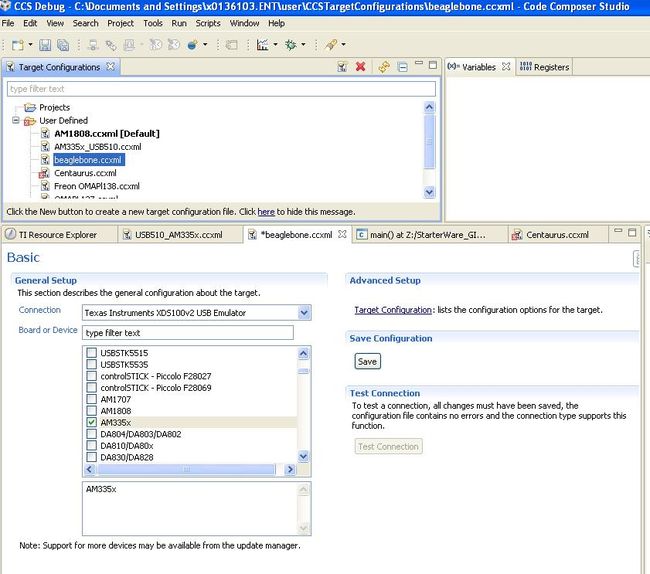
- Now the Initialization Script which is the GEL File has to be specified.
- Go to 'Basic -> Advanced Setup -> Target Configuration'. Here click on 'Texas Instruments XDS100v2 USB Emulator_0 -> AM335x_0 -> IcePick_D_0 -> DAP -> CS_DAP_DebugSS -> ModenaSS -> CortexA8'.
- Now the path to the GEL file has to be specified. For this click Browse present beside to 'Target Configuration -> Cpu Properties -> Initialization script'. On the window which opens, select the required GEL file and click 'Open'. The GEL file to be used is 'tools/gel/AM335x.gel' of the StarterWare package.
- Now click on 'Save'. The Target Configuration file is now ready to be launched.

Launching the Target Configuration
- In the Target Configuration window, right click on the target configuration file and select 'Launch Selected Configuration'. This will launch the Target Configuration and will succeed provided the Emulator is attached to the host PC.
Connecting to the Target
- Now the Target (a core in a multi-core SoC) has to be connected to CCS so that the executable that will be loaded later executes on this Target. The target in context is 'CortexA8'. In the Debug window ( View -> Debug ), right-click on 'CortexA8' and select 'Connect Target'. The target gets connected. This step succeeds only when the Device is attached to the Emulator and it is powered ON.
- The GEL file specified earlier has some initialization functions which does system level configurations such as clock configuration and pin multiplexing for the target. This is essential in the absence of a bootloader. These initialization functions can be invoked by selecting them in 'Scripts' in the Menu bar. Select the script named 'AM335x_EVM_Initialization' and it gets executed. No other functions need to be executed.
Loading an executable
- An ELF executable can now be loaded. Travel to 'Run -> Load -> Load Program' to load the required executable.
IAR Embedded Workbench 6.XX Projects
This section explains, steps to build a StarterWare IAR Embedded Workbench IDE Project. IAR IDE is supported only on windows.
- IAR Embedded Workbench 6.10 support upto StarterWare release version 02.00.00.06 and IAR Embedded Workbench 6.30 to be used for later versions of StarterWare.
- Please go through the Read Me page and copy the required files to the respective locations from File:IAR Files.zip.
- Launch IAR Embedded Workbench
- Go to Project->Add Existing Project
- Select the required StarterWare project
- Once imported the project is listed in the workspace.Select the required profile for build from the drop down (usually Debug or Release)
- Ensure that the project settings like the include paths etc are proper under, Project->Options->Compiler , Project->Options->Linker etc
- Select Project->Rebuild All
- The IDE might ask to save the workspace file. Select a directory and name to save the file (usually the build directory is used for saving the workspace files). Once the project is build succesfully, an executable project can be debugged on the target by downloading the executable as described in the next steps.
- Ensure that for an executable project, Target type is chose appropriately.
- Ensure that the Debugger type and the target initialization script (*.mac) are selected properly
- Ensure that the host and the target are connected via IAR JLINK Debugger.
- Select Project->Download and Debug