OFbiz--HelloWorld
上篇博客《OFbiz--简介》我们介绍了OFbiz是什么,下面我们就开始用OFbiz开发我们的第一个程序--HelloWorld。步骤如下:
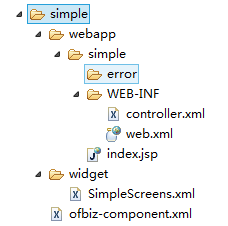
首先在hot-deploy下新建文件夹simple。目录结构如下:
1.ofbiz-component.xml文件配置
此文件为程序的启动配置,配置webapp的名称、位置、权限、信息。
<?xml version="1.0" encoding="UTF-8"?>
<ofbiz-component name="simple" xmlns:xsi="http://www.w3.org/2001/XMLSchema-instance"
       xsi:noNamespaceSchemaLocation="http://ofbiz.apache.org/dtds/ofbiz-component.xsd">

    <resource-loader name="main" type="component"/>

    <webapp name="simple"
         title="Simple"
         server="default-server"
         base-permission="OFBTOOLS"
         location="webapp/simple"
         mount-point="/simple"
         app-bar-display="false"/>

</ofbiz-component>
2.web.xml文件配置
配置默认的实体加载器、分发器、装饰器。可以与springMVC或struts的项目中的web.xml进行比较,会发现有些地方是相同的。做为MVC模式的项目,在配置文件中都需要配置ControlServlet进行请求分法。
<?xml version="1.0" encoding="UTF-8"?>
<!DOCTYPE web-app PUBLIC "-//Sun Microsystems, Inc.//DTD Web Application 2.3//EN" "http://java.sun.com/dtd/web-app_2_3.dtd">

<web-app>
  <!-- 有关实体引擎 -->
	<context-param>
		<param-name>entityDelegatorName</param-name>
		<param-value>default</param-value>
	</context-param>

	<!-- 有关服务引擎 -->
	<context-param>
		<param-name>localDispatcherName</param-name>
		<param-value>school</param-value>
	</context-param>

	<!-- 有关界面装饰器 -->
	<context-param>
		<param-name>mainDecoratorLocation</param-name>
		<param-value>component://simple/widget/SimpleScreens.xml</param-value>
	</context-param>

	<!-- 配置访问过滤器 -->
	<filter>
		<filter-name>ContextFilter</filter-name>
		<display-name>ContextFilter</display-name>
		<filter-class>org.ofbiz.webapp.control.ContextFilter</filter-class>
		<init-param>
			<param-name>disableContextSecurity</param-name>
			<param-value>N</param-value>
		</init-param>
		<init-param>
			<param-name>allowedPaths</param-name>
			<param-value>/error:/control:/select:/index.html:/index.jsp:/default.html:/default.jsp:/images:includes/maincss.css</param-value>
		</init-param>
		<init-param>
			<param-name>errorCode</param-name>
			<param-value>403</param-value>
		</init-param>
		<init-param>
			<param-name>redirectPath</param-name>
			<param-value>/control/main</param-value>
		</init-param>
	</filter>
	<filter-mapping>
		<filter-name>ContextFilter</filter-name>
		<url-pattern>/*</url-pattern>
	</filter-mapping>

	<!-- 配置控制监听器 -->
	<listener>
		<listener-class>org.ofbiz.webapp.control.ControlEventListener</listener-class>
	</listener>

	<!-- 配置登录监听器 -->
	<listener>
		<listener-class>org.ofbiz.webapp.control.LoginEventListener</listener-class>
	</listener>

	<!-- 配置核心控制器 -->
	<servlet>
		<servlet-name>ControlServlet</servlet-name>
		<servlet-class>org.ofbiz.webapp.control.ControlServlet</servlet-class>
		<load-on-startup>1</load-on-startup>
	</servlet>
	<servlet-mapping>
		<servlet-name>ControlServlet</servlet-name>
		<url-pattern>/control/*</url-pattern>
	</servlet-mapping>

	<!-- 配置session过期时间 -->
	<session-config>
		<session-timeout>60</session-timeout>
	</session-config>

	<!-- 配置默认界面 -->
	<welcome-file-list>
		<welcome-file>index.jsp</welcome-file>
		<welcome-file>index.html</welcome-file>
		<welcome-file>index.htm</welcome-file>
	</welcome-file-list>
</web-app>
3.controller.xml
配置request请求及请求的视图。
<?xml version="1.0" encoding="UTF-8"?>
<site-conf xmlns:xsi="http://www.w3.org/2001/XMLSchema-instance"
       xsi:noNamespaceSchemaLocation="http://ofbiz.apache.org/dtds/site-conf.xsd">
       <include location="component://common/webcommon/WEB-INF/common-controller.xml"/>
       <!-- Request Mappings -->
       <request-map uri="main">
           <security https="false" auth="false"/>
           <response name="success" type="view" value="main"/>
       </request-map>
       <!-- View Mappings -->
       <view-map name="main" type="screen" page="component://simple/widget/SimpleScreens.xml#main"/>

</site-conf>
4.SimpleScreens.xml
配置界面信息,一个screen是一个定义的界面。
<?xml version="1.0" encoding="UTF-8"?>
<screens xmlns:xsi="http://www.w3.org/2001/XMLSchema-instance"
     xsi:noNamespaceSchemaLocation="http://ofbiz.apache.org/dtds/widget-screen.xsd">
    <screen name="main">
        <section>
            <widgets>
                <label text="Hello World"/>
            </widgets>
        </section>
    </screen>
</screens>
5.访问
访问地址:http://localhost:8080/simple/control/main
结果如下:
总结
通过如上操作,我们建立了自己的第一个OFbiz程序,这个程序不涉及实体的CRUD、不涉及请求的重定向、不涉及表单拼装界面、不涉及请求服务。下面我们会一点点的完善这个Demo.
大家可以感受到使用OFbiz如此简单,没有一行java代码,全是xml配置文件。大家只要熟悉xml的编写规范即可快速上手。

