Android学习札记28:深入理解Android中的消息处理机制——Thread、Looper、MessageQueue和Handler(2)
前几天,和同事探讨了一下Android中的消息处理机制,探究了消息的发送和接收过程以及与线程之间的关系。虽然我们经常使用这些基础的东西,但对于其内部原理的了解,能使我们更加容易、合理地架构系统,并避免一些低级错误。
对于这部分的内容,将分成4小节来描述:
1、职责与关系
2、消息循环
3、线程与更新
4、几点小结
1、接下来,我们开始这部分的内容,首先了解一下各自的职责及相互之间的关系。
职责
Message:消息,其中包含了消息ID,消息处理对象以及需要处理的数据等,由MessageQueue统一列队,最终由Handler处理。
Handler:处理者,负责Message的发送和处理。使用Handler时,需要实现handleMessage(Message msg)方法来对特定的Message进行处理,例如更新UI等。
MessageQueue:消息队列,用来存放Handler发送过来的消息,并按照FIFO规则执行。当然,存放Message并非实际意义的保存,而是将Message以链表的方式串联起来的,等待Looper的抽取。
Looper:消息泵,不断地从MessageQueue中抽取Message执行。因此,一个MessageQueue需要一个Looper。
Thread:线程,负责调度整个消息循环,即消息循环的执行场所。
关系
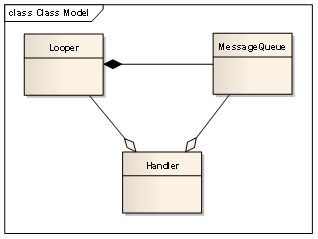
Handler、Looper和MessageQueue就是简单的三角关系。Looper和MessageQueue一一对应,创建一个Looper的同时,会创建一个MessageQueue。而Handler与它们的关系,只是简单的聚集关系,即Handler里会引用当前线程里的特定Looper和MessageQueue。
这样说来,多个Handler都可以共享同一个Looper和MessageQueue了。当然,这些Handler也就运行在同一个线程里。
2、接下来,我们简单地看一下消息的循环过程:
生成
Handler.java
    /**
     * Returns a new {@link android.os.Message Message} from the global message pool. More efficient than
     * creating and allocating new instances. The retrieved message has its handler set to this instance (Message.target == this).
     *  If you don't want that facility, just call Message.obtain() instead.
     */
    public final Message obtainMessage()
    {
        return Message.obtain(this);
    }
Message.java
    /**
     * Same as {@link #obtain()}, but sets the value for the <em>target</em> member on the Message returned.
     * @param h  Handler to assign to the returned Message object's <em>target</em> member.
     * @return A Message object from the global pool.
     */
    public static Message obtain(Handler h) {
        Message m = obtain();
        m.target = h;

        return m;
    }
    /**
     * Return a new Message instance from the global pool. Allows us to
     * avoid allocating new objects in many cases.
     */
    public static Message obtain() {
        synchronized (sPoolSync) {
            if (sPool != null) {
                Message m = sPool;
                sPool = m.next;
                m.next = null;
                sPoolSize--;
                return m;
            }
        }
        return new Message();
    }
发送
Handler.java
    /**
     * Enqueue a message into the message queue after all pending messages
     * before the absolute time (in milliseconds) <var>uptimeMillis</var>.
     * <b>The time-base is {@link android.os.SystemClock#uptimeMillis}.</b>
     * You will receive it in {@link #handleMessage}, in the thread attached
     * to this handler.
     *
     * @param uptimeMillis The absolute time at which the message should be
     *         delivered, using the
     *         {@link android.os.SystemClock#uptimeMillis} time-base.
     *
     * @return Returns true if the message was successfully placed in to the
     *         message queue.  Returns false on failure, usually because the
     *         looper processing the message queue is exiting.  Note that a
     *         result of true does not mean the message will be processed -- if
     *         the looper is quit before the delivery time of the message
     *         occurs then the message will be dropped.
     */
    public boolean sendMessageAtTime(Message msg, long uptimeMillis)
    {
        boolean sent = false;
        MessageQueue queue = mQueue;
        if (queue != null) {
            msg.target = this;
            sent = queue.enqueueMessage(msg, uptimeMillis);
        }
        else {
            RuntimeException e = new RuntimeException(
                this + " sendMessageAtTime() called with no mQueue");
            Log.w("Looper", e.getMessage(), e);
        }
        return sent;
    }
在Handler.java的sendMessageAtTime(Message msg, long uptimeMillis)方法中,我们看到,它找到它所引用的MessageQueue,然后将Message的target设定成自己(目的是为了在处理消息环节,Message能找到正确的Handler),再将这个Message纳入到消息队列中。
抽取
Looper.java
    /**
     * Run the message queue in this thread. Be sure to call
     * {@link #quit()} to end the loop.
     */
    public static void loop() {
        Looper me = myLooper();
        if (me == null) {
            throw new RuntimeException("No Looper; Looper.prepare() wasn't called on this thread.");
        }
        MessageQueue queue = me.mQueue;

        // Make sure the identity of this thread is that of the local process,
        // and keep track of what that identity token actually is.
        Binder.clearCallingIdentity();
        final long ident = Binder.clearCallingIdentity();

        while (true) {
            Message msg = queue.next(); // might block
            if (msg != null) {
                if (msg.target == null) {
                    // No target is a magic identifier for the quit message.
                    return;
                }

                long wallStart = 0;
                long threadStart = 0;

                // This must be in a local variable, in case a UI event sets the logger
                Printer logging = me.mLogging;
                if (logging != null) {
                    logging.println(">>>>> Dispatching to " + msg.target + " " +
                            msg.callback + ": " + msg.what);
                    wallStart = SystemClock.currentTimeMicro();
                    threadStart = SystemClock.currentThreadTimeMicro();
                }

                msg.target.dispatchMessage(msg);

                if (logging != null) {
                    long wallTime = SystemClock.currentTimeMicro() - wallStart;
                    long threadTime = SystemClock.currentThreadTimeMicro() - threadStart;

                    logging.println("<<<<< Finished to " + msg.target + " " + msg.callback);
                    if (logging instanceof Profiler) {
                        ((Profiler) logging).profile(msg, wallStart, wallTime,
                                threadStart, threadTime);
                    }
                }

                // Make sure that during the course of dispatching the
                // identity of the thread wasn't corrupted.
                final long newIdent = Binder.clearCallingIdentity();
                if (ident != newIdent) {
                    Log.wtf(TAG, "Thread identity changed from 0x"
                            + Long.toHexString(ident) + " to 0x"
                            + Long.toHexString(newIdent) + " while dispatching to "
                            + msg.target.getClass().getName() + " "
                            + msg.callback + " what=" + msg.what);
                }

                msg.recycle();
            }
        }
    }
在Looper.java的loop()函数里,我们看到,这里有一个死循环,不断地从MessageQueue中获取下一个(next()方法)Message,然后通过Message中携带的target信息,交由正确的Handler处理(dispatchMessage()方法)。
处理
Handler.java
    /**
     * Handle system messages here.
     */
    public void dispatchMessage(Message msg) {
        if (msg.callback != null) {
            handleCallback(msg);
        } else {
            if (mCallback != null) {
                if (mCallback.handleMessage(msg)) {
                    return;
                }
            }
            handleMessage(msg);
        }
    }
    /**
     * Subclasses must implement this to receive messages.
     */
    public void handleMessage(Message msg) {
    }
在Handler.java的dispatchMessage(Message msg)方法里,其中的一个分支就是调用handleMessage方法来处理这条Message,而这也正是我们在职责处描述使用Handler时需要实现handleMessage(Message msg)的原因。
至于dispatchMessage()方法中的另外一个分支,我将会在后面的内容中说明。
至此,我们看到,一个Message经由Handler的发送,MessageQueue的入队,Looper的抽取,又再一次地回到Handler的怀抱。而绕的这一圈,也正好帮助我们将同步操作变成了异步操作。
3、剩下的部分,我们将讨论一下Handler所处的线程及更新UI的方式。
在主线程(UI线程)里,如果创建Handler时不传入Looper对象,那么将直接使用主线程(UI线程)的Looper对象(系统已经帮我们创建了);在其它线程里,如果创建Handler时不传入Looper对象,那么,这个Handler将不能接收处理消息。在这种情况下,通用的作法是:
class LooperThread extends Thread {
	public Handler mHandler;

	public void run() {
		Looper.prepare();

		mHandler = new Handler() {
			public void handleMessage(Message msg) {
				// process incoming messages here
			}
		};

		Looper.loop();
	}
}
在创建Handler之前,为该线程准备好一个Looper(Looper.prepare()),然后让这个Looper跑起来(Looper.loop()),抽取Message,这样,Handler才能正常工作。
因此,Handler处理消息总是在创建Handler的线程里运行。而我们的消息处理中,不乏更新UI的操作,不正确的线程直接更新UI将引发异常。因此,需要时刻关心Handler在哪个线程里创建的。
如何更新UI才能不出异常呢?SDK告诉我们,有以下4种方式可以从其它线程访问UI线程:
· Activity.runOnUiThread(Runnable)
· View.post(Runnable)
· View.postDelayed(Runnable, long)
· Handler
其中,重点说一下的是View.post(Runnable)方法。在post(Runnable action)方法里,View获得当前线程(即UI线程)的Handler,然后将action对象post到Handler里。在Handler里,它将传递过来的action对象包装成一个Message(Message的callback为action),然后将其投入UI线程的消息循环中。在Handler再次处理该Message时,有一条分支(未解释的那条)就是为它所设,直接调用runnable的run方法。而此时,已经路由到UI线程里,因此,我们可以毫无顾虑的来更新UI。
4、几点小结
Handler的处理过程运行在创建Handler的线程里
· 一个Thread对应一个Looper
· 一个Looper对应一个MessageQueue
· 一个Looper可以对应多个Handler
· 不确定当前线程时,更新UI时尽量调用post()方法
转载自:
http://www.cnblogs.com/xirihanlin/archive/2011/04/11/2012746.html
