mini6410移植全攻略(6)--uboot移植之支持dm9000
本文有muge0913编写,仅供技术交流,转载请注明出处http://blog.csdn.net/muge0913/article/details/7176580
我们获得的UBOOT的代码中实际是有DM9000的网口驱动的,位于:driver/net/dm9000x.c
特别需要注意的是dm9000的驱动与dm9000AE的驱动还是有区别的,如果直接使用代码中自带的dm9000驱动流程,会出现无法收到数据的情况
一、在include/configs/th6410.h中添加如下代码:
/*在这里添加代码,是支持DM9000AE网卡*/
#define CONFIG_DRIVER_DM9000	1
#define CONFIG_DRIVER_DM9000_NO_EEPROM	1
#define CONFIG_DM9000_USE_16BIT 1
#define CONFIG_DM9000_BASE	0x18000300
#define DM9000_IO CONFIG_DM9000_BASE
#define DM9000_DATA (CONFIG_DM9000_BASE+4)
注销:
#define CONFIG_NET_MULTI(这个不注销,否则会编译出错)
//#define CONFIG_CS8900			/* we have a CS8900 on-board	*/
//#define CONFIG_CS8900_BASE	  	0x18800300
//#define CONFIG_CS8900_BUS16		/* follow the Linux driver	*/
去修改如下可能用到的一些地址:
/*添加网络配置信息*/
#define CONFIG_ETHADDR		08:90:90:90:90:90
#define CONFIG_NETMASK          255.255.255.0
#define CONFIG_IPADDR		192.168.1.230
#define CONFIG_SERVERIP		192.168.1.88
#define CONFIG_GATEWAYIP	192.168.1.1
添加ping命令:在include/configs/th6410.h中添加
/***********************************************************
 * Command definition
 ***********************************************************/
/*使支持ping命令*/
#define CONFIG_CMD_PING
二、在board/Samsung/th6410/th6410.c中:
/*dm9000移植部分*/
#define DM9000_Tacs     (0x0)   // 0clk         address set-up
#define DM9000_Tcos     (0x4)   // 4clk         chip selection set-up
#define DM9000_Tacc     (0xE)   // 14clk        access cycle
#define DM9000_Tcoh     (0x1)   // 1clk         chip selection hold
#define DM9000_Tah      (0x4)   // 4clk         address holding time
#define DM9000_Tacp     (0x6)   // 6clk         page mode access cycle
#define DM9000_PMC      (0x0)   // normal(1data)page mode configuration
编写初始化函数:
static void dm9000_pre_init(void)
{
        SROM_BW_REG &= ~(0xf << 4);
        SROM_BW_REG |= (1<<7) | (1<<6) | (1<<4);
        SROM_BC1_REG = ((DM9000_Tacs<<28)+(DM9000_Tcos<<24)+(DM9000_Tacc<<16)+(DM9000_Tcoh<<12)+(DM9000_Tah<<8)+(DM9000_Tacp<<4)+(DM9000_PMC));
}
修改在board_init函数中作如下修改,红色标出:
int board_init(void)
{
	DECLARE_GLOBAL_DATA_PTR;


	/*网卡初始化*/
	//cs8900_pre_init();
	  dm9000_pre_init();
	/* NOR-flash in SROM0 */

	/* Enable WAIT */
	SROM_BW_REG |= 4 | 8 | 1;

	gd->bd->bi_arch_number = MACH_TYPE;//记录机器类型
	gd->bd->bi_boot_params = PHYS_SDRAM_1 + 0x100;//一个是指定向内核传参的地址

	return 0;
}
下载到nand中运行如下图:
从图中可以看出没有发现网卡。
三、uboot在运行到board.c时,会执行
/*其实现在net/eth.c*/
	eth_initialize(gd->bd);
修改net/eth.c文件:
在文件前面添加:
extern int dm9000_initialize(bd_t*);
在下面的函数中添加如下:
int eth_initialize(bd_t *bis)
{
	unsigned char env_enetaddr[6];
	int eth_number = 0;

	eth_devices = NULL;
	eth_current = NULL;

	show_boot_progress (64);
#if defined(CONFIG_MII) || defined(CONFIG_CMD_MII)
	miiphy_init();
#endif
	/* Try board-specific initialization first.  If it fails or isn't
	 * present, try the cpu-specific initialization */
	if (board_eth_init(bis) < 0)
		cpu_eth_init(bis);

#if defined(CONFIG_DB64360) || defined(CONFIG_CPCI750)
	mv6436x_eth_initialize(bis);
#endif
#if defined(CONFIG_DRIVER_DM9000)
       dm9000_initialize(bis);//这是我添加的
#endif
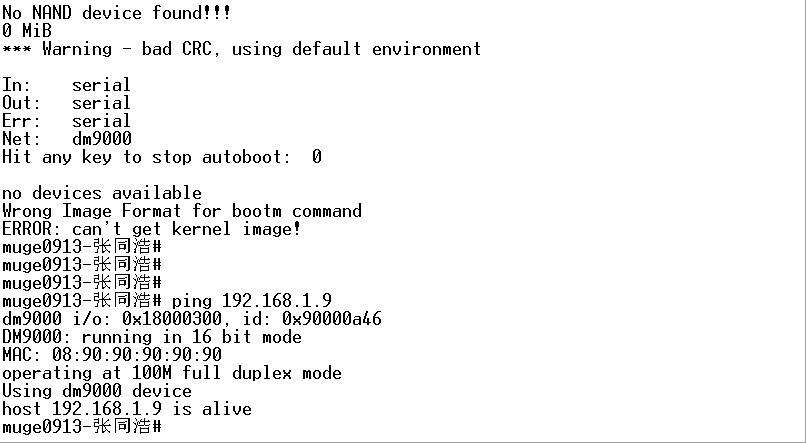
运行结果如下:我的主机ip为192.168.1.9
本文有muge0913编写,仅供技术交流,转载请注明出处http://blog.csdn.net/muge0913/article/details/7176580