简单iphone应用程序-OC+UI
Objective-C语法系列在之前的文章中一直在介绍基本的语法的相关知识,但是学习语法的目的还是为了走进iPhone IOS的开发世界。从今以后Objective-C语法文章将不在更新。全力更新IOS游戏开发 软件开发系列文章,这篇文章MOMO将带各位盆友们简单介绍iPhone开发的一些基本控件的使用,简单的构建我们第一个iPhone应用程序。各位盆友们我们先预热一下,嘿嘿。
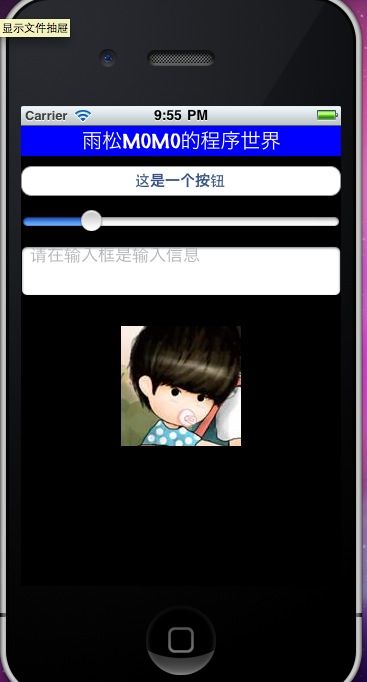
读过我Android系列开发的盆友应该很清楚这个熟悉的界面吧,哇咔咔~~
获取手机屏幕尺寸的方法
- //得到屏幕的宽和高
- CGRect rect=[[UIScreen mainScreen] bounds];
- CGSize size = rect.size;
- int screenWidth = size.width;
- int screenHeight = size.height;
1.文本框视图
在视图中加入一个文本框,可在框内攥写一些内容,设置字体颜色,位置 ,大小等等。
- //创建label视图
- label = [[UILabel alloc] initWithFrame:CGRectMake(0, 0, screenWidth, 30)];
- //设置显示内容
- label.text = @"雨松MOMO的程序世界";
- //设置背景颜色
- label.backgroundColor = [UIColor blueColor];
- //设置文字颜色
- label.textColor = [UIColor whiteColor];
- //设置显示位置居中
- label.textAlignment = UITextAlignmentCenter;
- //设置字体大小
- label.font = [UIFont fontWithName:[[UIFont familyNames] objectAtIndex:10] size:20];
2.按钮视图
按钮类型为1 为普通按钮,CGrectMake设置按钮的位置与大小,前两个参数设置按钮起始X 与 Y坐标,后两个参数设置按钮的宽度与高度。
这里重点说一下addTarget, 它可以设置按钮的绑定事件,action:设置按钮点击后响应方法,这行代码的意思是点击这个按钮后程序执行方法ButtonPressed这个函数中的代码。
- //创建按钮
- button = [UIButton buttonWithType:1];
- //设置按钮范围
- button.frame = CGRectMake(0, 40, screenWidth, 30);
- //设置按钮显示内容
- [button setTitle:@"这是一个按钮" forState:UIControlStateNormal];
- //设置按钮显示颜色
- button.backgroundColor = [UIColor blackColor];
- //设置按钮改变后 绑定响应方法
- [button addTarget:self action:@selector(ButtonPressed) forControlEvents:UIControlEventTouchUpInside];
- - (void)ButtonPressed
- {
- //创建对话框
- UIAlertView * alertA= [[UIAlertView alloc] initWithTitle:@"我的视图" message:@"欢迎一起学习IPHONE开发" delegate:self cancelButtonTitle:@"确定" otherButtonTitles: nil];
- //添加取消按钮
- [alertA addButtonWithTitle:@"取消"];
- //将这个UIAlerView 显示出来
- [alertA show];
- //objective-C 不像java 有自己的垃圾回收机制 所以我们在编写程序中一定要注意释放内存 从一开始就养成良好习惯
- [alertA release];
- }
3.进度条视图
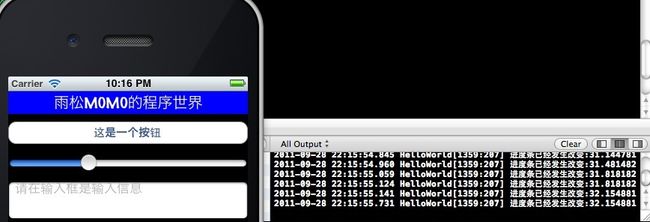
和上面button视图的构建差不多,这里设置进度条最大值与最小值,拖动的时候就可以直接得到这个范围之间的数值,同样将拖动事件绑定在valueChangeTest方法中。
- //创建进度条
- slider=[[UISlider alloc] initWithFrame:CGRectMake(0,80,screenWidth,30)];
- //进度条最大值
- slider.maximumValue=100;
- //进度条最小值
- slider.minimumValue=0;
- //起始点的位置
- slider.value=20;
- //设置背景颜色
- slider.backgroundColor=[UIColor blackColor];
- //设置进度条改变后 绑定响应方法
- [slider addTarget:self action:@selector(valueChangeTest) forControlEvents:UIControlEventValueChanged];
- - (void)valueChangeTest
- {
- float value = [slider value];
- NSLog(@"进度条已经发生改变:%f",value);
- }
4.编辑框视图
非常常见的视图,可以在编辑框中输入信息。前提是用户触摸点击输入框,这时弹出系统软键盘方可输入信息,但是这个输入框不会自动关闭,须要我们在程序中自己调用代码去关闭,稍后介绍如何关闭这个输入框。
- //创建文字输入框
- textfield = [[UITextField alloc] initWithFrame:CGRectMake(0,120,screenWidth,50)];
- //默认显示文字
- textfield.text = @"这是一个输入框";
- //点击后显示文字
- textfield.placeholder = @"请在输入框是输入信息";
- //文字显示位置,这里居左对齐
- textfield.textAlignment = UITextAlignmentLeft;
- //默认显示文字颜色
- textfield.textColor = [UIColor grayColor];
- //设置输入的字体
- textfield.font = [UIFont fontWithName:[[UIFont familyNames] objectAtIndex:0] size:17];
- //设置输入框的类型,3为普通类型
- textfield.borderStyle = 3;
- //点击输入框后清楚原始内容
- textfield.clearsOnBeginEditing = YES;
- //设置输入框背景颜色
- textfield.backgroundColor = [UIColor blackColor];
5.图片视图
设置图片在屏幕中显示的位置,当然这个图片文件必需拷贝到工程当中,拷贝方法可以直接将图片用鼠标拖动到Xcode的工程中。
- //创建图片视图
- imageview = [[UIImageView alloc] initWithFrame:
- CGRectMake(100, 200, 120, 120)];
- //设置图片的显示的资源路径
- [imageview setImage:[UIImage imageNamed:@"temp.jpg"]];
6.透明全屏按钮
它的存在就是为了解决输入法出现后无法自动关闭,就是说如果输入法软键盘出现后 ,这时候点击屏幕任意位置关闭输入法,实现的原理是用户点击到了屏幕中设置的透明按钮,调用关闭输入法方法将输入法关闭了而已 .
- //创建一个隐藏的按钮
- backgroudButton=[[UIButton alloc] init];
- //让这个填充整个屏幕
- backgroudButton.frame = self.view.frame;
- //添加按钮的响应时间,用来关闭软键盘
- [backgroudButton addTarget:self action:@selector(ButtonClick) forControlEvents:UIControlEventTouchUpInside];
- -(void)ButtonClick
- {
- // 触摸屏幕人以地方 关闭软键盘
- [textfield resignFirstResponder];
- }
这样所有的视图的代码都已经贴上,这些视图实际上是subView,须要将这些subView添加到屏幕的主视图当中。并且为了避免内存出现泄漏,一定要及时的释放这些视图。
- //将所有对象添加入视图中
- [self.view addSubview:backgroudButton];
- [self.view addSubview:label];
- [self.view addSubview:imageview];
- [self.view addSubview:button];
- [self.view addSubview:slider];
- [self.view addSubview:textfield];
- //释放所有对象
- [imageview release];
- [label release];
- [slider release];
- [textfield release];
下面给出完整的代码
HelloWorldViewController.h
- #import <UIKit/UIKit.h>
- @interface HelloWorldViewController : UIViewController
- {
- //文本框
- UILabel * label;
- //按钮
- UIButton * button;
- //进度条
- UISlider *slider;
- //输入框
- UITextField * textfield;
- //图片视图
- UIImageView *imageview ;
- //背景按钮
- UIButton * backgroudButton;
- }
- @end
HelloWorldViewController.m
- #import "HelloWorldViewController.h"
- @implementation HelloWorldViewController
- - (void)didReceiveMemoryWarning
- {
- // Releases the view if it doesn't have a superview.
- [super didReceiveMemoryWarning];
- // Release any cached data, images, etc that aren't in use.
- }
- #pragma mark - View lifecycle
- // Implement viewDidLoad to do additional setup after loading the view, typically from a nib.
- - (void)viewDidLoad
- {
- [super viewDidLoad];
- //得到屏幕的宽和高
- CGRect rect=[[UIScreen mainScreen] bounds];
- CGSize size = rect.size;
- int screenWidth = size.width;
- int screenHeight = size.height;
- //创建label视图
- label = [[UILabel alloc] initWithFrame:CGRectMake(0, 0, screenWidth, 30)];
- //设置显示内容
- label.text = @"雨松MOMO的程序世界";
- //设置背景颜色
- label.backgroundColor = [UIColor blueColor];
- //设置文字颜色
- label.textColor = [UIColor whiteColor];
- //设置显示位置居中
- label.textAlignment = UITextAlignmentCenter;
- //设置字体大小
- label.font = [UIFont fontWithName:[[UIFont familyNames] objectAtIndex:10] size:20];
- //创建按钮
- button = [UIButton buttonWithType:1];
- //设置按钮范围
- button.frame = CGRectMake(0, 40, screenWidth, 30);
- //设置按钮显示内容
- [button setTitle:@"这是一个按钮" forState:UIControlStateNormal];
- //设置按钮显示颜色
- button.backgroundColor = [UIColor blackColor];
- //设置按钮改变后 绑定响应方法
- [button addTarget:self action:@selector(ButtonPressed) forControlEvents:UIControlEventTouchUpInside];
- //创建进度条
- slider=[[UISlider alloc] initWithFrame:CGRectMake(0,80,screenWidth,30)];
- //进度条最大值
- slider.maximumValue=100;
- //进度条最小值
- slider.minimumValue=0;
- //起始点的位置
- slider.value=20;
- //设置背景颜色
- slider.backgroundColor=[UIColor blackColor];
- //设置进度条改变后 绑定响应方法
- [slider addTarget:self action:@selector(valueChangeTest) forControlEvents:UIControlEventValueChanged];
- //创建文字输入框
- textfield = [[UITextField alloc] initWithFrame:CGRectMake(0,120,screenWidth,50)];
- //默认显示文字
- textfield.text = @"这是一个输入框";
- //点击后显示文字
- textfield.placeholder = @"请在输入框是输入信息";
- //文字显示位置,这里居左对齐
- textfield.textAlignment = UITextAlignmentLeft;
- //默认显示文字颜色
- textfield.textColor = [UIColor grayColor];
- //设置输入的字体
- textfield.font = [UIFont fontWithName:[[UIFont familyNames] objectAtIndex:0] size:17];
- //设置输入框的类型,3为普通类型
- textfield.borderStyle = 3;
- //点击输入框后清楚原始内容
- textfield.clearsOnBeginEditing = YES;
- //设置输入框背景颜色
- textfield.backgroundColor = [UIColor blackColor];
- //创建图片视图
- imageview = [[UIImageView alloc] initWithFrame:
- CGRectMake(100, 200, 120, 120)];
- //设置图片的显示的资源路径
- [imageview setImage:[UIImage imageNamed:@"temp.jpg"]];
- //创建一个隐藏的按钮
- backgroudButton=[[UIButton alloc] init];
- //让这个填充整个屏幕
- backgroudButton.frame = self.view.frame;
- //添加按钮的响应时间,用来关闭软键盘
- [backgroudButton addTarget:self action:@selector(ButtonClick) forControlEvents:UIControlEventTouchUpInside];
- //设置整个视图的背景颜色
- [self.view setBackgroundColor:[UIColor blackColor]];
- //将所有对象添加入视图中
- [self.view addSubview:backgroudButton];
- [self.view addSubview:label];
- [self.view addSubview:imageview];
- [self.view addSubview:button];
- [self.view addSubview:slider];
- [self.view addSubview:textfield];
- //释放所有对象
- [imageview release];
- [label release];
- [slider release];
- [textfield release];
- }
- - (void)ButtonPressed
- {
- //创建对话框
- UIAlertView * alertA= [[UIAlertView alloc] initWithTitle:@"我的视图" message:@"欢迎一起学习IPHONE开发" delegate:self cancelButtonTitle:@"确定" otherButtonTitles: nil];
- //添加取消按钮
- [alertA addButtonWithTitle:@"取消"];
- //将这个UIAlerView 显示出来
- [alertA show];
- //objective-C 不像java 有自己的垃圾回收机制 所以我们在编写程序中一定要注意释放内存 从一开始就养成良好习惯
- [alertA release];
- }
- - (void)valueChangeTest
- {
- float value = [slider value];
- NSLog(@"进度条已经发生改变:%f",value);
- }
- -(void)ButtonClick
- {
- // 触摸屏幕人以地方 关闭软键盘
- [textfield resignFirstResponder];
- }
- - (void)viewDidUnload
- {
- [super viewDidUnload];
- // Release any retained subviews of the main view.
- // e.g. self.myOutlet = nil;
- }
- - (BOOL)shouldAutorotateToInterfaceOrientation:(UIInterfaceOrientation)interfaceOrientation
- {
- // Return YES for supported orientations
- return (interfaceOrientation == UIInterfaceOrientationPortrait);
- }
- @end


