Create your own mobile Ubuntu repository with APTonCD
How many times have you installed Linux, tweaked it to perfection with various applications, only to have something happen and you have to re-install. Or you get that machine up and running with all the goods and then want to re-create the system on another machine. In either of these situations, the last thing you would want to do is to have to remember all of the applications and then spend the time to download them all again.
Well, there’s a handy tool that will take care of all of that for you. The tool is called APTonCD. What this tool does is create a CD with all of the applications you have installed – basically a portable repository. And, with the same tool, you can restore all of the packages on the CD – all from one convenient GUI.
Features
Choose specific packages on your local machine (or choose all).
Download entire repositories.
Burn CD/DVD from within APTonCD.
Create and restore from same GUI.
Auto-selection of dependencies option.
Easy to use.
Installation
The installation is simple:
- Open up your Add/Remove Software Application.
- Enter “aptoncd” in the search bar (no quotes).
- Mark APTonCD for installation.
- Click Apply.
Once the installation is complete you can close out the installation tool and get ready to use APTonCD.
Starting and using APTonCD
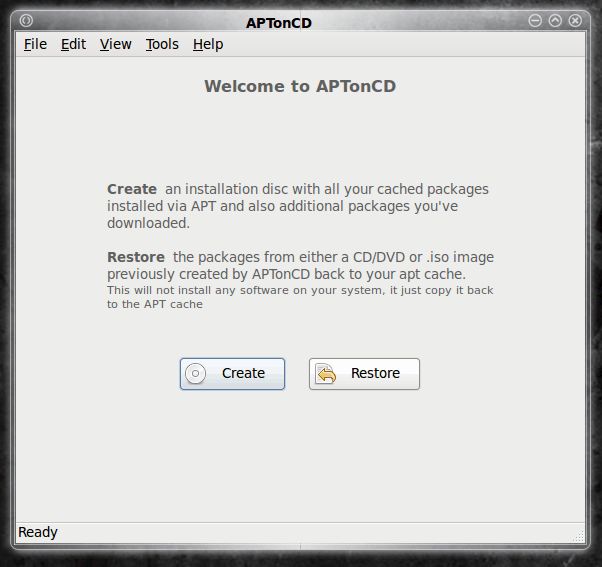
Figure 1
Once installed APTonCD is found in the Administration sub-menu of the System menu (GNOME desktop). Figure 1 shows the main window for the application. From this window you can either create a new CD or restore from an already existing CD.
To create a new CD click the Create button which will open up another window. In this new window (see Figure 2) the packages will be collected and, eventually, listed out for you. From this listing you can select the packages you want to include on your CD. By default all of the packages are selected.This window will also includ the total size of the completed installation. As you can see (in Figure 2) the total size of my restore CD will be 596 MB (some of the packages are not selected).

Figure 2
If you want to add packages not already on your system you can click the Add drop down and select either Packages or Folder and then navigate to those files/folders. You can also open up Nautilus and drag and drop packages into the APTonCD window.
Once you have selected all of your packages you might want to go to the Edit menu and select “Auto-select Dependencies” to ensure all dependencies are met on your CD. Now it’s time to burn. When you’re ready click the Burn button which will open up a Disc Properties window (see Figure 3). In this new window you select your medium, the destination for the image file, a file name, and whether or not you want to create a meta-package. The meta-package is one package that
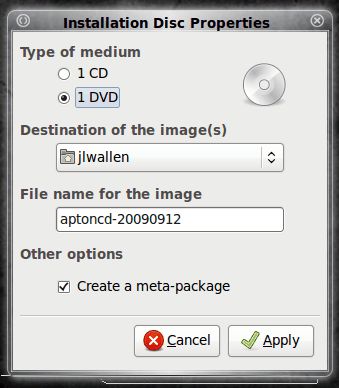
Figure 3
includes all packages on the CD as dependencies. This makes restoration very simple in that all APTonCD has to do is select one package to install.
When you click Apply APTonCD will begin to create the .iso image that you will then burn onto disk using your favorite CD burning software.
When the iso has been created a new window will open asking if you want to burn the CD/DVD. This window will allow you to select that application you want to burn with. If you chose you can click No and burn the CD/DVD later. I have found the burn portion of the APTonCD to be a bit flaky, so I just always burn by open up K3B and burning the image.
Restoring
I would like to say that APTonCD can easily handle the installation of your packages with a simple click of a button. It can not. What APTon CD does is create portable repositories. So you can use the APTonCD restore option to basically add your CD repository for installation. I have found, however, the best way to install the entirety of the packages is with the tried and true command line. This allows you to quickly get all of your packages installed with a couple of easy commands. What you will want to do is this:
- Insert your CD/DVD created by APTonCD.
- Open up a command line.
- Change to the directory where you CD is located with the command cd /media/cdrom (Note: Your CD might be located in a different directory).
- Change into the packages directory with the command cd packages.
- Issue the command sudo dpkg -i *deb which will install all packages on the CD.
- After the installation is complete you MIGHT have to use Syanptic in the event their are broken packages.
Close out the command prompt and check your Applications menu, you should be good to go.
Final thoughts
I hope that the developers of APTonCD will some day make it much easier to restore from the GUI. But even with the inconvenience of having to use the command line for quick restoration, APTonCD is a very handy tool.