GNU Autotools的使用方法
转自 http://blog.csdn.net/scucj/article/details/6079052
手工写Makefile是一件很有趣的事情,对于比较大型的项目,如果有工具可以代劳,自然是一件好事。在Linux系统开发环境中,GNU Autotools 无疑就充当了这个重要角色。(在Windows系统的开发环境中,IDE工具,诸如Visual Studio,来管理项目也很方便。)
本文以一个简单项目为例子,来讲述GNU Autotools的一列工具及其命令的用法。
autotools是系列工具, 它主要由autoconf、automake、perl语言环境和m4等组成;所包含的命令有五个:
(1)aclocal
(2)autoscan
(3)autoconf
(4)autoheader
(5)automake
一、准备源代码
(1)目录project包含一个main.c的文件和两个子目录lib与include;lib目录中包含一个test.c,include目录中包含一个test.h。在系统中,显示如下
- [root@localhost project]# ls
- include lib main.c
- [root@localhost project]#
- [root@localhost project]# ls include/
- test.h
- [root@localhost project]# ls lib/
- test.c
- [root@localhost project]#
(2)源代码如下:
-
- #include <stdio.h>
- #include "include/test.h"
- int main()
- {
- printf("main entrance./n");
- test_method();
- return 0;
- }
-
- #include <stdio.h>
- #include "../include/test.h"
- void test_method()
- {
- printf("test method./n");
- }
二、autotools 使用步骤
2.1 使用autoscan命令,它将扫描工作目录,生成 configure.scan 文件。
- [root@localhost project]# autoscan
- autom4te: configure.ac: no such file or directory
- autoscan: /usr/bin/autom4te failed with exit status: 1
- [root@localhost project]# ls
- autoscan.log configure.scan include lib main.c
- [root@localhost project]#
2.2 将configure.scan 文件重命名为configure.ac,并做适当的修改。在 configure.ac 中,# 号开始的行是注释,其他都是m4 宏命令;configure.ac里面的宏的主要作用是侦测系统。
- [root@localhost project]mv configure.scan configure.ac
- [root@localhost project]# ls
- autoscan.log configure.ac include lib main.c
- [root@localhost project]#
- [root@localhost project]# cat configure.ac
- # -*- Autoconf -*-
- # Process this file with autoconf to produce a configure script.
- AC_PREREQ(2.59)
- AC_INIT(FULL-PACKAGE-NAME, VERSION, BUG-REPORT-ADDRESS)
- AC_CONFIG_SRCDIR([main.c])
- AC_CONFIG_HEADER([config.h])
- # Checks for programs.
- AC_PROG_CC
- # Checks for libraries.
- # Checks for header files.
- # Checks for typedefs, structures, and compiler characteristics.
- # Checks for library functions.
- AC_OUTPUT
- [root@localhost project]#
2.3 对 configure.ac 文件做适当的修改,修改显示如下[1]:
- [root@localhost project]# cat configure.ac
- # -*- Autoconf -*-
- # Process this file with autoconf to produce a configure script.
- AC_PREREQ(2.59)
- #AC_INIT(FULL-PACKAGE-NAME, VERSION, BUG-REPORT-ADDRESS)
- AC_INIT(hello,1.0,[email protected])
- AM_INIT_AUTOMAKE(hello,1.0)
- AC_CONFIG_SRCDIR([main.c])
- AC_CONFIG_HEADER([config.h])
- # Checks for programs.
- AC_PROG_CC
- # Checks for libraries.
- # Checks for header files.
- # Checks for typedefs, structures, and compiler characteristics.
- # Checks for library functions.
- AC_CONFIG_FILES([Makefile])
- AC_OUTPUT
说明:
(1)以“#”号开始的行均为注释行。
(2)AC_PREREQ 宏声明本文要求的 autoconf 版本, 如本例中的版本 2.59。
(3)AC_INIT 宏用来定义软件的名称、版本等信息、作者的E-mail等。
(4)AM_INIT_AUTOMAKE是通过手动添加的, 它是automake所必备的宏, FULL-PACKAGE-NAME是软件名称,VERSION是软件版本号。
(5)AC_CONFIG_SCRDIR 宏用来侦测所指定的源码文件是否存在, 来确定源码目录的有效性.。此处为当前目录下main.c。
(6)AC_CONFIG_HEADER 宏用于生成config.h文件,以便 autoheader 命令使用。
(7)AC_PROG_CC用来指定编译器,如果不指定,默认gcc。
(8)AC_OUTPUT 用来设定 configure 所要产生的文件,如果是makefile,configure 会把它检查出来的结果带入makefile.in文件产生合适的makefile。使用 Automake 时,还需要一些其他的参数,这些额外的宏用aclocal工具产生。
(9)AC_CONFIG_FILES宏用于生成相应的Makefile文件。
2.4 使用 aclocal 命令,扫描 configure.ac 文件生成 aclocal.m4文件, 该文件主要处理本地的宏定义,它根据已经安装的宏、用户定义宏和 acinclude.m4 文件中的宏将 configure.ac 文件需要的宏集中定义到文件 aclocal.m4 中。[2]
- [root@localhost project]# aclocal
- [root@localhost project]# ls
- aclocal.m4 autom4te.cache autoscan.log configure.in include lib main.c
- [root@localhost project]#
2.5 使用 autoconf 命令生成 configure 文件。这个命令将 configure.ac 文件中的宏展开,生成 configure 脚本。这个过程可能要用到aclocal.m4中定义的宏。
- [root@localhost project]# autoconf
- [root@localhost project]# ls
- aclocal.m4 autom4te.cache autoscan.log configure configure.in include lib main.c
2.6 使用 autoheader 命令生成 config.h.in 文件。该命令通常会从 "acconfig.h” 文件中复制用户附加的符号定义。该例子中没有附加的符号定义, 所以不需要创建 "acconfig.h” 文件[2].
- [root@localhost project]# autoheader
- [root@localhost project]# ls
- aclocal.m4 autom4te.cache autoscan.log config.h.in configure configure.in include lib main.c
- [root@localhost project]#
2.7 手工创建Makefile.am文件。Automake工具会根据 configure.in 中的参量把 Makefile.am 转换成 Makefile.in 文件。
- [root@localhost project]# cat Makefile.am
- UTOMAKE_OPTIONS = foreign
- bin_PROGRAMS = hello
- hello_SOURCES = main.c include/test.h lib/test.c
说明:
(1)其中的AUTOMAKE_OPTIONS为设置automake的选项. 由于GNU对自己发布的软件有严格的规范, 比如必须附带许可证声明文件COPYING等,否则automake执行时会报错. automake提供了3中软件等级:foreign, gnu和gnits, 供用户选择。默认级别是gnu. 在本例中, 使用了foreign等级, 它只检测必须的文件。
(2)bin_PROGRAMS定义要产生的执行文件名. 如果要产生多个执行文件, 每个文件名用空格隔开。
(3)hello_SOURCES 定义”hello”这个可执行程序所需的原始文件。如果”hello”这个程序是由多个源文件所产生的, 则必须把它所用到的所有源文件都列出来,并用空格隔开。如果要定义多个可执行程序,那么需要对每个可执行程序建立对应的file_SOURCES。
2.8 使用 Automake 命令生成 Makefile.in 文件。使用选项 "--add-missing" 可以让 Automake 自动添加一些必需的脚本文件。
- [root@localhost project]# automake --add-missing
- configure.ac: installing `./install-sh'
- configure.ac: installing `./missing'
- Makefile.am: installing `./INSTALL'
- Makefile.am: required file `./NEWS' not found
- Makefile.am: required file `./README' not found
- Makefile.am: required file `./AUTHORS' not found
- Makefile.am: required file `./ChangeLog' not found
- Makefile.am: installing `./COPYING'
- Makefile.am: installing `./depcomp'
- [root@localhost project]#
2.8.1 再次使用 automake ——add-missing 运行一次,可以辅助生成几个必要的文件。
- [root@localhost project]# automake --add-missing
- Makefile.am: required file `./NEWS' not found
- Makefile.am: required file `./README' not found
- Makefile.am: required file `./AUTHORS' not found
- Makefile.am: required file `./ChangeLog' not found
- [root@localhost project]# ls
- aclocal.m4 autom4te.cache autoscan.log config.h.in config.h.in~ configure configure.ac COPYING depcomp include INSTALL install-sh lib main.c Makefile.am missing
- [root@localhost project]#
2.8.2 在当前目录创建上面未发现的四个文件,并再次使用 automake ——add-missing 运行一次。
- [root@localhost project]# touch NEWS
- [root@localhost project]# touch README
- [root@localhost project]# touch AUTHORS
- [root@localhost project]# touch ChangeLog
- [root@localhost project]#
- [root@localhost project]# automake --add-missing
- [root@localhost project]# ls
- aclocal.m4 autom4te.cache ChangeLog config.h.in~ config.status configure.ac depcomp INSTALL lib Makefile.am missing README
- AUTHORS autoscan.log config.h.in config.log configure COPYING include install-sh main.c Makefile.in NEWS
- [root@localhost project]#
2.9 使用 configure 命令, 把 Makefile.in 变成最终的 Makefile 文件。
- [root@localhost project]# ./configure
- checking for a BSD-compatible install... /usr/bin/install -c
- checking whether build environment is sane... yes
- checking for gawk... gawk
- checking whether make sets $(MAKE)... yes
- checking for gcc... gcc
- checking for C compiler default output file name... a.out
- checking whether the C compiler works... yes
- checking whether we are cross compiling... no
- checking for suffix of executables...
- checking for suffix of object files... o
- checking whether we are using the GNU C compiler... yes
- checking whether gcc accepts -g... yes
- checking for gcc option to accept ANSI C... none needed
- checking for style of include used by make... GNU
- checking dependency style of gcc... gcc3
- configure: creating ./config.status
- config.status: creating Makefile
- config.status: creating config.h
- config.status: config.h is unchanged
- config.status: executing depfiles commands
- [root@localhost project]# ls
- aclocal.m4 autom4te.cache ChangeLog config.h.in config.log configure COPYING hello INSTALL lib main.o Makefile.am missing README test.o
- AUTHORS autoscan.log config.h config.h.in~ config.status configure.ac depcomp include install-sh main.c Makefile Makefile.in NEWS stamp-h1
- [root@localhost project]#
Makefile文件已经生成成功。
三、Makefile的用法
3.1 make 命令,用来编译代码, 默认执行”make all”命令,可以看到生成了"hello"的可执行文件,
- [root@localhost project]# make
- make all-am
- make[1]: Entering directory `/home/chenjie/project'
- gcc -g -O2 -o hello main.o test.o
- make[1]: Leaving directory `/home/chenjie/project'
- [root@localhost project]#
- [root@localhost project]# ls
- aclocal.m4 autom4te.cache ChangeLog config.h.in config.log configure COPYING hello INSTALL lib main.o Makefile.am missing README test.o
- AUTHORS autoscan.log config.h config.h.in~ config.status configure.ac depcomp include install-sh main.c Makefile Makefile.in NEWS stamp-h1
- [root@localhost project]#
3.2 make clean 命令清除编译时的obj文件,它与 make 命令是对应关系,一个是编译,一个清除编译的文件
3.3 运行”./hello”就能看到运行结果:
- [root@localhost project]# ./hello
- main entrance.
- test method.
- [root@localhost project]#
3.4 make install 命令把目标文件安装到系统中。这一,直接输入hello, 就可以看到程序的运行结果。
- [root@localhost project]# make install
- make[1]: Entering directory `/home/chenjie/project'
- test -z "/usr/local/bin" || mkdir -p -- "/usr/local/bin"
- /usr/bin/install -c 'hello' '/usr/local/bin/hello'
- make[1]: Nothing to be done for `install-data-am'.
- make[1]: Leaving directory `/home/chenjie/project'
- [root@localhost project]#
- [root@localhost project]# hello
- main entrance.
- test method.
- [root@localhost project]#
3.5 make uninstall 命令把目标文件从系统中卸载。
3.6 make dist 命令将程序和相关的文档打包为一个压缩文档以供发布,在本例子中,生成的打包文件名为:hello-1.0.tar.gz。
- [root@localhost project]# make dist
- { test ! -d hello-1.0 || { find hello-1.0 -type d ! -perm -200 -exec chmod u+w {} ';' && rm -fr hello-1.0; }; }
- mkdir hello-1.0
- find hello-1.0 -type d ! -perm -755 -exec chmod a+rwx,go+rx {} /; -o /
- ! -type d ! -perm -444 -links 1 -exec chmod a+r {} /; -o /
- ! -type d ! -perm -400 -exec chmod a+r {} /; -o /
- ! -type d ! -perm -444 -exec /bin/sh /home/chenjie/project/install-sh -c -m a+r {} {} /; /
- || chmod -R a+r hello-1.0
- tardir=hello-1.0 && /bin/sh /home/chenjie/project/missing --run tar chof - "$tardir" | GZIP=--best gzip -c >hello-1.0.tar.gz
- { test ! -d hello-1.0 || { find hello-1.0 -type d ! -perm -200 -exec chmod u+w {} ';' && rm -fr hello-1.0; }; }
- [root@localhost project]# ls
- aclocal.m4 autom4te.cache ChangeLog config.h.in config.log configure COPYING hello include install-sh main.c Makefile Makefile.in NEWS stamp-h1
- AUTHORS autoscan.log config.h config.h.in~ config.status configure.ac depcomp hello-1.0.tar.gz INSTALL lib main.o Makefile.am missing README test.o
- [root@localhost project]#
四 如何使用已发布的压缩文档
4.1 下载到“hello-1.0.tar.gz”压缩文档
4.2 使用“ tar -zxvf hello-1.0.tar.gz ”命令解压
4.3 使用 “./configure” 命令,主要的作用是对即将安装的软件进行配置,检查当前的环境是否满足要安装软件的依赖关系。
4.4 使用“ make ” 命令编译源代码文件生成软件包。
4.5 使用 “ make install ”命令来安装编译后的软件包。
- [root@localhost chenjie]# ls
- hello-1.0.tar.gz
- [root@localhost chenjie]# tar -zxvf hello-1.0.tar.gz
- [root@localhost chenjie]# ls
- hello-1.0 hello-1.0.tar.gz
- [root@localhost chenjie]# cd hello-1.0
- [root@localhost hello-1.0]# ls
- aclocal.m4 AUTHORS ChangeLog config.h.in configure configure.ac COPYING depcomp include INSTALL install-sh lib main.c Makefile.am Makefile.in missing NEWS README
- [root@localhost hello-1.0]#
- [root@localhost hello-1.0]#
- [root@localhost hello-1.0]# ./configure
- checking for a BSD-compatible install... /usr/bin/install -c
- checking whether build environment is sane... yes
- checking for gawk... gawk
- checking whether make sets $(MAKE)... yes
- checking for gcc... gcc
- checking for C compiler default output file name... a.out
- checking whether the C compiler works... yes
- checking whether we are cross compiling... no
- checking for suffix of executables...
- checking for suffix of object files... o
- checking whether we are using the GNU C compiler... yes
- checking whether gcc accepts -g... yes
- checking for gcc option to accept ANSI C... none needed
- checking for style of include used by make... GNU
- checking dependency style of gcc... gcc3
- configure: creating ./config.status
- config.status: creating Makefile
- config.status: creating config.h
- config.status: executing depfiles commands
- [root@localhost hello-1.0]#
- [root@localhost hello-1.0]# make
- make all-am
- make[1]: Entering directory `/home/chenjie/hello-1.0'
- if gcc -DHAVE_CONFIG_H -I. -I. -I. -g -O2 -MT main.o -MD -MP -MF ".deps/main.Tpo" -c -o main.o main.c; /
- then mv -f ".deps/main.Tpo" ".deps/main.Po"; else rm -f ".deps/main.Tpo"; exit 1; fi
- if gcc -DHAVE_CONFIG_H -I. -I. -I. -g -O2 -MT test.o -MD -MP -MF ".deps/test.Tpo" -c -o test.o `test -f 'lib/test.c' || echo './'`lib/test.c; /
- then mv -f ".deps/test.Tpo" ".deps/test.Po"; else rm -f ".deps/test.Tpo"; exit 1; fi
- gcc -g -O2 -o hello main.o test.o
- make[1]: Leaving directory `/home/chenjie/hello-1.0'
- [root@localhost hello-1.0]#
- [root@localhost hello-1.0]# make install
- make[1]: Entering directory `/home/chenjie/hello-1.0'
- test -z "/usr/local/bin" || mkdir -p -- "/usr/local/bin"
- /usr/bin/install -c 'hello' '/usr/local/bin/hello'
- make[1]: Nothing to be done for `install-data-am'.
- make[1]: Leaving directory `/home/chenjie/hello-1.0'
- [root@localhost hello-1.0]#
- [root@localhost hello-1.0]# hello
- main entrance.
- test method.
五、命令使用的整个流程图
图我就不画了,转载两个图[2][3],对比着看,或许更明白一些。


六、总结
本文描述了如果使用GNU Autotools的来管理源代码,发布源代码包,以及获得源代码包后如何编译、安装。由于这个例子过于简单,GNU Autotools的用法还未完全描述清楚,主要体现在以下几点:
(1)在创建 Makefile.am 文件中,描述的很简单。在实际的项目中,文件关系很复杂,而且还有引用其他动态库、第三方动态库等关系。
(2)虽然 makefile 是自动生成的,但是了解它的规则是非常重要的。makefile 涉及到的规则本文并未加以描述。
有空的时候再写一篇blog来描述上述两个问题。
[1] http://book.chinaitlab.com/linux/777286.html
[2] http://blog.ossxp.com/2010/04/954/
=======================================================================================================
GNU Autotools的使用
转自 http://www.ezloo.com/2008/04/gnu_autotools.html
Linux下,工程管理器 Make 可用于自动编译、链接程序的实用工具。我们要做的是写一个makefile 文件,然后用make命令来编译、链接程序。
Makefile的作用就是让编译器知道要编译一个文件需要依赖其他的哪些文件。这里我们就是要用GNU Autotools来收集系统配置信息并自动生成Makefile文件。
GNU Autotools指的就是下面的五个工具:
(1)aclocal
(2)autoscan
(3)autoconf
(4)autoheader
(5)automake
Autotools的使用流程
第一步:手工编写Makefile.am这个文件
第二步:在源代码目录树的最高层运行autoscan。然后手动修改configure.scan文件,并改名为configure.ac/configure.in。
第三步:运行aclocal,它会根据configure.ac的内容生成aclocal.m4文件。
第四步:运行autoconf,它根据configure.ac和aclocal.m4的内容生成configure这个配置脚本文件。
第五步:运行automake --add-missing,它根据Makefile.am的内容生成Makefile.in。
第六步:运行configure,它会根据Makefile.in的内容生成Makefile这个文件。
获得Makefile文件后,我们就可以使用make程序来管理我们的工程了
下面我们来举个例子:
有一个简单的工程,其目录和文件结构如下所述:工程的最高层目录test中有一个hello.c文件和lib、include两个子目录。在lib目录中有一个print.c文件,在include目录中有一个print.h文件。
(1)为该工程编写automake的输入配置脚本Makefile.am。
(2)使用Gnu Autotools工具为该工程创建Makefile文件,并编译该工程。
这里我们总共有三个目录,但只要在 test目录 和 test/lib目录下分别创建Makefile.am文件,test/include不需要创建Makefile.am文件。文件内容如下:
(1)hello.c
include "include/print.h"
int main(void)
{
print("Hello, Aillo\n");
return 0;
}
(2)print.h
void print ( char *s );
(3)print.c
#include "../include/print.h"
#include<stdio.h>
void print(char *string)
{
printf("%s",string);
}
(4)test目录下的Makefile.am的内容:
SUBDIRS = lib
AUTOMAKE_OPTIONS = foreign
bin_PROGRAMS = hello
hello_SOURCES = hello.c
hello_LDADD = ./lib/libprint.a
(5)lib目录下的Makefile.am的内容:
noinst_LIBRARIES = libprint.a
libprint_a_SOURCES = print.c ../include/print.h
开始使用aututools:步骤如下:
(1)输入并执行"autoscan"命令,生成configure.scan文件,修改configure.scan文件的内容如下(图中选中的位置为需要添加或修改的地方),改完之后将文件重命名为configure.ac

(2)输入并执行"aclocal"命令
(3)输入并执行"autoconf"命令
(4)输入并执行"autoheader"命令
(5)输入并执行"automake --add-missing"命令,该步骤如果出现
"Makefile.am:require file ./NEWS" not found"
"Makefile.am:require file "./README not found"
则运行 touch NEWS README * * ( * * 代表你所缺失的文件,个数、名称因个人情况而定)
(6)输入并执行"./configure"命令,即可生成Makefile文件
(7)输入并执行"make -f Makefile "命令,编译文件,生成 hello 文件
(8)" ./hello "执行hello文件,运行结果如下:
=================================================================================================
图解aclocal、autoconf、automake、autoheader、configure
转自 http://www.laruence.com/2008/11/11/606.html
1. autoscan (autoconf): 扫描源代码以搜寻普通的可移植性问题,比如检查编译器,库,头文件等,生成文件configure.scan,它是configure.ac的一个雏形。
2. aclocal (automake):根据已经安装的宏,用户定义宏和acinclude.m4文件中的宏将configure.ac文件所需要的宏集中定义到文件 aclocal.m4中。
aclocal是一个perl 脚本程序,它的定义是:“aclocal - create aclocal.m4 by scanning configure.ac”
user input files optional input process output files
================ ============== ======= ============
acinclude.m4 - - - - -.
V
.-------,
configure.ac ------------------------>|aclocal|
{user macro files} ->| |------> aclocal.m4
`-------'
3. autoheader(autoconf): 根据configure.ac中的某些宏,比如cpp宏定义,运行m4,声称config.h.in
user input files optional input process output files
================ ============== ======= ============
aclocal.m4 - - - - - - - .
|
V
.----------,
configure.ac ----------------------->|autoheader|----> autoconfig.h.in
`----------'
4. automake: automake将Makefile.am中定义的结构建立Makefile.in,然后configure脚本将生成的Makefile.in文件转换为Makefile。
如果在configure.ac中定义了一些特殊的宏,比如AC_PROG_LIBTOOL,它会调用libtoolize,否则它会自己产生config.guess和config.sub
user input files optional input processes output files
================ ============== ========= ============
.--------,
| | - - -> COPYING
| | - - -> INSTALL
| |------> install-sh
| |------> missing
|automake|------> mkinstalldirs
configure.ac ----------------------->| |
Makefile.am ----------------------->| |------> Makefile.in
| |------> stamp-h.in
.---+ | - - -> config.guess
| | | - - -> config.sub
| `------+-'
| | - - - -> config.guess
|libtoolize| - - - -> config.sub
| |--------> ltmain.sh
| |--------> ltconfig
`----------'
5. autoconf:将configure.ac中的宏展开,生成configure脚本。这个过程可能要用到aclocal.m4中定义的宏。
user input files optional input processes output files
================ ============== ========= ============
aclocal.m4 - - - - - -.
V
.--------,
configure.ac ----------------------->|autoconf|------> configure ----->autoconfi
==============================================================================================
例解 autoconf 和 automake 生成 Makefile 文件
转自 http://www.ibm.com/developerworks/cn/linux/l-makefile/
杨 小华, Linux 内核开发工程师, 自由撰稿人
简介: 本文介绍了在 linux 系统中,通过 Gnu autoconf 和 automake 生成 Makefile 的方法。主要探讨了生成 Makefile 的来龙去脉及其机理,接着详细介绍了配置 Configure.in 的方法及其规则。
发布日期: 2006 年 9 月 21 日
级别: 初级
访问情况 : 70338 次浏览
评论: 2 (查看 | 添加评论 - 登录)

平均分 (131个评分)
为本文评分
引子
无论是在Linux还是在Unix环境中,make都是一个非常重要的编译命令。不管是自己进行项目开发还是安装应用软件,我们都经常要用到make或 make install。利用make工具,我们可以将大型的开发项目分解成为多个更易于管理的模块,对于一个包括几百个源文件的应用程序,使用make和 makefile工具就可以轻而易举的理顺各个源文件之间纷繁复杂的相互关系。
但是如果通过查阅make的帮助文档来手工编写Makefile,对任何程序员都是一场挑战。幸而有GNU 提供的Autoconf及Automake这两套工具使得编写makefile不再是一个难题。
本文将介绍如何利用 GNU Autoconf 及 Automake 这两套工具来协助我们自动产生 Makefile文件,并且让开发出来的软件可以像大多数源码包那样,只需"./configure", "make","make install" 就可以把程序安装到系统中。
回页首
模拟需求
假设源文件按如下目录存放,如图1所示,运用autoconf和automake生成makefile文件。
图 1文件目录结构
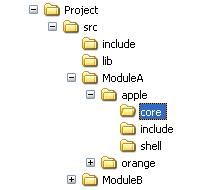
假设src是我们源文件目录,include目录存放其他库的头文件,lib目录存放用到的库文件,然后开始按模块存放,每个模块都有一个对应的目录,模块下再分子模块,如apple、orange。每个子目录下又分core,include,shell三个目录,其中core和shell目录存放.c文件,include的存放.h文件,其他类似。
样例程序功能:基于多线程的数据读写保护(联系作者获取整个autoconf和automake生成的Makefile工程和源码,E-mail:[email protected])。
回页首
工具简介
所必须的软件:autoconf/automake/m4/perl/libtool(其中libtool非必须)。
autoconf是一个用于生成可以自动地配置软件源码包,用以适应多种UNIX类系统的shell脚本工具,其中autoconf需要用到 m4,便于生成脚本。automake是一个从Makefile.am文件自动生成Makefile.in的工具。为了生成Makefile.in,automake还需用到perl,由于automake创建的发布完全遵循GNU标准,所以在创建中不需要perl。libtool是一款方便生成各种程序库的工具。
目前automake支持三种目录层次:flat、shallow和deep。
1) flat指的是所有文件都位于同一个目录中。
就是所有源文件、头文件以及其他库文件都位于当前目录中,且没有子目录。Termutils就是这一类。
2) shallow指的是主要的源代码都储存在顶层目录,其他各个部分则储存在子目录中。
就是主要源文件在当前目录中,而其它一些实现各部分功能的源文件位于各自不同的目录。automake本身就是这一类。
3) deep指的是所有源代码都被储存在子目录中;顶层目录主要包含配置信息。
就是所有源文件及自己写的头文件位于当前目录的一个子目录中,而当前目录里没有任何源文件。 GNU cpio和GNU tar就是这一类。
flat类型是最简单的,deep类型是最复杂的。不难看出,我们的模拟需求正是基于第三类deep型,也就是说我们要做挑战性的事情:)。注:我们的测试程序是基于多线程的简单程序。
回页首
生成 Makefile 的来龙去脉
首先进入 project 目录,在该目录下运行一系列命令,创建和修改几个文件,就可以生成符合该平台的Makefile文件,操作过程如下:
1) 运行autoscan命令
2) 将configure.scan 文件重命名为configure.in,并修改configure.in文件
3) 在project目录下新建Makefile.am文件,并在core和shell目录下也新建makefile.am文件
4) 在project目录下新建NEWS、 README、 ChangeLog 、AUTHORS文件
5) 将/usr/share/automake-1.X/目录下的depcomp和complie文件拷贝到本目录下
6) 运行aclocal命令
7) 运行autoconf命令
8) 运行automake -a命令
9) 运行./confiugre脚本
可以通过图2看出产生Makefile的流程,如图所示:
图 2生成Makefile流程图
回页首
Configure.in的八股文
当我们利用autoscan工具生成confiugre.scan文件时,我们需要将confiugre.scan重命名为confiugre.in文件。confiugre.in调用一系列autoconf宏来测试程序需要的或用到的特性是否存在,以及这些特性的功能。
下面我们就来目睹一下confiugre.scan的庐山真面目:
# Process this file with autoconf to produce a configure script.
AC_PREREQ(2.59)
AC_INIT(FULL-PACKAGE-NAME, VERSION, BUG-REPORT-ADDRESS)
AC_CONFIG_SRCDIR([config.h.in])
AC_CONFIG_HEADER([config.h])
# Checks for programs.
AC_PROG_CC
# Checks for libraries.
# FIXME: Replace `main' with a function in `-lpthread':
AC_CHECK_LIB([pthread], [main])
# Checks for header files.
# Checks for typedefs, structures, and compiler characteristics.
# Checks for library functions.
AC_OUTPUT
|
每个configure.scan文件都是以AC_INIT开头,以AC_OUTPUT结束。我们不难从文件中看出confiugre.in文件的一般布局:
AC_INIT
 测试程序
 测试函数库
 测试头文件
 测试类型定义
 测试结构
 测试编译器特性
 测试库函数
 测试系统调用
AC_OUTPUT
|
上面的调用次序只是建议性质的,但我们还是强烈建议不要随意改变对宏调用的次序。
现在就开始修改该文件:
$mv configure.scan configure.in
$vim configure.in
|
修改后的结果如下:
#                                -*- Autoconf -*-
# Process this file with autoconf to produce a configure script.

AC_PREREQ(2.59)
AC_INIT(test, 1.0, [email protected])
AC_CONFIG_SRCDIR([src/ModuleA/apple/core/test.c])
AM_CONFIG_HEADER(config.h)
AM_INIT_AUTOMAKE(test,1.0)

# Checks for programs.
AC_PROG_CC
# Checks for libraries.
# FIXME: Replace `main' with a function in `-lpthread':
AC_CHECK_LIB([pthread], [pthread_rwlock_init])
AC_PROG_RANLIB
# Checks for header files.
# Checks for typedefs, structures, and compiler characteristics.
# Checks for library functions.
AC_OUTPUT([Makefile
		src/lib/Makefile
		src/ModuleA/apple/core/Makefile
		src/ModuleA/apple/shell/Makefile
		])
|
其中要将AC_CONFIG_HEADER([config.h])修改为:AM_CONFIG_HEADER(config.h), 并加入AM_INIT_AUTOMAKE(test,1.0)。由于我们的测试程序是基于多线程的程序,所以要加入AC_PROG_RANLIB,不然运行automake命令时会出错。在AC_OUTPUT输入要创建的Makefile文件名。
由于我们在程序中使用了读写锁,所以需要对库文件进行检查,即AC_CHECK_LIB([pthread], [main]),该宏的含义如下:
其中,LIBS是link的一个选项,详细请参看后续的Makefile文件。由于我们在程序中使用了读写锁,所以我们测试pthread库中是否存在pthread_rwlock_init函数。
由于我们是基于deep类型来创建makefile文件,所以我们需要在四处创建Makefile文件。即:project目录下,lib目录下,core和shell目录下。
Autoconf提供了很多内置宏来做相关的检测,限于篇幅关系,我们在这里对其他宏不做详细的解释,具体请参看参考文献1和参考文献2,也可参看autoconf信息页。
回页首
实战Makefile.am
Makefile.am是一种比Makefile更高层次的规则。只需指定要生成什么目标,它由什么源文件生成,要安装到什么目录等构成。
表一列出了可执行文件、静态库、头文件和数据文件,四种书写Makefile.am文件个一般格式。
表 1Makefile.am一般格式

对于可执行文件和静态库类型,如果只想编译,不想安装到系统中,可以用noinst_PROGRAMS代替bin_PROGRAMS,noinst_LIBRARIES代替lib_LIBRARIES。
Makefile.am还提供了一些全局变量供所有的目标体使用:
表 2 Makefile.am中可用的全局变量

在Makefile.am中尽量使用相对路径,系统预定义了两个基本路径:
表 3Makefile.am中可用的路径变量

在上文中我们提到过安装路径,automake设置了默认的安装路径:
1) 标准安装路径
默认安装路径为:$(prefix) = /usr/local,可以通过./configure --prefix=<new_path>的方法来覆盖。
其它的预定义目录还包括:bindir = $(prefix)/bin, libdir = $(prefix)/lib, datadir = $(prefix)/share, sysconfdir = $(prefix)/etc等等。
2) 定义一个新的安装路径
比如test, 可定义testdir = $(prefix)/test, 然后test_DATA =test1 test2,则test1,test2会作为数据文件安装到$(prefix)/ /test目录下。
我们首先需要在工程顶层目录下(即project/)创建一个Makefile.am来指明包含的子目录:
SUBDIRS=src/lib src/ModuleA/apple/shell src/ModuleA/apple/core
CURRENTPATH=$(shell /bin/pwd)
INCLUDES=-I$(CURRENTPATH)/src/include -I$(CURRENTPATH)/src/ModuleA/apple/include
export INCLUDES
|
由于每个源文件都会用到相同的头文件,所以我们在最顶层的Makefile.am中包含了编译源文件时所用到的头文件,并导出,见蓝色部分代码。
我们将lib目录下的swap.c文件编译成libswap.a文件,被apple/shell/apple.c文件调用,那么lib目录下的Makefile.am如下所示:
noinst_LIBRARIES=libswap.a
libswap_a_SOURCES=swap.c
INCLUDES=-I$(top_srcdir)/src/includ
|
细心的读者可能就会问:怎么表1中给出的是bin_LIBRARIES,而这里是noinst_LIBRARIES?这是因为如果只想编译,而不想安装到系统中,就用noinst_LIBRARIES代替bin_LIBRARIES,对于可执行文件就用noinst_PROGRAMS代替bin_PROGRAMS。对于安装的情况,库将会安装到$(prefix)/lib目录下,可执行文件将会安装到${prefix}/bin。如果想安装该库,则Makefile.am示例如下:
bin_LIBRARIES=libswap.a
libswap_a_SOURCES=swap.c
INCLUDES=-I$(top_srcdir)/src/include
swapincludedir=$(includedir)/swap
swapinclude_HEADERS=$(top_srcdir)/src/include/swap.h
|
最后两行的意思是将swap.h安装到${prefix}/include /swap目录下。
接下来,对于可执行文件类型的情况,我们将讨论如何写Makefile.am?对于编译apple/core目录下的文件,我们写成的Makefile.am如下所示:
noinst_PROGRAMS=test
test_SOURCES=test.c
test_LDADD=$(top_srcdir)/src/ModuleA/apple/shell/apple.o $(top_srcdir)/src/lib/libswap.a
test_LDFLAGS=-D_GNU_SOURCE
DEFS+=-D_GNU_SOURCE
#LIBS=-lpthread
|
由于我们的test.c文件在链接时,需要apple.o和libswap.a文件,所以我们需要在test_LDADD中包含这两个文件。对于Linux下的信号量/读写锁文件进行编译,需要在编译选项中指明-D_GNU_SOURCE。所以在test_LDFLAGS中指明。而test_LDFLAGS只是链接时的选项,编译时同样需要指明该选项,所以需要DEFS来指明编译选项,由于DEFS已经有初始值,所以这里用+=的形式指明。从这里可以看出,Makefile.am中的语法与Makefile的语法一致,也可以采用条件表达式。如果你的程序还包含其他的库,除了用AC_CHECK_LIB宏来指明外,还可以用LIBS来指明。
如果你只想编译某一个文件,那么Makefile.am如何写呢?这个文件也很简单,写法跟可执行文件的差不多,如下例所示:
noinst_PROGRAMS=apple
apple_SOURCES=apple.c
DEFS+=-D_GNU_SOURCE
|
我们这里只是欺骗automake,假装要生成apple文件,让它为我们生成依赖关系和执行命令。所以当你运行完automake命令后,然后修改apple/shell/下的Makefile.in文件,直接将LINK语句删除,即:
…….
clean-noinstPROGRAMS:
	-test -z "$(noinst_PROGRAMS)" || rm -f $(noinst_PROGRAMS)
apple$(EXEEXT): $(apple_OBJECTS) $(apple_DEPENDENCIES)
	@rm -f apple$(EXEEXT)
#$(LINK) $(apple_LDFLAGS) $(apple_OBJECTS) $(apple_LDADD) $(LIBS)
…….
|
通过上述处理,就可以达到我们的目的。从图1中不难看出为什么要修改Makefile.in的原因,而不是修改其他的文件。
回页首
下载
| 名字 |
大小 |
下载方法 |
| project.rar |
|
HTTP |
关于下载方法的信息
参考资料
- Kurt Wall,张辉译 《GNU/Linux编程指南》 清华大学出版社
- Robert Mecklenburg,《GNU Make项目管理(第三版)》 东南大学出版社 2006
- http://www.cngnu.org/technology/index.html
关于作者