LAMP环境搭建过程
之前使用的是Win7下独立安装的Apache、php和mysql,然后后来使用过WampServer,也在Ubuntu下独立安装过Apache、php和mysql,现在遇到的是需要管理一个服务器,重新安装上述组件,由于时间太久,基本都忘记了方法,感觉什么很多流程性的东西还是需要有个记录才行,否则像环境搭建这种不会一直放在手头的工作很容易就忘记,因为环境搭建好了就一直在进行开发工作,基本不会再涉及到。现记录一下本次安装过程和遇到的问题,以备忘而应不时之需。
本地使用Ubuntu 12.10桌面版,使用ssh命令登录到远程服务器,服务器是open SUSE Linux 64位系统。
一、安装前准备
1、gcc编译器
检查Linux系统是否安装了gcc编译器
#gcc --version
这个本次遇到了很多次,都是在安装linux系统之前没有选择development tools,导致没有安装gcc编译器。如果没有安装,先安装gcc,这个比较麻烦,需要挂载安装镜像文件进行安装,否则如果是下载gcc源码包安装会有很多依赖项要安装。
mkdir -p /media/cdrom

mount -r /dev/cdrom /media/cdrom

cd /media/cdrom/CentOS

rpm -Uvh glibc-devel-2.*

rpm -Uvh gcc-4.*

rpm -Uvh gcc-c++-4.*

rpm -Uvh libaio-devel-0.*

rpm -Uvh libstdc++-devel-4.*
上述安装某个rpm包的时候提示需要安装另一个包时,直接在安装镜像中寻找并安装。
这此安装就是因为系统没有gcc编译器耽误了很长时间,最好还是安装linux系统时就选择好安装gcc,如ubuntu系统安装时预先都安装了gcc编译器。
2、安装包
下载各种安装包文件:
httpd-2.4.9.tar.gz http://httpd.apache.org/download.cgi
mysql-5.0.41.tar.gz http://dev.mysql.com/downloads/
php-5.5.11.tar.gz http://mirrors.sohu.com/php/
phpMyAdmin-3.5.1-all-languages.tar.gz http://www.phpmyadmin.net/home_page/downloads.php
libxml2-2.7.2.tar.gz ftp://xmlsoft.org/libxml2/
libmcrypt-5.5.8.tar.gz http://sourceforge.net/projects/mcrypt/files/Libmcrypt/2.5.8/
gd-2.0.5.tar.gz http://www.libgd.org
zlib-1.2.5.tar.gz http://www.zlib.net
autoconf-2.69.tar.gz http://ftp.gnu.org/gnu/autoconf/
freetype-2.4.9.tar.gz http://download.savannah.gnu.org/releases/freetype/
libpng-1.5.10.tar.gz ftp://ftp.simplesystems.org/pub/libpng/png/src/
jpegsrc.v8b.tar.gz http://www.ijg.org/files/
将上述安装包放到/usr/local/src目录下,并解压:
#tar -zxf package.tar.gz
3、卸载低版本组件
如果安装的时候选择默认全部安装,就已经安装了LAMP环境,但是相对版本较低,而且安装的路径等可能不是我们想要的结果。检查是否安装和卸载如下:
#rpm -qa | grep -i httpd  //检查是否安装apache
#service httpd stop  //停止apache服务
#rpm -e httpd-xxx --nodeps  //卸载apache
对于php、mysql等组件的检查和卸载类似。
二、安装LAMP
搭建LAMP环境时需要按照一定顺序安装,按照Apache->MySQL -> PHP的顺序,其中在安装php之前需要安装php5需要的库文件libxml2、GD2等。GD2库是为了支持GIF/PNG/JPEG图片格式,因此安装GD2之前还要安装zlib、libpng、freetype、jpegsrc等文件。
1、安装libxml2
#cd /libxml2-2.2.7
#./configure --prefix=/usr/local/libxml2
#make && make install
安装完成后会在/usr/local/libxml2文件夹下出现bin、include、lib、man、share这几个文件夹。
2、安装libmcrypt
#cd /libmcrypt-2.5.8
#./configure --prefix=/usr/local/libmcrypt
#make && make install
安装完成后会在/usr/local/libmcrypt文件夹下出现bin、include、lib、man、share这几个文件夹。然后在安装php的时候可以指定配置项“--with-mcrypt-dir=/usr/local/libmcrypt”来指定libmcrypt库的位置。
3、安装zlib
#cd /zlib-1.2.3
#./configure --prefix=/usr/local/zlib
#make && make install
安装完成后会在/usr/local/zlib文件夹下出现include、lib、share这几个文件夹。然后 在安装php的时候可以指定配置项“--with-zlib-dir=/usr/local/zlib” 来指定zlib库文件的位置。
4、安装libpng
#cd /libpng-1.2.31
#./configure --prefix=/usr/local/libpng
此处执行的时候遇到“configure: error : zlib not installed”。解决办法如下:
#cd /zlib-1.2.3
#make clean
#./configure
#make && make install
然后重新回到libpng源目录下,重新configure和安装。
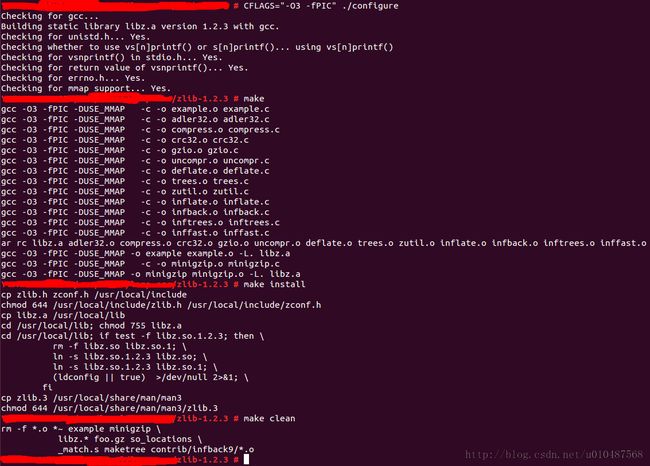
此处安装到make步骤时出错“/usr/local/lib/libz.a: could not read symbols: Bad value”,查询得知这是因为是64位linux系统出现的错误。解决方法如下:
#cd zlib-1.2.3 //进入zlib目录
#CFLAGS="-O3 -fPIC" ./configure   //使用64位元的方法进行编译
#make
#make install
#make clean
如图所示:
安装完成后,会在/usr/local/libpng目录下有 bin、include、lib、share四个文件夹。在安装php的时候可以指定配置项“--with-png=/usr/local/libpng”来指定libpng库文件的位置。
5、安装jpeg9
    #mkdir /usr/local/jpeg9
  #mkdir /usr/local/jpeg9/bin
  #mkdir /usr/local/jpeg9/lib
  #mkdir /usr/local/jpeg9/include
  #mkdir -p /usr/local/jpeg9/man/man1

  #./configure --prefix=/usr/local/jpeg9/ --enable-shared --enable-static
  #make
  #make install
在make阶段出错, make: ./libtool: Command not found ,这也是因为是64位系统的缘故,由于系统的libtool版本太低,需要重新下载,并且按照默认方式安装。解决办法如下:参照http://www.phpiii.com/thread-544-1-1.html
#wget http://ftp.gnu.org/gnu/libtool/libtool-2.4.tar.gz   //下载libtool新版本文件
#tar -zxf libtool-2.4.tar.gz
#cd libtool-2.4
#./configure   //按照默认设置安装
#make && make install

#cd /usr/local/src/jpeg6
#cp /usr/share/libtool/config/config.sub .   //复制新安装的配置文件到jpeg源码目录下,注意是当前目录“.”
#cp /usr/share/libtool/config/config.guess .
#make clean   //清理之前配置安装文件
#./configure --prefix=/usr/local/jpeg6 --enable-shared --enable-static
#make && make install
上述执行完毕之后,就安装完成了 。 在安装php的时候可以指定配置项“--with-jpeg=/usr/local/jpeg6” 来指定jpeg库文件的位置。
6、安装freetype
#cd freetype-2.3.5
#./configure --prefix=/usr/lcoal/freetype
#make && make install
安装成功将会在/usr/local/freetype目录下存在bin,include,lib和share四个目录。并在 安装GD2库时, 通过configure命令选项中加上“--with-freetype=/usr/local/freetype/”选项,指定freetype库文件 位置。
7、安装autoconf
#cd autoconf-2.61
#./configure
#make && make install
直接默认安装即可。
8、安装GD2库
#cd gd-2.0.35
#./configure \
>--prefix=/usr/local/gd \
>--with-zlib=/usr/local/zlib \
>--with-jpeg=/usr/local/jpeg6 \
>--with-png=/usr/local/libpng/ \
>--with-freetype=/usr/local/freetype/   //使用前面安装的zlib、jpeg、png和freetype库文件位置
#make && make install
安装过程中出现错误:
make[2]: *** [gd_png.lo] Error 1
make[2]: Leaving directory `/usr/local/lamp-src/gd-2.0.35'
make[1]: *** [all-recursive] Error 1
make[1]: Leaving directory `/usr/local/lamp-src/gd-2.0.35'
make: *** [all] Error 2
解决方案为:
vi gd_png.c
找到#include "png.h"改成#include "/usr/local/libpng/include/png.h"文件夹下出现 bin 、include、lib文件夹。在安装PHP5时,通过在configure命令选项中加上“--with-gd=/usr/local/gd”选项,指定GD库文件的位置。
9、安装Apache
(1)安装apr、apr-util和pcre
检查是否安装,没有安装则开始安装。
#wget http://mirrors.cnnic.cn/apache//apr/apr-1.5.0.tar.gz
#tar -zxf apr-1.5.0.tar.gz
#cd apr-1.5.0
#./configure --prefix=/usr/local/apr-httpd
#make && make install
注意这里安装的apr目录在安装apr-util时候需要指定。
#wget http://mirrors.cnnic.cn/apache//apr/apr-util-1.5.3.tar.gz
#tar -zxf apr-util-1.5.3.tar.gz
#cd apr-util-1.5.3
#./configure \
> --prefix=/usr/local/apr-util-httpd \
> --with-apr=/usr/local/apr-httpd
#make && make install
#wget ftp://ftp.csx.cam.ac.uk/pub/software/programming/pcre/pcre-8.35.tar.gz
#tar -zxf pcre-8.35.tar.gz
#cd pcre-8.35
#./configure  --prefix=/usr/local/pcre
#make && make install
(2)安装Apache
#cd httpd-2.4.9
#./congifure --prefix=/usr/local/apache2  --enable-mods-shared=all --enable-so  --enable-cache --enable-file-cache  --enable-mem-cache --enable-disk-cache --enable-rewrite=shared --enable-expires=shared --enable-static-support --disable-cgid --disable-cgi  --enable-deflate=shared --sysconfdir=/etc/httpd/ --with-z=/usr/local/zlib/ --with-apr=/usr/local/apr-httpd/ --with-apr-util=/usr/local/apr-util-httpd/ --with-pcre=/usr/local/pcre/
#make && make install
make出错:
/usr/local/zlib//lib/libz.a: could not read symbols: Bad value
collect2: ld returned 1 exit status
make[4]: *** [mod_deflate.la] Error 1
make[4]: Leaving directory `/usr/local/lamp-src/httpd-2.4.9/modules/filters'
make[3]: *** [shared-build-recursive] Error 1
make[3]: Leaving directory `/usr/local/lamp-src/httpd-2.4.9/modules/filters'
make[2]: *** [shared-build-recursive] Error 1
make[2]: Leaving directory `/usr/local/lamp-src/httpd-2.4.9/modules'
make[1]: *** [shared-build-recursive] Error 1
make[1]: Leaving directory `/usr/local/lamp-src/httpd-2.4.9'
make: *** [all-recursive] Error 1
安装成功后可以找到/usr/local/apache2文件夹下出现了apache服务器的安装目录:bin build cgi-bin error htdocs icons include logs man manual modules。
(3)设置开机自启动
首先应该在/etc/httpd/httpd.conf文件中修改配置文件,特别是要指定ServerName localhost:80,其他配置项根据自己需要指定。
然后启动方式为:
#/usr/local/apache2/bin/apachectl startstart换为stop或者restart可以执行关闭和重启服务,“ netstat - tnl|grep 80” 可以查看是否开启apache服务。curl localhost可以查看页面内容。
设置自启动:
#echo "/usr/local/apache2/bin/apachectl start" >> /etc/rc.d/rc.local
(1)添加用户组和用户
#groupadd mysql
#useradd -g mysql mysqluser
(2)编译安装:
#./configure \
>--prefix=/usr/local/mysql \  //将软件安装在/usr/local/mysql目录下
>--enable-thread-safe-client \
>--with-extra-charsets=all
出错:
checking for tgetent in -ltermcap… no
checking for termcap functions library… configure: error: No curses/termcap library found
说明 curses/termcap 库没有安装
解决办法如下http://blog.sina.com.cn/s/blog_6d0b92d90100mm2a.html,去下载一个ncurses-5.6.tar.gz,安装后重新编译mysql安装。
#wget http://ftp.gnu.org/pub/gnu/ncurses/ncurses-5.9.tar.gz
#tar -zxvf ncurses-5.9.tar.gz
#cd ncurses-5.9
#./configure –-prefix=/usr --with-shared --without-debug
#make
#make install
出现如下内容表示已配置完成:
MySQL has a Web site at http://www.mysql.com/ which carries details on the
latest release, upcoming features, and other information to make your
work or play with MySQL more productive. There you can also find
information about mailing lists for MySQL discussion.
Remember to check the platform specific part of the reference manual for
hints about installing MySQL on your platform. Also have a look at the
files in the Docs directory.
Thank you for choosing MySQL!
(3)配置
创建mysql数据库服务器的配置文件,可以使用源码包support-files目录中的my-medium.cnf文件作为模板,将其复制到/etc/目录下,命名为my.cnf文件即可。
#cp support-files/my-medium.cnf /etc/my.cnf
(4)创建授权表
没有安装过MySQL必须创建授权表。
#cd /usr/local/mysql
#bin/mysql_install_db --user=mysqluser  //创建授权表
使用的用户是之前添加的mysql用户。创建授权表之后需要重启服务器。
改变二进制文件权限为root,数据目录的所有权为mysqld程序的mysqluser用户。
#cd /usr/local/mysql
#chown -R root .
#chown -R mysqluser var
#chgrp -R mysql .
授权表定义了初始mysql用户账户和访问权限,所有初始化账户均没有密码。这些账户为超用户账户,可以执行任何操作。初始root账户的密码为空,因此任何人可以用root账户不用任 何密码来连接mysql服务器,并具有所有权限,这意味着mysql安装未受保护。如果想要防止客户端不使用密码用匿名用户来连接,你应当为匿名账户指 定密码或删掉匿名帐户,应当为mysql root账户指定密码。使用mysql -u root启动mysql客户端控制台,连接mysql服务器。
#/usr/local/mysql/bin/mysqld_safe --user=mysql &    启动数据库
#netstat -tnl|grep 3306     //查看3306端口是否开启
#bin/mysqladmin version   //简单的测试
#bin/mysqladmin variables       //查看所有mysql参数
#bin/mysql -u root  //没有密码可以直接登录本机服务器
mysql> DELETE FROM mysql.user WHERE Host='localhost' AND User='';
mysql> FLUSH PRIVILEGES;
mysql> SET PASSWORD FOR 'root'@'localhost' = PASSWORD('123456');
#bin/mysql -u root -h localhost –p  //回车进入MySQL客户端
#bin/mysqladmin -u root –p shutdown  //关闭MySQL数据库
# cd /usr/local/src/mysql-5.0.40
#cp support-files/mysql.server  /etc/init.d/mysqld
#chown root.root /etc/rc.d/init.d/mysqld
#chmod 755 /etc/init.d/mysqld
#chkconfig --add mysqld
#./configure  --prefix=/usr/local/php --with-apxs2=/usr/local/apache2/bin/apxs  --with-zlib-dir=/usr/local/zlib  --with-libxml-dir=/usr/local/libxml2 --with-gd=/usr/local/gd --with-freetype-dir=/usr/local/freetype --with-jpeg-dir=/usr/local/jpeg6 --with-png-dir=/usr/local/libpng --with-mcrypt=/usr/local/libmcrypt --enable-mbstring=all --with-mysql=/usr/local/mysql  --with-mysqli=/usr/local/mysql/bin/mysql_config --with-config-file-path=/etc/php --with-iconv --enable-sockets --enable-soap
#make && make install
如下即为配置成功后的信息。
+--------------------------------------------------------------------+
| License: |
| This software is subject to the PHP License, available in this |
| distribution in the file LICENSE. By continuing this installation |
| process, you are bound by the terms of this license agreement. |
| If you do not agree with the terms of this license, you must abort |
| the installation process at this point. |
+--------------------------------------------------------------------+
Thank you for using PHP.
安装完成后,进行配置,进入/etc/php文件夹,将源码包下面的php.ini-development 文件复制到 /etc/php中,并改名为php.ini即可。
# cp php.ini-development /etc/php/php.ini
编译之前,我们使用configure命令安装配置时,使用--with-apxs2=/usr/local /apache242/bin/apxs选项以使Apache 2将PHP作为功能模块使用。但我们还要修改Apahce配置文件,添加PHP的支持,告 诉Apache将哪些后缀作为PHP解析。
打开Apache的配置文件 /etc/httpd/httpd.conf,找到AddType application/x-gzip .gz .tgz指令选项,并在其下方添加一 条指令AddType application/x-httpd-php .php .phtml。
重启Apache后即可测试。
