android优化之UI优化
android UI的优化
一、了解View的绘制过程
首先我们要了解android的View的绘制的过程:
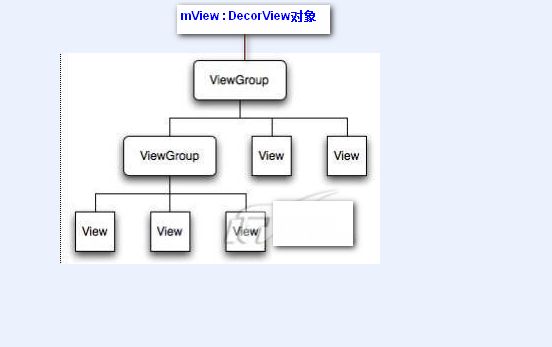
android的view是一个树形的结构,从根view也就是DecorView开始,其下面是ViewGroup以及其他的子View,在view绘制的时候,遍历每一个子节点,同时调用相应的方法。
Android中View绘制流程以及invalidate()等相关方法分析
androidView的绘制过程
当我们对UI的绘制过程有所了解后我们才会找到一些写代码过程中需要优化注意的地方。
二、UI布局文件的优化
1、减少布局的层次;
2、去除不用的布局或者是累赘的的父控件;
3、使用include,merge,ViewStub 标签
4、用RelativeLayout代替LinearLayout
例如:
<FrameLayout xmlns:android="http://schemas.android.com/apk/res/android"
    xmlns:tools="http://schemas.android.com/tools"
    android:id="@+id/container"
    android:layout_width="match_parent"
    android:layout_height="match_parent"
    tools:context="com.example.heraracky.MainActivity"
    tools:ignore="MergeRootFrame" >
    <LinearLayout
        android:layout_width="300dp"
        android:layout_height="300dp"
        android:orientation="vertical"
        android:background="@android:color/darker_gray">
        <ImageView
            android:layout_width="wrap_content"
            android:layout_height="wrap_content"
            android:src="@drawable/ic_launcher"/>
        <TextView
            android:layout_width="200dp"
            android:layout_height="wrap_content"
            android:text="textView"/>
    </LinearLayout>
</FrameLayout>
当我们在布局的时候要尽可能少的减少子ViewGroup以及子View的个数。红色框的Framlayout就是多余的层,这样会白白的消耗资源。
布局修改之后:
<merge xmlns:android="http://schemas.android.com/apk/res/android"
    xmlns:tools="http://schemas.android.com/tools"
    android:id="@+id/container"
    android:layout_width="match_parent"
    android:layout_height="match_parent"
    tools:context="com.example.heraracky.MainActivity"
    tools:ignore="MergeRootFrame" >
    <LinearLayout
        android:layout_width="300dp"
        android:layout_height="300dp"
        android:orientation="vertical"
        android:background="@android:color/darker_gray">
        <ImageView
            android:layout_width="wrap_content"
            android:layout_height="wrap_content"
            android:src="@drawable/ic_launcher"/>
        <TextView
            android:layout_width="200dp"
            android:layout_height="wrap_content"
            android:text="textView"/>
    </LinearLayout>
</merge>
通过使用merge标签我们就减少了一层。在这个场合适合使用merge标签来替代Framlayout,但是如果是LinnearLayout的话就不行了。
有关merge标签的使用的话请看android merge标签的使用
此外我们还可以使用ViewStub标签来减少布局的层,如果你的布局不会变化,而且会根据某些状态来判断显示这个布局还是那个布局。这时候我们就可以用ViewStub标签,ViewStub标签不会被加载,相当于是0,资源零消耗。
ViewStub的用法请看《Android实战技巧:ViewStub的应用》
三、背景的优化
Activity在启动的时候会涉及到
Drawing(绘制的刷新率)
Startup Time (启动Activities的时间)
以上两个性能的优化都将依赖于 Window backGround drawable功能设置。
通过Window backGround标识会对部分人产生一定的误解,其实每次通过setContentView()来显示预先配置的界面时,Android仅仅是将你所创建的Views添加到Activiy的Window中。而且这个Window并不仅仅包含你所创建的Views,还包括Android为Activity预置的元素。通过Emulator运行你的程序,然后通过Hierarchy Viewer查看当前程序UI架构Root节点 DecorView,这个是Android额外添加的最顶层的节点。
实际上Window background drawable是由DecorView决定的。可以在Activity中调用getWindow().setBackgroundDrawable()方法来设置DecorView的background drawable。这里要特别注意这个方法是针对当前版本的Android平台,以后可能会因为版本的更新或不同的硬件设备而改变。(目前我们仅针对 G1,如果在其它环境下测试需要小心验证)
如果目前正在使用android默认的标准Themes,那么在调用getWindow().setBackgroundDrawable()方法之后,这个background drawable将会影响你的activities。
通过一个例子来直观的比较性能提升的效果:
我们在设定theme的时候会paint一个background,而现在的根目录Framlayout也有一个background而且是全屏的覆盖住DecorView的背景,所以background drawable占用了不必要的计算资源造成资源的浪费。
下面我们新建一个Theme
创建res/values/theme.xml, XML的内容:
Xml代码
<resources>
    <style name="Theme.NoBackground" parent="android:Theme">
        <item name="android:windowBackground">@null</item>
    </style>
</resources>
同时也需要修改AndroidMainfest.xml文件,将上边所创建的Theme应用到Activity中,格式为:
Xml代码
<application android:icon="@drawable/icon" android:label="@string/app_name">
    <activity android:name=".EggImageViewer"
     android:label="@string/app_name"
     android:theme="@style/Theme.NoBackground">
        <intent-filter>
            <action android:name="android.intent.action.MAIN" />
            <category android:name="android.intent.category.LAUNCHER" />
        </intent-filter>
    </activity>
</application>
这样
DecorView就不会再加载背景,性能上会有所提高。
我们还可以这样做,效果更佳。就是在Theme中设置背景,在布局文件中去掉背景,这样在Activity加载的时候直接就加载了背景,
创建 res/drawable/background_res.xml
Xml代码
<bitmap xmlns:android="http://schemas.android.com/apk/res/android"
    android:src="@drawable/shelf_panel"
    android:tileMode="repeat" />
创建res/values/theme.xml
Xml代码
<resources>
    <style name="Theme.Shelves" parent="android:Theme">
        <item name="android:windowBackground">@drawable/background_res</item>
        <item name="android:windowNoTitle">true</item>
    </style>
</resources>
这样Activity在加载的时候,加载的时间就会缩短。
四、资源背景图片
NinePatch图片节省内存,一个小的图片就可以满足一个大的背景
五、经常变化的控件要自定义
比如:UI中有时钟的话,时钟每一秒钟都会跟新一次,我们不能用View的invalidate方法和postInvalidate方法更新,这样的话屏幕中所有的UI控件都会从新绘制,这样会造成极大的性能问题。我们要局部更新,只更新显示时间的控件。
所以我们要自定控件来实现。

