标签/TabActivity 深度研究
何谓标签 印象最深刻的应该是这个
现在 我们将通过一系列的扩展来研究之
写道
1. 自定义TabActivity 使得标签处于屏幕下方
2. 各个标签所用布局 既可在 *.xml 中定义 也可在 *.java 中定义
3. 更改标签布局
2. 各个标签所用布局 既可在 *.xml 中定义 也可在 *.java 中定义
3. 更改标签布局
1. 标签页 在 屏幕下方
写道
一个典型的标签Activity 是由2 部分构成的 且其id都有规定 即:
* TabWidget 用于展示标签页 id=tabs
* FrameLayout 用于展示隶属于各个标签的具体布局 id=tabcontent
* TabWidget 用于展示标签页 id=tabs
* FrameLayout 用于展示隶属于各个标签的具体布局 id=tabcontent
* 基本布局如下:
- <?xml version="1.0" encoding="utf-8"?>
- <TabHost xmlns:android="http://schemas.android.com/apk/res/android"
- android:id="@android:id/tabhost"
- android:layout_width="fill_parent"
- android:layout_height="fill_parent" >
- <LinearLayout
- android:orientation="vertical"
- android:gravity="bottom"
- android:layout_width="fill_parent"
- android:layout_height="fill_parent" >
- <FrameLayout
- android:id="@android:id/tabcontent"
- android:layout_width="fill_parent"
- android:layout_height="200dip" >
- <RelativeLayout
- android:id="@+id/view1"
- android:orientation="vertical"
- android:layout_width="fill_parent"
- android:layout_height="fill_parent"
- >
- <TextView
- android:id="@+id/text"
- android:layout_width="wrap_content"
- android:layout_height="wrap_content"
- android:text="Hello to Johnny.Griffin!"
- android:layout_centerInParent="true"
- android:textStyle="bold|italic" />
- <ImageView
- android:layout_width="fill_parent"
- android:layout_height="fill_parent"
- android:src="@drawable/robot"
- android:layout_toLeftOf="@id/text" />
- </RelativeLayout>
- <TextView
- android:id="@+id/view2"
- android:layout_width="fill_parent"
- android:layout_height="fill_parent"
- android:text="创新源于模仿!" />
- <TextView
- android:id="@+id/view3"
- android:layout_width="fill_parent"
- android:layout_height="fill_parent"
- android:text="欢迎进入 droid 世界!" />
- <ImageView
- android:id="@+id/view4"
- android:layout_width="fill_parent"
- android:layout_height="fill_parent"
- android:src="@drawable/robot" />
- </FrameLayout>
- <TabWidget
- android:id="@android:id/tabs"
- android:layout_width="fill_parent"
- android:layout_height="wrap_content" />
- </LinearLayout>
- </TabHost>
<?xml version="1.0" encoding="utf-8"?>
<TabHost xmlns:android="http://schemas.android.com/apk/res/android"
	android:id="@android:id/tabhost"
	android:layout_width="fill_parent"
	android:layout_height="fill_parent" >
<LinearLayout
	android:orientation="vertical"
	android:gravity="bottom"
	android:layout_width="fill_parent"
	android:layout_height="fill_parent" >
<FrameLayout
	android:id="@android:id/tabcontent"
	android:layout_width="fill_parent"
	android:layout_height="200dip" >

	<RelativeLayout
    android:id="@+id/view1"
    android:orientation="vertical"
    android:layout_width="fill_parent"
    android:layout_height="fill_parent"
    >
		<TextView
			android:id="@+id/text"
    		android:layout_width="wrap_content"
    		android:layout_height="wrap_content"
    		android:text="Hello to Johnny.Griffin!"
    		android:layout_centerInParent="true"
    		android:textStyle="bold|italic" />
		<ImageView
    		android:layout_width="fill_parent"
    		android:layout_height="fill_parent"
    		android:src="@drawable/robot"
    		android:layout_toLeftOf="@id/text" />
	</RelativeLayout>

	<TextView
		android:id="@+id/view2"
		android:layout_width="fill_parent"
    	android:layout_height="fill_parent"
    	android:text="创新源于模仿!" />

    <TextView
		android:id="@+id/view3"
		android:layout_width="fill_parent"
    	android:layout_height="fill_parent"
    	android:text="欢迎进入 droid 世界!" />

    <ImageView
		android:id="@+id/view4"
		android:layout_width="fill_parent"
    	android:layout_height="fill_parent"
    	android:src="@drawable/robot" />
</FrameLayout>
<TabWidget
	android:id="@android:id/tabs"
	android:layout_width="fill_parent"
	android:layout_height="wrap_content" />
</LinearLayout>
</TabHost>
* 得到TabHost tHost 仅在TabActivity中有效
- tHost = this.getTabHost();
tHost = this.getTabHost();
* 创建4个标签 并指定所使用的布局
- public static final String Tab1 = "Tab1";
- public static final String Tab2 = "Tab2";
- public static final String Tab3 = "Tab3";
- public static final String Tab4 = "Tab4";
- public static final String Tab5 = "Tab5";
- tHost.addTab(tHost.newTabSpec(Tab1).setIndicator("Tab 1", getResources().getDrawable(R.drawable.icon)).setContent(R.id.view1));
- tHost.addTab(tHost.newTabSpec(Tab2).setIndicator("Tab 2", getResources().getDrawable(R.drawable.beijing_small)).setContent(R.id.view2));
- tHost.addTab(tHost.newTabSpec(Tab3).setIndicator("Tab 3").setContent(R.id.view3));
- tHost.addTab(tHost.newTabSpec(Tab4).setIndicator("Tab 4").setContent(R.id.view4));
public static final String Tab1 = "Tab1";
public static final String Tab2 = "Tab2";
public static final String Tab3 = "Tab3";
public static final String Tab4 = "Tab4";
public static final String Tab5 = "Tab5";

tHost.addTab(tHost.newTabSpec(Tab1).setIndicator("Tab 1", getResources().getDrawable(R.drawable.icon)).setContent(R.id.view1));
        tHost.addTab(tHost.newTabSpec(Tab2).setIndicator("Tab 2", getResources().getDrawable(R.drawable.beijing_small)).setContent(R.id.view2));
        tHost.addTab(tHost.newTabSpec(Tab3).setIndicator("Tab 3").setContent(R.id.view3));
        tHost.addTab(tHost.newTabSpec(Tab4).setIndicator("Tab 4").setContent(R.id.view4));
* 设定监听器 用于监听 标签间切换事件
- tHost.setOnTabChangedListener(new OnTabChangeListener(){
- @Override
- public void onTabChanged(String tabId) {
- // TODO Auto-generated method stub
- }
- });
tHost.setOnTabChangedListener(new OnTabChangeListener(){
			@Override
			public void onTabChanged(String tabId) {
				// TODO Auto-generated method stub
			}

        });
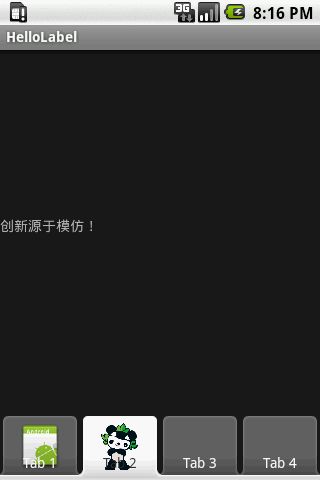
* emulator 运行情况:
2. 在 *.java 中定义标签所需布局
- public class CustomLayout implements TabHost.TabContentFactory {
- Activity activity;
- LayoutInflater inflaterHelper;
- LinearLayout layout;
- public CustomLayout (Activity a) {
- activity = a;
- inflaterHelper = a.getLayoutInflater();
- }
- /** {@inheritDoc} *///tag 标记各个标签
- public View createTabContent(String tag) {
- return addCustomView(tag);
- }
- public View addCustomView(String id){
- layout = new LinearLayout(activity);
- layout.setOrientation(LinearLayout.VERTICAL);
- if(id.equals(Tab1)){
- ImageView iv = new ImageView(activity);
- iv.setImageResource(R.drawable.beijing_big);
- layout.addView(iv,
- new LinearLayout.LayoutParams(LinearLayout.LayoutParams.FILL_PARENT, LinearLayout.LayoutParams.FILL_PARENT));
- }
- else if(id.equals(Tab2)){
- EditText edit = new EditText(activity);
- layout.addView(edit,
- new LinearLayout.LayoutParams(LinearLayout.LayoutParams.FILL_PARENT, LinearLayout.LayoutParams.FILL_PARENT));
- Button btn = new Button(activity);
- btn.setText("OK");
- btn.setWidth(100);
- layout.addView(btn,
- new LinearLayout.LayoutParams(LinearLayout.LayoutParams.FILL_PARENT, LinearLayout.LayoutParams.FILL_PARENT));
- RadioGroup rGroup = new RadioGroup(activity);
- rGroup.setOrientation(LinearLayout.HORIZONTAL);
- RadioButton radio1 = new RadioButton(activity);
- radio1.setText("Radio A");
- rGroup.addView(radio1);
- RadioButton radio2 = new RadioButton(activity);
- radio2.setText("Radio B");
- rGroup.addView(radio2);
- layout.addView(rGroup,
- new LinearLayout.LayoutParams(LinearLayout.LayoutParams.WRAP_CONTENT, LinearLayout.LayoutParams.WRAP_CONTENT));
- }
- else if(id.equals(Tab3)){
- LinearLayout.LayoutParams param3 =
- new LinearLayout.LayoutParams(LinearLayout.LayoutParams.FILL_PARENT, LinearLayout.LayoutParams.FILL_PARENT);
- layout.addView(inflaterHelper.inflate(R.layout.hello, null),param3);
- }
- else if(id.equals(Tab4)){
- TextView tv = new TextView(activity);
- tv.setText("HelloTags!");
- tv.setGravity(Gravity.CENTER);
- layout.addView(tv);
- }
- return layout;
- }
- }
public class CustomLayout implements TabHost.TabContentFactory  {
    	Activity activity;
    	LayoutInflater inflaterHelper;

    	LinearLayout layout;

    	public CustomLayout (Activity a) {
    		activity = a;

    		inflaterHelper = a.getLayoutInflater();
    	}

    	/** {@inheritDoc} *///tag 标记各个标签
        public View createTabContent(String tag) {
        		return addCustomView(tag);
        }

        public View addCustomView(String id){

        	layout = new LinearLayout(activity);
            layout.setOrientation(LinearLayout.VERTICAL);


            if(id.equals(Tab1)){
                ImageView iv = new ImageView(activity);
                iv.setImageResource(R.drawable.beijing_big);
                layout.addView(iv,
                		new LinearLayout.LayoutParams(LinearLayout.LayoutParams.FILL_PARENT, LinearLayout.LayoutParams.FILL_PARENT));
            }
            else if(id.equals(Tab2)){
                EditText edit = new EditText(activity);
                layout.addView(edit,
                		new LinearLayout.LayoutParams(LinearLayout.LayoutParams.FILL_PARENT, LinearLayout.LayoutParams.FILL_PARENT));

                Button btn = new Button(activity);
                btn.setText("OK");
                btn.setWidth(100);
                layout.addView(btn,
                		new LinearLayout.LayoutParams(LinearLayout.LayoutParams.FILL_PARENT, LinearLayout.LayoutParams.FILL_PARENT));

                RadioGroup rGroup = new RadioGroup(activity);
                rGroup.setOrientation(LinearLayout.HORIZONTAL);
                RadioButton radio1 = new RadioButton(activity);
                radio1.setText("Radio A");
                rGroup.addView(radio1);
                RadioButton radio2 = new RadioButton(activity);
                radio2.setText("Radio B");
                rGroup.addView(radio2);

                layout.addView(rGroup,
                		new LinearLayout.LayoutParams(LinearLayout.LayoutParams.WRAP_CONTENT, LinearLayout.LayoutParams.WRAP_CONTENT));
            }
            else if(id.equals(Tab3)){

            	LinearLayout.LayoutParams param3 =
                    new LinearLayout.LayoutParams(LinearLayout.LayoutParams.FILL_PARENT, LinearLayout.LayoutParams.FILL_PARENT);

                layout.addView(inflaterHelper.inflate(R.layout.hello, null),param3);
            }
            else if(id.equals(Tab4)){
            	TextView tv = new TextView(activity);
            	tv.setText("HelloTags!");
            	tv.setGravity(Gravity.CENTER);
            	layout.addView(tv);
            }

            return layout;
        }

    }
* 如何使用:
- CustomLayout ct = new CustomLayout(this);
- tHost.addTab(tHost.newTabSpec(Tab4).setIndicator("Tab 4").setContent(ct));
CustomLayout ct = new CustomLayout(this);

tHost.addTab(tHost.newTabSpec(Tab4).setIndicator("Tab 4").setContent(ct));
* emulator 运行结果:
3. 改变标签布局
写道
可能很多人对TabActivity 不满意 原因之一:其很不美观 而不美观的根源就是:标签的问题 其图像和文字相互覆盖 导致的
那么 我们可以自己扩展么? 当然
那么 我们可以自己扩展么? 当然
写道
TabWidget 理解:
1. TabWidget 为 horizontal 的 LinearLayout
2. 且 其包含的标签又是一个RelativeLayout
3. 每个标签RelativeLayout 里面包含2个View: TextView ImageView
1. TabWidget 为 horizontal 的 LinearLayout
2. 且 其包含的标签又是一个RelativeLayout
3. 每个标签RelativeLayout 里面包含2个View: TextView ImageView
因此 我们甚至可以推算出其布局为:
- <?xml version="1.0" encoding="utf-8"?>
- <LinearLayout xmlns:android="http://schemas.android.com/apk/res/android"
- android:orientation="horizontal"
- android:layout_width="fill_parent"
- android:layout_height="fill_parent"
- >
- <RelativeLayout
- android:orientation="vertical"
- android:layout_width="fill_parent"
- android:layout_height="wrap_content">
- <ImageView />
- <TextView />
- </RelativeLayout>
- <RelativeLayout
- android:orientation="vertical"
- android:layout_width="fill_parent"
- android:layout_height="wrap_content">
- <ImageView />
- <TextView />
- </RelativeLayout>
- <RelativeLayout
- android:orientation="vertical"
- android:layout_width="fill_parent"
- android:layout_height="wrap_content">
- <ImageView />
- <TextView />
- </RelativeLayout>
- <RelativeLayout
- android:orientation="vertical"
- android:layout_width="fill_parent"
- android:layout_height="wrap_content">
- <ImageView />
- <TextView />
- </RelativeLayout>
- </LinearLayout>
<?xml version="1.0" encoding="utf-8"?>
<LinearLayout xmlns:android="http://schemas.android.com/apk/res/android"
    android:orientation="horizontal"
    android:layout_width="fill_parent"
    android:layout_height="fill_parent"
    >
<RelativeLayout
	android:orientation="vertical"
    android:layout_width="fill_parent"
    android:layout_height="wrap_content">
	<ImageView  />
    <TextView  />
</RelativeLayout>
<RelativeLayout
	android:orientation="vertical"
    android:layout_width="fill_parent"
    android:layout_height="wrap_content">
	<ImageView  />
    <TextView  />
</RelativeLayout>
<RelativeLayout
	android:orientation="vertical"
    android:layout_width="fill_parent"
    android:layout_height="wrap_content">
	<ImageView  />
    <TextView  />
</RelativeLayout>
<RelativeLayout
	android:orientation="vertical"
    android:layout_width="fill_parent"
    android:layout_height="wrap_content">
	<ImageView  />
    <TextView  />
</RelativeLayout>
</LinearLayout>
* 去掉系统默认的布局 即 在 setIndicator() 中置空 修改如下:
- tHost.addTab(tHost.newTabSpec(Tab1).setIndicator("").setContent(ct));
tHost.addTab(tHost.newTabSpec(Tab1).setIndicator("").setContent(ct));
写道
可能有人会说:那我不调用setIndicator() 不久可以了么 不行 否则 会报错
* 自己定义布局 并 指定显示的内容
- public View composeLayout(String s, int i){
- LinearLayout layout = new LinearLayout(this);
- layout.setOrientation(LinearLayout.VERTICAL);
- TextView tv = new TextView(this);
- tv.setGravity(Gravity.CENTER);
- tv.setSingleLine(true);
- tv.setText(s);
- layout.addView(tv,
- new LinearLayout.LayoutParams(LinearLayout.LayoutParams.FILL_PARENT, LinearLayout.LayoutParams.WRAP_CONTENT));
- ImageView iv = new ImageView(this);
- iv.setImageResource(i);
- layout.addView(iv,
- new LinearLayout.LayoutParams(LinearLayout.LayoutParams.FILL_PARENT, LinearLayout.LayoutParams.WRAP_CONTENT));
- return layout;
- }
public View composeLayout(String s, int i){
    	LinearLayout layout = new LinearLayout(this);
        layout.setOrientation(LinearLayout.VERTICAL);

        TextView tv = new TextView(this);
        tv.setGravity(Gravity.CENTER);
        tv.setSingleLine(true);
        tv.setText(s);
        layout.addView(tv,
        		new LinearLayout.LayoutParams(LinearLayout.LayoutParams.FILL_PARENT, LinearLayout.LayoutParams.WRAP_CONTENT));

        ImageView iv = new ImageView(this);
        iv.setImageResource(i);
        layout.addView(iv,
        		new LinearLayout.LayoutParams(LinearLayout.LayoutParams.FILL_PARENT, LinearLayout.LayoutParams.WRAP_CONTENT));
        return layout;
    }
* 得到 TabWidget 实例 tw
- LinearLayout ll=(LinearLayout)tHost.getChildAt(0);
- tw =(TabWidget)ll.getChildAt(1);
LinearLayout ll=(LinearLayout)tHost.getChildAt(0);
        tw =(TabWidget)ll.getChildAt(1);
* 得到 TabWidget 内的具体某个Layout 并使用上面的布局 composeLayout()
- public void updateWidgetView(int i,String text,int image){
- RelativeLayout rl =(RelativeLayout)tw.getChildAt(i);
- rl.addView(composeLayout(text,image));
- }
public void updateWidgetView(int i,String text,int image){
    	RelativeLayout rl =(RelativeLayout)tw.getChildAt(i);

    	rl.addView(composeLayout(text,image));
    }
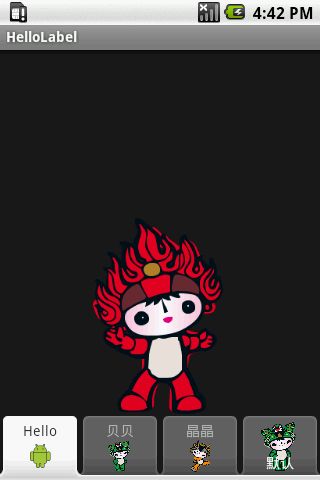
* emulator 运行截图 // 前面 3个是使用新布局 最后一个是使用TabActivity 默认的布局 哪个好看 大家自己选择之
that's all!


