用Python和OpenCV创建一个图片搜索引擎的完整指南
在我的博文里曾经有一篇文章简单的介绍了CBIR(Content-Based Image Retrieval),详细内容猛戳基于内容的图像检索技(CBIR)术相术介绍。CBIR由于其应用的广泛性,特别是近年来,随着数码设备的迅猛普及,网络上的图片每天以几十亿级的速度猛增,而且对于一些摄影爱好者和自拍族来说,电脑和存储设备里更是有数不清的图片,如何从这么多图片中找到自己所需的图片是困惑很多人的难题。而CBIR正是这问题的一种一种很好的解决方式。
什么是CBIR呢?简单的说,就是你提供一张图片,然后从图片库找为你找到与你相似的图片,看看百度识图:http://stu.baidu.com/,输入一张图片:
从本地上传一张图片,立马就可以返回与上传图片类似的网络图片。本文将介绍用Python和OpenCV创建一个简单的图片搜索引擎。
CBIR系统的构建主要包括:
1)定义图像描述符(图像特征提取)
这一阶段,需要决定描述图像的哪一方面。图像的可描述特征很多、包括颜色、形状、纹理、能量等,而颜色有分为很多种,如颜色直方图、颜色矩等。在这一阶段,我们选定要提取的颜色特征,根据应用的不同,选取的颜色特征可以是一种或多种。
2)索引化数据集(存储)
现在有了图像描述符,接着就是将这个图像描述符应用得到数据集中的每幅图像,提取这些图像的特征,将其存储起来(如CSV文件、RDBMS、Redis数据库中),这样后续步骤就能使用以便比较。
3)定义相似矩阵
很好,现在有了许多特征向量。但如何比较这些特征向量呢?比较常用的流行的相似性度量方式有:欧几里德距离、余弦距离、或卡方距离、巴氏距离、闵式距离、相关性等。但实际中取决于两点:①、数据集;②、提取的特征类型。
4)检索
上面步骤都完成了,剩下的就是根据输入的图片,从图像库中检索相似的图像并返回了。用户会向系统提交一幅需要搜索的图片(例如从上传窗口或通过移动App提交),而你的任务是:1、提取这幅图像的特征;2、使用相似度函数将这幅图像的特征与已经索引化的特征进行比较。这样,只需根据相似度函数的结果,返回相关的图像就可以了。
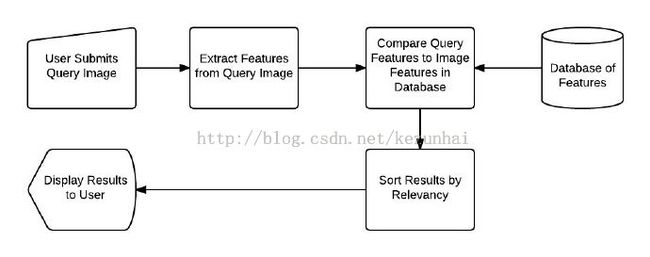
很简单吧,其实和我们常用的百度搜索、google搜索是一样的,只不过,传统的搜索的输入都是文本关键字,而CBIR的输入是一副图像罢了。上面的步骤,通过下图就很清晰了:
步骤1和2(定义图像描述符和存储):

步骤3和4(定义相似性和检索):
接着,开始实施CBIR系统。
1、定义图像描述符(特征提取)
颜色直方图是一种比较常用而且有效的描述图像特征的描述子,因此本文采用颜色直方图来表示图像特征;而HSV颜色空间是更符合人类视觉感知的颜色空间,因此我们在HSV颜色空间计算颜色直方图。为了减少计算量,我们进一步对颜色空间进行量化,用8个bin量化H色相通道、12个bin量化S饱和度通道和3个bin量化V明度通道,总共的特征向量有8 × 12 × 3=288。这也意味着对于数据集中的每幅图像,无论其像素数目是36 × 36,还是2000 × 1800。最终都会用288个浮点数构成的列表抽象并量化表示。
为了提供检索的精度,这里我们采用局部颜色直方图,将图像划分为5个部分,分别表示为:1、左上角;2、右上角;3、右下角;4、左下角;以及图像的中央,然后计算各个区域颜色直方图特征,图示如下:
颜色描述符的实现如下colordescriptor.py:
"CBIR(Content-Base Image Retrieval)"
import numpy as np
import cv2

class ColorDescriptor:
    def __init__(self, bins):
        # store the number of bins for the HSV histogram
        self.bins = bins

    def describe(self, image):
        # convert the image into HSV color space
        image = cv2.cvtColor(image, cv2.COLOR_BGR2HSV)
        features =[]
        # grab the dimensions and compute the center of the image
        (h,w) = image.shape[:2]
        (cx,cy) = (int(w*0.5), int(h*0.5))

        # segment the image
        segments =[(0,cx,0,cy),(cx,w,0,cy),(cx,w,cy,h),(0,cx,cy,h)]

        # construct an elliptical mask representing the center of the image
        (axesX, axesY) =(int(w*0.75)/2, int(h*0.75)/2)
        ellipMask = np.zeros(image.shape[:2],dtype="unit8")
        cv2.ellipse(ellipMask,(cx,cy),(axesX,axesY),0,0,360,255,-1)

        # loop over the segments
        for(startX,endX, startY, endY) in segments:
            cornerMask = np.zeros(image.shpae[:2],dtype="unit8")
            cv2.rectangle(cornerMask,(startX,startY),(endX,endY),255,-1)
            cornerMask = cv2.subtract(cornerMask, ellipMask)

            # compute the histogram
            hist = self.histogram(image, cornerMask)
            features.extend(hist)

        # compute the ellipse histogram
        hist = self.histogram(image, ellipMask)
        features.extend(hist)

        # return the feature vectr
        return features

    # define the function of histogram
    def histogram(self, image, mask):
        # extract the color histogram from the masked region
        hist = cv2.calcHist([image],[0,1,2],mask, self.bins,[0,180,0,256,0,256])
        hist = cv2.normalize(hist).flatten()
        return hist
2、特征索引化
定义好了图像描述符,就进入第二步,对数据集中的每幅图像提取特征(如颜色直方图)。提取特征并将其持久保存起来的过程一般称为“索引化”,实现代码如下:
"CBIR(Content-Base Image Retrieval)--Extract Features and Indexing"
import ColorDescriptor
import argparse
import glob
import cv2

ap = argparse.ArgumentParser()
ap.add_argument("-d", "--dataset", required=True, help="Path to the directory that cntains the images to be indexed")
ap.add_argument("-i", "--index", required=True, help="Path to where the computed index will be stored")
args = vars(ap.parse_args())
cd = ColorDescriptor.ColorDescriptor((8,12,3))

#Open the output index file for writing
output = open(args["index"],"w")

# use glob to grab the image paths and loop over them
for imagePath in glob.glob(args["dataset"]+"/*.jpg"):
    # extract the image ID from the image
    imageID = imagePath[imagePath.rfind("/")+1:]
    image = cv2.imread(imagePath)

    # describe the image
    features = cd.describe(image)

    # write feature to file
    features = [str(f) for f in features]
    output.write("%s,%sn" %(imageID,",".join(features)))
# close index file
output.close()
现在,可以创建索引了。本实例将文章代码保存在python2.7的根目录的CBIR下,通过下面命令创建索引文件:

通过以上2步,图像特征库已经建好了。接下来,我们需要定义图像特征相似度。
现在已经从数据集提取了特征了,接下来需要一个方法来比较这些特征,获取相似度。这就是第三步的内容,创建一个类来定义两幅图像的相似矩阵。
"CBIR(Content-Base Image Retrieval)--Similarity and Search"
import numpy as np
# use for processing index.csv
import csv

class Searcher:
    def __init__(self, indexPath):
        self.indexPath = indexPath

    def search(self, queryFeatures, limit=10):
        results = {}

        # open the index file for reading
        with open(self.indexPath) as f:
            # initialize the CSV reader
            reader = csv.reader()

            # loop over the rows in the index
            for row in reader:
                # parse out the imageID and features,
                # then compute the chi-squared distance
                features = [float(x) for x in row[1:]]
                d = self.chi2_distance(features, queryFeatures)
                results[row[0]] = d
            f.close()
            results = sorted([(v,k) for (k,v) in results.items()])
            return results[:limit]

        def chi2_distance(self, histA, histB, eps=1e-10):
            # compute the chi-squred distance
            d = 0.5*np.sum([((a-b)**2)/(a+b+eps) for(a,b) in zip(histA,histB)])
            return d
4)执行搜索
最后一步就是把上面的代码结合起来,执行搜索操作。
"CBIR(Content-Base Image Retrieval)--Search"
import ColorDescriptor
import Searcher
import argparse
import cv2

ap = argparse.ArgumentParser()
ap.add_argument("-i", "--index", required=True, help="Path to where the computed index will be stored")

ap.add_argument("-q", "--query", required=True, help="Path to query image")
ap.add_argument("-r", "--result_path", required = True, help="Path to the result Path")
args = vars(ap.parse_args())
cd = ColorDescriptor.ColorDescriptor((8,12,3))

# load the query image and describe it
query = cv2.imread(args["query"])
features = cd.describe(query)

# perform the search
searcher = Searcher.Searcher(args["index"])
results = searcher.search(features)

# loop over the results
for(score, resultID) in results:
    # load the result image and display it
    print(args["result_path"]+"/"+resultID)
    result = cv2.imread(args["result_path"]+"/"+resultID)
    cv2.imshow("Result",result)
    cv2.waitKey(0)
参考资料
1、用Python和OpenCV创建一个图片搜索引擎的完整指南
2、基于内容的图像检索技(CBIR)术相术介绍