iOS7 - iBeacon学习笔记及Demo展示
一、什么是iBeacon
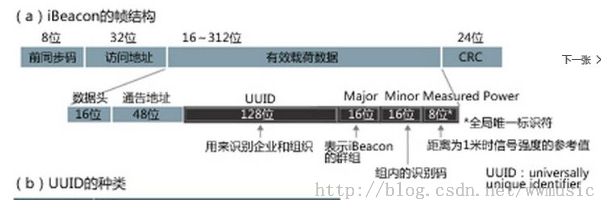
iBeacon是苹果公司2013年9月WWDC发布的 iOS7上配备的新功能。它利用的是 BLE 中名为“通告帧”(Advertising)的广播帧。通告帧由配备 BLE的设备定期发出,只要是支持 BLE的终端,都可以接收到信号。通告帧的有效载荷部分,写入了由苹果定义的数据。
iBeacon 的数据大致由四部分信息组成:
(1)UUID(universally unique identifier):一个128位的值唯一标识一个或多个Beacon基站为特定类型或特定的组织。
(2) Major :一个16位的无符号整数,可以将具有相同proximity UUID的Beacon基站组织联系起来。(用户可自定义)
(3)Minor :一个16位的无符号整数,区分proximity UUID和major相同的Beacon基站。(用户可自定义)
(4)Measured Power :是 iBeacon 的发送模块与接收器之间距离为 1 米时信号强度(RSSI:received signal strength indicator)的参照值。
iBeacon技术是使用蓝牙低功耗无线技术(BLE)发送特定识别信息,来确定Beacon基站和设备之间的相对距离。而这个距离并不是精密推算的,而是将其分为三级:
(1) 约 10 厘米(immediate)
(2) 1 米以内(near)
(3) 1 米以外(far)
这是因为,发送与接受设备之间的距离在 1 米之内时,RSSI 值基本是按照理论值减少的,而在 1 米以外,受到反射波的影响,RSSI 不会明显随距离增加减少,而是会上下波动。也就是说,1 米以外的距离无法非常精密推测,可以 用“far”来概括。
二、模拟一个 iBeacon 基站
如果你没有一个独立的 iBeacon 发射器,但你有另外一个支持低功耗蓝牙技术的 iOS 设备,你可以通过创建一个应用来模拟一个 iBeacon 。
具体步骤如下图所示:

代码实现:
- (void)createBeaconRegion{
    NSUUID *uuid = [[NSUUID alloc] initWithUUIDString:_uuidTextField.text];
    NSString *identifier = @"com.chili.XQiBeaconPeripheral";
    if (_beaconRegion) {
        self.beaconRegion = nil;
    }
    //Create a CLBeaconRegion.
    self.beaconRegion = [[CLBeaconRegion alloc] initWithProximityUUID:uuid major:[_majorIdTextField.text integerValue] minor:[_minorIdTextField.text integerValue] identifier:identifier];
    self.beaconRegion.notifyOnEntry = bEntry;
    self.beaconRegion.notifyOnExit = bExit;
    self.beaconRegion.notifyEntryStateOnDisplay = YES;

    //Obtain the peripheral data from CLBeaconRegion.
    NSDictionary *peripheralData = [self.beaconRegion peripheralDataWithMeasuredPower:nil];

    //Create a CBPeripheralManager.
    dispatch_queue_t queue = dispatch_get_global_queue(DISPATCH_QUEUE_PRIORITY_BACKGROUND, 0);
    _peripheralManager = [[CBPeripheralManager alloc] initWithDelegate:self queue:queue];

    //Start advertising with CBPeripheralManager.
    [_peripheralManager startAdvertising:peripheralData];

}
相应的CBPeripheralManagerDelegate:
- (void)peripheralManagerDidUpdateState:(CBPeripheralManager *)peripheral{
    if(_peripheralManager.state < CBPeripheralManagerStatePoweredOn)
    {
        UIAlertView *errorAlert = [[UIAlertView alloc] initWithTitle:@"Bluetooth must be enabled" message:@"To configure your device as a beacon" delegate:self cancelButtonTitle:@"OK" otherButtonTitles:nil];
        [errorAlert show];
    }

}
三、监控 iBeacon 区域
上面利用一个iOS设备建立好了信号发射基站,那么下面就要利用另一台iOS设备来监控这个beacon 区域了。
创建和注册beacon区域:
- (CLBeaconRegion *)beaconRegionWithItem:(XQBeaconInfoVO *)item {
	// Create the beacon region to be monitored.
    CLBeaconRegion *beaconRegion = [[CLBeaconRegion alloc] initWithProximityUUID:item.uuid
                                                                           major:item.majorValue
                                                                           minor:item.minorValue
                                                                      identifier:item.name];
    return beaconRegion;
}
利用 CLLocationManager 的 startMonitoringForRegion 开始监控,当监测设备进入某个注册过的 beacon 区域时,可以用 CLLocationManager 的 startRangingBeaconsInRegion: 方法来确定该区域内的一个或多个 beacon 基站的相对距离,并且当距离发生变化时发出通知。
- (void)startMonitoringItem:(XQBeaconInfoVO *)item {
    CLBeaconRegion *beaconRegion = [self beaconRegionWithItem:item];
	// Register the beacon region with the location manager.
    [self.locationManager startMonitoringForRegion:beaconRegion];
    [self.locationManager startRangingBeaconsInRegion:beaconRegion];
}
相应的停止监控方法:
- (void)stopMonitoringItem:(XQBeaconInfoVO *)item {
    CLBeaconRegion *beaconRegion = [self beaconRegionWithItem:item];
    [self.locationManager stopMonitoringForRegion:beaconRegion];
    [self.locationManager stopRangingBeaconsInRegion:beaconRegion];
}
注:beacon监控取决于检测蓝牙低功耗的无线电信号的强度,并且这些信号的精度衰减(或减少)受墙壁,门窗,以及其他物理对象影响。该信号也受水的影响,代表人体本身也会影响这些信号。
- (void)locationManager:(CLLocationManager *)manager
        didRangeBeacons:(NSArray *)beacons
               inRegion:(CLBeaconRegion *)region
{

    for (CLBeacon *beacon in beacons) {
        for (XQBeaconInfoVO *item in self.items) {
            if ([item isEqualToCLBeacon:beacon]) {
                item.lastSeenBeacon = beacon;
                if(!bAlertViewShowed){
                    if(nowBeaconInfoVO == nil){
                        nowBeaconInfoVO = item;
                    }else{
                        nowBeaconInfoVO = (nowBeaconInfoVO.lastSeenBeacon.accuracy>item.lastSeenBeacon.accuracy)?item:nowBeaconInfoVO;
                    }

                }
            }
        }
    }

    if(nowBeaconInfoVO.lastSeenBeacon.proximity == CLProximityImmediate){
        NSString *str = [NSString stringWithFormat:@"You have come to the range of the %@, jump to know the details?",nowBeaconInfoVO.name];
        NSLog(@"%@",str);
    }
}
以上代码,利用CLBeacon对象的 accuracy属性找出距离最近的基站,若它近在咫尺(Immediate),则打印出信息。正如前文所说距离的概念,所以这个 accuracy也只能作为参考,因为在1m之外受反射波影响,距离无法精准。
四、Demo测试结果
在我的Demo种,我采用的默认数据为:
    self.uuidTextField.text = @"41EAF359-C87F-4AAF-92DC-9E4A17519AE1";
    self.nameTextField.text = @"Peripheral_1";
    self.majorIdTextField.text = @"65504";
    self.minorIdTextField.text = @"65505";
在将一个iOS设备作为beacon基站时配置的这些数据,和在利用一个iOS设备进行监控beacon区域时注册的信息要一致,不然监控设备无法监控到基站,即使这个基站一直在以一定频率发送信息。当然你可以监控多个Beacon区域,前提时注册了这些区域信息。
1、Demo1,模拟真机为Beacon基站
运行Demo1,设置某真机为Beacon基站,一定频率向周围发送信息,演示结果如下:(真机:iPhone5s,iOS8.0)
上面左图是Demo1运行起后,直接将真机模拟为一个Beacon基站,上面显示了默认设置的基本信息。右图演示了信息更改来设置新的Beacon基站。
2、Demo2,监控某Beacon区域
运行Demo2,点击“ + ”添加监控区域,此处我加入了默认添加信息,即 Demo1 中模拟Beacon的信息,添加完后,开始监控该Beacon区域,下图展示了监控的部分信息:(真机:iPhone5,iOS7.1)

在我的Demo2中,我设置当设备与Beacon基站相距距离级别为 “ Immediate ” 时,弹出提示是否跳转了解详情,此处主要演示Demo2结果,故跳转到的新界面,仅是个WebView展示本人Blog地址而已,如下图所示: