NS2.35自带的卫星网络仿真学习
首先,NS2.35自带iridium和teledesic的星座配置,在ns/tcl/ex下,先看一下iridium的
下表是iridium星座的参数:
相邻轨道面plane的间隔是31.6°,缝隙处是22°,不是均匀的
每个轨道面11颗星,所以360/11=32.73°
不同轨道面的相位因子360/66=5.454545,16.36/5.454545=3,正好是轨道面内相位差的一半
Ns/tcl/ex中的例子将node和link单独独立为两个文件,node文件部分内容如下:
set plane 1
set n0 [$ns node]; $n0 set-position $alt $inc 0 0 $plane
set n1 [$ns node]; $n1 set-position $alt $inc 0 32.73 $plane
set n2 [$ns node]; $n2 set-position $alt $inc 0 65.45 $plane
set n3 [$ns node]; $n3 set-position $alt $inc 0 98.18 $plane

incr plane
set n15 [$ns node]; $n15 set-position $alt $inc 31.6 16.36 $plane
set n16 [$ns node]; $n16 set-position $alt $inc 31.6 49.09 $plane
set n17 [$ns node]; $n17 set-position $alt $inc 31.6 81.82 $plane
地面终端会不停的切换,为了让切换发生更优,nodetcl中设置的next卫星,为同轨道面下一颗卫星,这里应该是假定了位置0处的卫星是上升轨道
# By setting the next_ variable on polar sats; handoffs can be optimized

$n0 set_next $n10; $n1 set_next $n0; $n2 set_next $n1; $n3 set_next $n2
$n4 set_next $n3; $n5 set_next $n4; $n6 set_next $n5; $n7 set_next $n6
$n8 set_next $n7; $n9 set_next $n8; $n10 set_next $n9

$n15 set_next $n25; $n16 set_next $n15; $n17 set_next $n16; $n18 set_next $n17
$n19 set_next $n18; $n20 set_next $n19; $n21 set_next $n20; $n22 set_next $n21
$n23 set_next $n22; $n24 set_next $n23; $n25 set_next $n24
节点设置好后,在linktcl中设置卫星链路,包括轨内和轨间星间链路
# Now that the positions are set up, configure the ISLs
# Plane 1 intraplane
$ns add-isl intraplane $n0 $n1 $opt(bw_isl) $opt(ifq) $opt(qlim)
$ns add-isl intraplane $n1 $n2 $opt(bw_isl) $opt(ifq) $opt(qlim)
$ns add-isl intraplane $n2 $n3 $opt(bw_isl) $opt(ifq) $opt(qlim)

# Interplane ISLs
# 2 interplane ISLs per satellite (one along the seam)

# Plane 1-2
$ns add-isl interplane $n0 $n15 $opt(bw_isl) $opt(ifq) $opt(qlim)
$ns add-isl interplane $n1 $n16 $opt(bw_isl) $opt(ifq) $opt(qlim)
$ns add-isl interplane $n2 $n17 $opt(bw_isl) $opt(ifq) $opt(qlim)
主tcl文件中设置参数:
global opt
set opt(chan)           Channel/Sat
set opt(bw_down)        1.5Mb; # Downlink bandwidth (satellite to ground)
set opt(bw_up)          1.5Mb; # Uplink bandwidth
set opt(bw_isl)         25Mb
set opt(phy)            Phy/Sat
set opt(mac)            Mac/Sat
set opt(ifq)            Queue/DropTail
set opt(qlim)           50
set opt(ll)             LL/Sat
set opt(wiredRouting) 	OFF

set opt(alt)            780; # Polar satellite altitude (Iridium)
set opt(inc)            86.4; # Orbit inclination w.r.t. equator
设置地面终端节点:
# Set up terrestrial nodes
$ns node-config -satNodeType terminal
set n100 [$ns node]
$n100 set-position 37.9 -122.3; # Berkeley
set n101 [$ns node]
$n101 set-position 42.3 -71.1; # Boston
增加星地链路,这里地面终端节点与那个卫星节点连接可以任意,因为切换管理器会重新设置为地面终端可见的卫星节点。
# Add GSL links
# It doesn't matter what the sat node is (handoff algorithm will reset it)
$n100 add-gsl polar $opt(ll) $opt(ifq) $opt(qlim) $opt(mac) $opt(bw_up) \
  $opt(phy) [$n0 set downlink_] [$n0 set uplink_]
$n101 add-gsl polar $opt(ll) $opt(ifq) $opt(qlim) $opt(mac) $opt(bw_up) \
  $opt(phy) [$n0 set downlink_] [$n0 set uplink_]
配置地面终端为CBR-UDP流量
# Attach agents
set udp0 [new Agent/UDP]
$ns attach-agent $n100 $udp0
set cbr0 [new Application/Traffic/CBR]
$cbr0 attach-agent $udp0
$cbr0 set interval_ 60.01
这是生成的trace文件的内容:
+ 1.000066 26 cbr 210 ------- 0 66.0 67.0 00 37.90 -122.30 48.90 -120.94
- 1.000066 26 cbr 210 ------- 0 66.0 67.0 0 0 37.90 -122.30 48.90 -120.94
r 1.006366 26 cbr 210 ------- 0 66.0 67.0 0 0 37.90 -122.30 48.90 -120.94
+ 1.0063 26 37 cbr 210 ------- 0 66.0 67.0 0 0 48.90-120.94 32.60 -87.51
- 1.0063 26 37 cbr 210 ------- 0 66.0 67.0 0 0 48.90-120.94 32.60 -87.51
r 1.0186 26 37 cbr 210 ------- 0 66.0 67.0 0 0 48.90-120.94 32.60 -87.51
+ 1.0186 37 48 cbr 210 ------- 0 66.0 67.0 0 0 32.60-87.51 48.90 -57.74
- 1.0186 37 48 cbr 210 ------- 0 66.0 67.0 0 0 32.60-87.51 48.90 -57.74
r 1.0300 37 48 cbr 210 ------- 0 66.0 67.0 0 0 32.60-87.51 48.90 -57.74
+ 1.0300 48 67 cbr 210 ------- 0 66.0 67.0 0 0 48.90 -57.74 42.30 -71.10
- 1.0300 48 67 cbr 210 ------- 066.0 67.0 0 0 48.90 -57.74 42.30 -71.10
r 1.0364 48 67 cbr 210 ------- 0 66.0 67.0 0 0 48.90 -57.74 42.30-71.10
+ 31.0100 66 26 cbr 210 ------- 0 66.067.0 1 1 37.90 -122.30 47.12 -120.81
- 31.0100 66 26cbr 210 ------- 0 66.0 67.0 1 1 37.90 -122.30 47.12 -120.81
r 31.0157 66 26cbr 210 ------- 0 66.0 67.0 1 1 37.90 -122.30 47.12 -120.81
+ 31.0157 26 37cbr 210 ------- 0 66.0 67.0 1 1 47.12 -120.81 30.81 -87.48
- 31.0157 26 37cbr 210 ------- 0 66.0 67.0 1 1 47.12 -120.81 30.81 -87.48
r 31.0282 26 37cbr 210 ------- 0 66.0 67.0 1 1 47.11 -120.81 30.81 -87.48
每次路径都是66-26-37-48-67,难道用的是虚拟节点策略?手册里也没有提及啊?
这是时延的绘图,呈现周期性,为什么不同时刻时延不一样呢?
下面看看NS2中卫星的坐标系统,在satgeometry.h, .cc中,首先定义了一些常数和计算宏
// Various constants
#define PI 3.1415926535897
#define MU 398601.2 // Greek Mu (km^3/s^2)
#define LIGHT 299793 // km/s
#define EARTH_PERIOD 86164 // seconds
#define EARTH_RADIUS 6378  // km
#define GEO_ALTITUDE 35786 // km
#define ATMOS_MARGIN 150 // km

#define DEG_TO_RAD(x) ((x) * PI/180)
#define RAD_TO_DEG(x) ((x) * 180/PI)
#define DISTANCE(s_x, s_y, s_z, e_x, e_y, e_z) (sqrt((s_x - e_x) * (s_x - e_x) \
                + (s_y - e_y) * (s_y - e_y) + (s_z - e_z) * (s_z - e_z)))

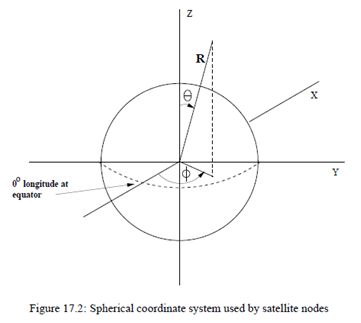
坐标系统采用了极坐标系
struct coordinate {
        double r;        // km
        double theta;    // radians
        double phi;      // radians
        // Convert to cartesian as follows:
        // x = rsin(theta)cos(phi)
        // y = rsin(theta)sin(phi)
        // z = rcos(theta)
};
有两套球面坐标系统,一套是轨道为中心的,这里的theta是90-下图的theta,下图才是真正的球面坐标系统。

SatGeometry中定义了一些方法,比如计算距离,极坐标和直角坐标转换,计算传播延时,获取经纬度高度,验证仰角是否在最低仰角之上,验证两颗同高度卫星是否可见(考虑地球大气层的遮挡150km)
Command方法是从OTCL访问C++类的方法。
// Library of routines involving satellite geometry
class SatGeometry : public TclObject {
public:
	SatGeometry() { printf("Started\n");}
	static double distance(coordinate, coordinate);
	static void spherical_to_cartesian(double, double, double,
	    double &, double &, double &);
	static double propdelay(coordinate, coordinate);
	static double get_latitude(coordinate);
	static double get_longitude(coordinate);
	static double get_radius(coordinate a) { return a.r; }
	static double get_altitude(coordinate);
	static double check_elevation(coordinate, coordinate, double);
	static int are_satellites_mutually_visible(coordinate, coordinate);

protected:
	// Define "command" appropriately if you want OTcl access to this class
        int command(/*int argc, const char*const* argv */) { return 0; }
};
