思考mysql内核之初级系列7---innodb的hash表实现
在上一篇里面,bingxi和alex谈到了文件系统管理,在结构体里面出现了两个常用的结构:hash_table_t、UT_LIST_NODE_T。这两个结构比较常用,在本篇里面,bingxi和alex聊了下关于hash_table_t的内容。
对应的文件为:
D:/mysql-5.1.7-beta/storage/innobase/ha/hash0hash.c
D:/mysql-5.1.7-beta/storage/innobase/include/hash0hash.h
1)常用结构体
Bingxi:“alex,我们今天聊下hash表,所谓hash表,常用的就是通过key,然后取模然后丢到相应的bucket里面。假设bucket的数量是13个,key值对应的bucket就是key%13,相同bucket值的放在一个链表里面。这里需要注意一点的是,1和27具有相同的bucket值,会放在同一个bucket里面,因此查找的时候,首先找到对应的桶(bucket),然后对该桶的链表进行遍历,每个成员里面记录了原始的key,1对应的结构里面有一个字段表示1,27对应的一个结构里面有一个字段表示27,这样就能找到对应的成员。
”
alex:“嗯,是的,bingxi。我们来看下hash表结构。同样地,我们将结构定义的其他元素先忽略,直接看其中的主要成员。如果需要了解其它的成员,则推荐设置debug断点进行调试。
/* The hash table structure */
struct hash_table_struct {
……
ulint n_cells; //hash表的成员数量,也可以称为bucket的数量
hash_cell_t* array; //指向桶的数组
……
};
结构中,就是成员的数量,以及一个数组。因为使用hash表的结构是多种多样的,比如前几篇文章中提到过的buf_pool_t、fil_system_t。这两者都使用到了hash,并且成员结构不一样。对于每个桶对应的指针类型是不确定,因此bucket中记录的指针是void*类型的。
struct hash_cell_struct{
void* node; /* hash chain node, NULL if none */
};
”
Bingxi:“alex,是这样的,这里带来两个问题:1、hash表的n_cells是个素数用于做模操作,在创建的时候提供一个准确的素数是有难度的,2、对应整型的key可以通过key%n_cells的方法来获得对应的桶,那么对于字符串型的如何处理?
”
Alex:“嗯,好吧。在说这两个问题之前,我们先看下hash表的创建过程。我们在函数fil_system_create如下面所示的行中设置一个断点。
system->spaces = hash_create(hash_size); //在此行设置断开
system->name_hash = hash_create(hash_size);
然后启动mysql,执行到该断点处我们可以发现对应的hash_size为50。F11进入该函数体,看看具体是怎么执行的。
/*****************************************************************
Creates a hash table with >= n array cells. The actual number of cells is
chosen to be a prime number slightly bigger than n. */
hash_table_t*
hash_create(
/*========*/
/* out, own: created table */
ulint n) /* in: number of array cells */
{
hash_cell_t* array;
ulint prime;
hash_table_t* table;
ulint i;
hash_cell_t* cell;
//在该例中,我们根据输入值50(n的取值),得到一个素数151
prime = ut_find_prime(n);
table = mem_alloc(sizeof(hash_table_t));
//sizeof(hash_cell_t)的值为4
//生成一个有151(prime)个桶的数组
array = ut_malloc(sizeof(hash_cell_t) * prime);
//初始化结构成员
table->adaptive = FALSE;
table->array = array;
table->n_cells = prime;
table->n_mutexes = 0;
table->mutexes = NULL;
table->heaps = NULL;
table->heap = NULL;
table->magic_n = HASH_TABLE_MAGIC_N;
/* Initialize the cell array */
//取得每一个bucket成员,将对应的node指针初始化为NULL
for (i = 0; i < prime; i++) {
//hash_get_nth_cell(table, i)的作用是取得第i个成员,即table->array + i
cell = hash_get_nth_cell(table, i);
cell->node = NULL;
}
return(table);
}
执行完成之后,我们生成了system->spaces的hash表,该hash表以space id作为key,接着我们又创建了system->name_hash的hash表,这个根据space name进行hash。我们看下space name对应的hash表创建后的情形,见图1。
从中我们可以看出问题1是已经解决掉了的,根据输入值产生一个素数,另外对于space name这样的字符串型,也是可以的,我们看下面的两个函数调用,调用函数ut_fold_string(name)生成了对应的整型key,插入的时候如此,查找、删除的时候也是如此。
HASH_SEARCH(name_hash, system->name_hash, ut_fold_string(name), space,
0 == strcmp(name, space->name));
HASH_INSERT(fil_space_t, name_hash, system->name_hash,
ut_fold_string(name), space);
HASH_DELETE(fil_space_t, name_hash, system->name_hash,
ut_fold_string(space->name), space);
”
2)常用的函数
Bingxi:“我们继续往下看,怎么进行hash的操作,我们先看hash表的插入操作。继续以space为例,在函数fil_space_create中创建了space结构,然后根据space id、space name插入相应的hash表。
/***********************************************************************
Creates a space memory object and puts it to the tablespace memory cache. If
there is an error, prints an error message to the .err log. */
ibool
fil_space_create(
/*=============*/
/* out: TRUE if success */
const char* name, /* in: space name */
ulint id, /* in: space id */
ulint purpose)/* in: FIL_TABLESPACE, or FIL_LOG if log */
{
……
//创建space结构,并初始化成员值
space = mem_alloc(sizeof(fil_space_t));
space->name = mem_strdup(name);
space->id = id;
……
//将新创建的space结构,根据space id插入system->spaces哈希表。
HASH_INSERT(fil_space_t, hash, system->spaces, id, space);
//将新创建的space结构,根据space name插入system->name_hash哈希表
HASH_INSERT(fil_space_t, name_hash, system->name_hash,
ut_fold_string(name), space);
……
return(TRUE);
}
插入操作调用的是HASH_INSERT宏,我们来看下插入space name哈希表操作的参数值。
//函数调用
HASH_INSERT(fil_space_t, name_hash, system->name_hash,
ut_fold_string(name), space);
//宏定义
#define HASH_INSERT(TYPE, NAME, TABLE, FOLD, DATA)
TYPE:表示插入hash表的结构类型,本例中的类型为fil_space_t
NAME:表示的是拥有同一个bucket值的成员,通过结构体中的该字段来指向拥有同bucket值的下一个成员,这里可以这么认为,space->name_hash用于指向同bucket的下一个成员。
TABLE:需要插入的hash表,这里我们可以看到,我们插入的hash表是system->name_hash
FOLD:也就是我们所说的key,通过ut_fold_string(name)函数将name转为key,本例子中name=’./ibdata1’
DATA:插入的结构体
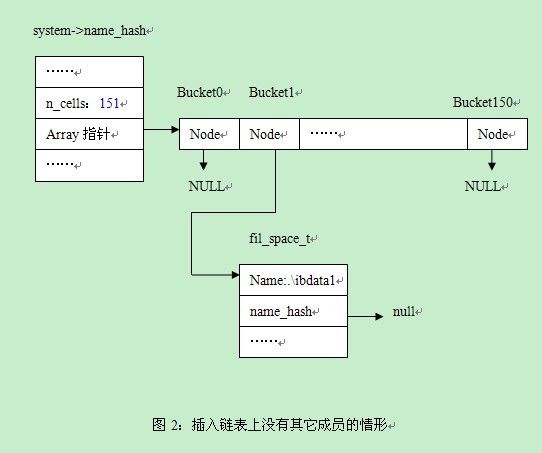
如果查对应的bucket中没有其他的同bucket值成员,插入后的情形是什么样的,假设对应的bucket为1(而实际上该例对应的bucket为51,为了绘图的方便,假设为1)。见图2。
从图2中,我们可以看出如下的步骤:
//步骤1,将插入成员的name_hash设置为NULL,也就是说,如果同bucket链表上有多个成员,也是插入到末尾
//(DATA)->NAME = NULL;
Space-> name_hash=NULL
//步骤2:找出所在bucket
//cell3333 = hash_get_nth_cell(TABLE, hash_calc_hash(FOLD, TABLE));
hash_cell_t* cell3333;
int i= hash_calc_hash(ut_fold_string(name), system->name_hash))
cell3333 = hash_get_nth_cell(system->name_hash,i);
//步骤3:如果该bucket上没有其他的成员则将该成员插入
if (cell3333->node == NULL) {
cell3333->node = space;
}
”
Alex:“是这样的,假设我们继续插入一个space,该space对应的bucket值也为1。那么执行到上面的步骤3不符合条件的时候,需要执行步骤4
//步骤4:如果有其它成员,则将新结点插入到末尾
struct3333 = cell3333->node;
//取得链表上最后一个结点
while (struct3333->name_hash != NULL) {
struct3333 = struct3333->name_hash; //取得下一个结点
}
//将新结点插入到最后一个结点之后
struct3333->name_hash = space;
假设name为’./itest’,对应的情形见图3.
完整的代码如下:
/***********************************************************************
Inserts a struct to a hash table. */
#define HASH_INSERT(TYPE, NAME, TABLE, FOLD, DATA)/
do {/
hash_cell_t* cell3333;/
TYPE* struct3333;/
/
HASH_ASSERT_OWNED(TABLE, FOLD)/ //这个是个断言,不考虑
/
(DATA)->NAME = NULL;/ //将新结点的指向的下一个结点设置为NULL
/ //找到对应的bucket
cell3333 = hash_get_nth_cell(TABLE, hash_calc_hash(FOLD, TABLE));/
/ //如果bucket成员为空,则直接插入,否则插入到最后一个结点之后
if (cell3333->node == NULL) {/
cell3333->node = DATA;/
} else {/
struct3333 = cell3333->node;/
/
while (struct3333->NAME != NULL) {/
/
struct3333 = struct3333->NAME;/
}/
/
struct3333->NAME = DATA;/
}/
} while (0)
”
Alex:“嗯,是这样的。我们再看看查找吧。假设这里需要查找的是./itest对应的space结构。
Creates a space memory object and puts it to the tablespace memory cache. If
there is an error, prints an error message to the .err log. */
ibool
fil_space_create(
/*=============*/
/* out: TRUE if success */
const char* name, /* in: space name */
ulint id, /* in: space id */
ulint purpose)/* in: FIL_TABLESPACE, or FIL_LOG if log */
{
……
//查看指定name的space是否存在,假设这里的name为./itest
HASH_SEARCH(name_hash, system->name_hash, ut_fold_string(name), space,
0 == strcmp(name, space->name));
……
return(TRUE);
}
同样地,HASH_SEARCH也是宏定义,我们用相应的c伪码来查看。从中我们可以看出首先找到对应的bucket,如果没有成员,则查找的space为空
my_key=ut_fold_string('./itest');
void hash_search(name_hash,system->name_hash,my_key,space,0 == strcmp(name, space->name))
{
HASH_ASSERT_OWNED(system->name_hash, my_key); //可以忽略
//取得fold对应的对应的key数据桶值
//取得对应的桶
bucket_id=hash_calc_hash(my_key, system->name_hash)
//取得第一个元素
space = HASH_GET_FIRST(system->name_hash, bucket_id);
while(space != NULL)
{
//因为不同的值,可能属于同一个桶,因此需要判断名称是不是相等
//比如图3中的第一个成员的space->name='./ibdata1',不相等
//获取下一个成员之后,再判断该条件,就相等了
if(0 == strcmp('./itest', space->name)) //注意,第一个参数name是前面传递过来的
{
break; //表示已经找到了对应的元素
}
else
{
//取得链表中的第一个元素
//space = HASH_GET_NEXT(name_hash, space);
space=space->name_hash;
}
}
//如果该桶没有元素或者没有匹配的成员,则space为NULL
}
查看HASH_SEARCH的定义,我们可以更容易的理解。
/************************************************************************
Looks for a struct in a hash table. */
#define HASH_SEARCH(NAME, TABLE, FOLD, DATA, TEST)/
{/
/
HASH_ASSERT_OWNED(TABLE, FOLD)/
/ //找到对应bucket的第一个成员
(DATA) = HASH_GET_FIRST(TABLE, hash_calc_hash(FOLD, TABLE));/
/
while ((DATA) != NULL) {/
if (TEST) {/ //要符合TEST条件
break;/
} else {/
(DATA) = HASH_GET_NEXT(NAME, DATA);/
}/
}/
}
”
Bingxi:“嗯,除了HASH_INSERT、HASH_SEARCH,还有其它的宏定义:HASH_DELETE、HASH_DELETE_AND_COMPACT 、HASH_GET_FIRST、HASH_GET_NEXT。这几个功能的实现也建议看下。这里面就不说这个了。”
Alex:“ok,今天就说到这吧。”
本文来自CSDN博客,转载请标明出处:http://blog.csdn.net/yzyangwanfu/archive/2010/07/25/5764667.aspx


