Mipv6及其补充协议的ns2模拟实验-HMIP(1)
下载season制作的FHMIP的补丁包,按照里面的安装方法安装至ns2.31中,不过我去下载的包按照的脚本有点问题:
if [ ! $ns2_ver_t = 2.2 ]
then
echo "Your ns2 (version $ns2_ver) is too old"
他总是跳到这步执行,也懒得看他的逻辑是怎么写的了,直接在这句前面加上:
ns2_ver_t="2.2"
最后编译通过了。
首先到他的expampl目录下,先跑一下他的simpla.tcl,按照他的实验脚本和mip-reg.cc的写法,应该是模拟HMIPv6的。
实验的结果令我大吃一惊,参照nam模拟效果以及分析trace数据我发现,该模拟脚本的MN根本就没有发生切换,只是在一开始和NAR建立链接(因为NAR的优先级比PAR的高),再仔细分析发现,应该是CSThresh_这个参数没有设置的缘故,系统默认的有效值是250,所以在MN移动的过程中根本就不会和NAR发生切断,有没有跨层设计让MN提前切换,所以才导致以上模拟结果。
所以,我稍微修改了一下模拟脚本:
利用propagation工具得到设置有效无线传输距离并在脚本中设置如下
Phy/WirelessPhy set CSThresh_ 1.20174e-07 //40
Phy/WirelessPhy set RXThresh_ 9.49522e-08 //45
Phy/WirelessPhy set bandwidth_ 2e6
Phy/WirelessPhy set Pt_ 0.28183815
Phy/WirelessPhy set freq_ 914e+06
Phy/WirelessPhy set L_ 1.0
还有就是直接设置MN的初始位置,要达到的效果就是,MN初始在PAR的可传输数据的范围内,而经过一段时间(40)后到达NAR的范围,这样就可以观察切换的效果了。如图所示:
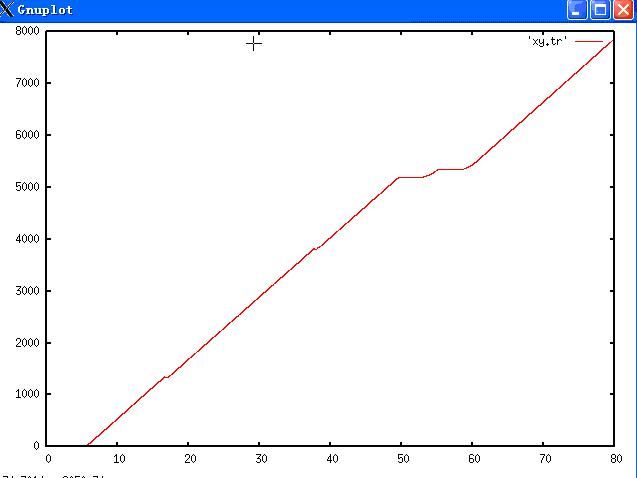
使用该模拟脚本模拟实验(为HMIP),得到实验数据,在这里,我只是分析一下切换过程中tcp的接受延迟来分析切换的性能,为此,我获得节点随时间增加获得tcp序列号的增加过程的一个关系图。过程如下:
首先获得点阵:
BEGIN {
}
{
if (($1=="r")&&($4=="AGT")&&($7 =="tcp")){
gsub(//[/,"",$18);
printf("%f %d/n",$2,$18);
}
}
END {
}
# awk -f anl.awk traffic.tr >xy.tr
然后用gunplot画出结果,
数据分析:
在50秒左后的时候可以明显发现由于切换导致的TCP包的时延效应,具体的定量分析我还没有想好如何去做,这里只有一个比较直观的图来显示,并且我发现在CN传输数据给MN的过程中,数据好像都是HA通过隧道出输给AR,也就是没有CN的coa的绑定更新过程,按理MIPV6中是可以对CN进行地址绑定更新的,是不是这个模拟包不支持也有待进一步确认。
使用udp,从CN传输CBR流到MN的实验
修改实验脚本,使CN传输CBR流到MN,只要在脚本中注释掉TCP的部分,恢复UDP部分就可以使用了,拓扑结构,以及数据传输路径等等都同上面TCP的一样。这里的区别就是由于UDP是无连接不可靠的服务,所以不能向TCP实验那样统计序列号来分析切换的性能,那怎么办呢,其实还是有办法的,我们可以分析MN接受UDP的抖动来分析切换性能。
分析脚本很简单ank.awk。
BEGIN {
}
{
if (($1=="r")&&($4=="AGT")&&($7 =="udp")){
printf("%f/n",$2);
}
}
END {
}
$ awk -f anl.awk traffic.tr >xy.tr
然后:ank1.awk。
BEGIN {
otime = 0;
}
{
delay = $1-otime;
printf("%lf %lf/n",$1,delay);
otime = $1;
}
END {
}
$ awk -f anl1.awk xy.tr >plot.tr
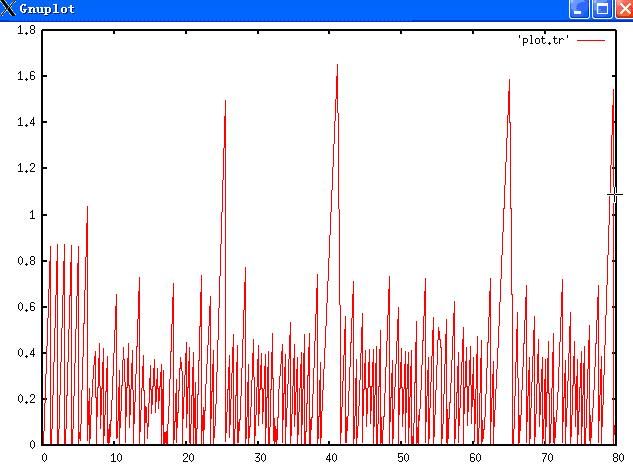
使用gnuplot画图如下:
数据分析:
可以看到明显有4次抖动,这其中的抖动有的是因为在AR处的队列大小有限,也就是拥塞导致的,不过我在nam中观察发现是在56左右是切换的,可是在这个统计中并没有发现,估计原因是由于我的CBR数据传输流速率过大的原因,有待以后验证。
附带:
Propagation的使用:
到,NS_HOME/ns-2.31/indep-utils/propagation下,如果程序没有被编译,先将程序编译,直接运行,他就会提示你使用方法了,非常简单方便。
可以看着个网页了解更加详细的
http://hi.baidu.com/vvfang/blog/item/bf834c0fc3b4ab296159f344.html
内容是:
1. 如果Pr < CSThresh,那么无线网络接口将这个信号作为噪声而丢弃。
因此,MAC 层不能检测到这个载波。或者说,对于MAC 层而言,这个信
号是不存在的。
2. 如果CSThresh < Pr < RXThresh,无线网络接口将这个信号标记为错
误信号,然后上传给MAC 层进行处理。对于MAC 层而言,该信号可以
被检测到,但是不能被正确地解码。因此,MAC 层将该信号视为一个干
扰噪声。
3. 如果Pr > RXThresh,无线网络接口直接将该信号上传给MAC 层。此
时, MAC 层可以对该信号进行正确地解码,并进行相应地处理。
在NS-2 仿真软件中,干扰范围的半径约为发射范围半径的2.2 倍。
最后附上实验脚本:(HMIPV6)
- set ns_ [new Simulator]
- $ns_ node-config -addressType hierarchical
- AddrParams set domain_num_ 5
- lappend cluster_num 2 1 1 2 2
- AddrParams set cluster_num_ $cluster_num
- lappend eilastlevel 1 1 2 1 1 1 1 1
- AddrParams set nodes_num_ $eilastlevel
- # to show ack number, header flags, header length
- # Note: only useful though if using tcpfull
- #Trace set show_tcphdr_ 1
- set tracefd [open traffic.tr w]
- # $ns_ use-newtrace
- $ns_ trace-all $tracefd
- set namtrace [open traffic.nam w]
- $ns_ namtrace-all $namtrace
- set topo [new Topography]
- $topo load_flatgrid 1000 1000
- set god_ [create-god 1]
- ##############
- # NODE SETUP #
- ##############
- # Wired nodes => CH, MAP, N1, N2, N3
- #
- #CH - 0
- set CN [$ns_ node 0.0.0]
- #MAP - 1
- set MAP [$ns_ node 2.0.0]
- #N1 - 2
- set N1 [$ns_ node 0.1.0]
- #N2 - 3
- set N2 [$ns_ node 3.0.0]
- #N3 - 4
- set N3 [$ns_ node 4.0.0]
- # NOAH nodes (wireless+wired) => HA, PAR, NAR
- # MN is a special node (i.e. a NOAH node with wiredrouting turned off)
- Phy/WirelessPhy set CSThresh_ 1.20174e-07
- Phy/WirelessPhy set RXThresh_ 9.49522e-08
- Phy/WirelessPhy set bandwidth_ 2e6
- Phy/WirelessPhy set Pt_ 0.28183815
- Phy/WirelessPhy set freq_ 914e+06
- Phy/WirelessPhy set L_ 1.0
- set chan_ [new Channel/WirelessChannel]
- $ns_ node-config -mobileIP ON /
- -adhocRouting NOAH /
- -llType LL /
- -macType Mac/802_11 /
- -ifqType Queue/DropTail/PriQueue /
- -ifqLen 50 /
- -antType Antenna/OmniAntenna /
- -propType Propagation/TwoRayGround /
- -phyType Phy/WirelessPhy /
- -channel $chan_ /
- -topoInstance $topo /
- -wiredRouting ON /
- -agentTrace ON /
- -routerTrace OFF /
- -macTrace ON
- #HA - 5
- set HA [$ns_ node 1.0.0]
- [$HA set regagent_] priority 3
- #MN - 6
- $ns_ node-config -wiredRouting OFF
- set MN [$ns_ node 1.0.1]
- [$MN set regagent_] set home_agent_ [AddrParams addr2id [$HA node-addr]]
- $ns_ node-config -wiredRouting ON
- #PAR - 7
- set PAR [$ns_ node 3.1.0 2.0.0]
- [$PAR set regagent_] priority 3
- #NAR - 8
- set NAR [$ns_ node 4.1.0 2.0.0]
- [$NAR set regagent_] priority 3
- #####################
- # PLACEMENT of NODE #
- #####################
- $CN set X_ 80.0
- $CN set Y_ 5.0
- $CN label "CN"
- $N1 set X_ 120.0
- $N1 set Y_ 10.0
- $N1 label "N1"
- $HA set X_ 160.0
- $HA set Y_ 5.0
- $HA label "HA"
- $MN set X_ 80
- $MN set Y_ 135
- $MN label "MN"
- $MAP set X_ 120.0
- $MAP set Y_ 15.0
- $MAP label "MAP"
- $N2 set X_ 85.0
- $N2 set Y_ 60.0
- $N2 label "N2"
- $N3 set X_ 155.0
- $N3 set Y_ 60.0
- $N3 label "N3"
- $PAR set X_ 85.0
- $PAR set Y_ 135.0
- $PAR label "PAR"
- $NAR set X_ 155.0
- $NAR set Y_ 135.0
- $NAR label "NAR"
- ##############
- # LINK SETUP #
- ##############
- # droptail = (FIFO), RED = Random Early Detection
- $ns_ duplex-link $CN $N1 100Mb 2ms RED ;# Since consitiute a domain, so we simplify it by just use 100M and keep the delay of 2ms constant
- $ns_ duplex-link $HA $N1 100Mb 2ms RED ;# same as above
- $ns_ duplex-link $MAP $N1 100Mb 50ms RED ;# We increase the dealy to 50ms to show the advantange of MAP
- $ns_ duplex-link $N2 $MAP 10Mb 2ms RED ;# All nodes below MAP belongs to a single domain, therefore we keep the delay at constant 2ms and vary the
- $ns_ duplex-link $N3 $MAP 10Mb 2ms RED ;# bandwidth in a decreasing order, i.e. from 100M to 10M to 1M.
- $ns_ duplex-link $PAR $N2 1000Kb 2ms DropTail
- $ns_ duplex-link $NAR $N3 1000Kb 2ms DropTail
- #####################
- # APPLICATION SETUP #
- #####################
- # RCH Attaching the MAP agent.
- $ns_ attach-mapagent $MAP ;# Need to enable MAP_MODE in mip-reg.cc
- set udp0 [new Agent/UDP]
- $ns_ attach-agent $CN $udp0
- set null1 [new Agent/Null]
- $ns_ attach-agent $MN $null1
- $ns_ connect $udp0 $null1
- set cbr0 [new Application/Traffic/CBR]
- $cbr0 attach-agent $udp0
- $cbr0 set packetSize_ 1000
- $cbr0 set rate_ 1.0Mb
- $cbr0 set random_ null
- $ns_ at 5.0 "$cbr0 start"
- $ns_ at 80.0 "$cbr0 stop"
- #set tcp_(1) [$ns_ create-connection TCP $CN TCPSink $MN 1]
- #$tcp_(1) set window_ 32
- #$tcp_(1) set packetSize_ 512
- # RCH Setting connection monitor - to compensate the non existance of frequency jumping in 802.11.
- #$ns_ connection-monitor 1 $MN
- #trace all congestion window (cwnd) value for this TCP connection
- #set cwndtrace [open all.cwnd w]
- #$tcp_(1) trace cwnd_
- #$tcp_(1) attach $cwndtrace
- #set ftp_(1) [new Application/FTP]
- #$ftp_(1) attach-agent $tcp_(1)
- #$ns_ at 5.0 "$ftp_(1) start"
- #$ns_ at 80.0 "$ftp_(1) stop"
- proc finish {} {
- global ns_ tracefd namtrace
- close $tracefd
- close $namtrace
- exec nam traffic.nam &
- }
- ############
- # SCENARIO #
- ############
- # $ns_ at 0.0 "$MN set X_ 85.0"
- # $ns_ at 0.0 "$MN set Y_ 135.1"
- $ns_ at 10.0 "$MN setdest 160.0 135.1 1"
- for {set t 10} {$t < 80} {incr t 10} {
- $ns_ at $t "puts stderr /"completed through $t/80 secs.../""
- }
- $ns_ at 0.0 "puts stderr /"Simulation started.../""
- $ns_ at 80.0001 "puts stderr /"Simulation finished/""
- $ns_ at 80.0002 "finish"
- $ns_ at 80.0003 "$ns_ halt"
- $ns_ run

