网络编程(三)---- MFC 仿QQ聊天软件
在应用程序开始的时候,我们先应该初始话winSock 库,所以便会用到下面的一个函数。
BOOL AfxSocketInit( WSADATA* lpwsaData = NULL ); //用来初始化Socket,用WSAStartup();来初始化,在应用程序结束时他会自动调用WSACleanup()我们在开始编程之前,应该调用这个函数,对Socket进行初始化。如果初始化成功返回非0 ,否则返回0.
可能人会问,这个函数加载的是那个版本的Socket库呢?通过查看底层代码,我们发现,他加载的是1.1版本的Socket
注意:这个函数只能在你自己应用程序的 CXXWinApp::InitInstance 中初始化.在初始化前还要记得加入头文件Afxsock.h
我服务器端程序 为 NetChatServer 所以我在的CNetChatServerApp::InitInstance()中加入
/////////////////////////////////////////////////////////////////////////////////////////////////////CNetChatServerApp::InitInstance()///////////////////////////////////////////////////////////////////////////////////////////////////////////////////////////////
   if(!AfxSocketInit())
	{
		AfxMessageBox(_T("Socket 库初始化出错!"));
		return false;
	}
m_iSocket 是一个 CServerSocket*的 指针 ,CServerSocket类是一个我们自己的类我会在后面给出相应代码,他继承于CSocket类。
   m_iSocket = new CServerSocket(); // 1.动态创建一个服务器Socket对象。
     if(!m_iSocket)
     {
	AfxMessageBox(_T("动态创建服务器套接字出错!"));
	return false;
     }
接着创建套接字
	if(!m_iSocket->Create(8989))
	{
		AfxMessageBox(_T("创建套接字错误!"));
		m_iSocket->Close();
		return false;
	}
其中8989 是指定的端口号,但是要注意在保存我们指定的8989端口前,这个端口是空闲的没有被其他进程所占用,那怎么查看端口是否被其他进程占用呢?
首先打开cmd 键入 netstat -aon
你会看到所有的TCP/UDP 信息 ,但是由于太多了不好查看,所以。我们再在最下面 tasklist|find “8989”
现在我们看到 我们没有找到任何 和8989端口相关的东西,所以说明8989端口没有被占用。
创建了套接字以后按照win32的步骤我们就应该 对bind端口。
但是MFC 不这样,应为MFC的Create内部已经调用了bind ,如下是MFC的底层代码
BOOL CAsyncSocket::Create(UINT nSocketPort, int nSocketType,long lEvent, LPCTSTR lpszSocketAddress)
{
      if (Socket(nSocketType, lEvent))
      {
          if (Bind(nSocketPort,lpszSocketAddress))//调用了bind
                  return TRUE;
          int nResult = GetLastError();
          Close();
          WSASetLastError(nResult);
      }
      return FALSE;
}
所以 我们不用在调用bind 了,直接对套接字进行监听
if(!m_iSocket->Listen())
{
	AfxMessageBox(_T("监听失败!"));
	m_iSocket->Close();
	return false;
}
/////////////////////////////////////////////////////////////////////////////////////////////////////////////////////////////////////////////////////////////////////////////////////////////////////////////////////////////////////////////////////////////////////////////////////////////////////
然后重载ExitInstance,退出时对进行清理
int CNetChatServerApp::ExitInstance()
{
if(m_iSocket)
{
delete m_iSocket;
m_iSocket = NULL;
}
return CWinApp::ExitInstance();
}
//////////////////////////////////////////////////////////////////////////////////////////////////////////////////////////////////////////////////////////////////////////////////////////////////////////////////////////////////////////////////////////////////////////////////////////////////////
下面 来看下CServerSocket的具体实现
#pragma once

#include "ClientSocket.h"

class CServerSocket : public CSocket
{
public:
	CServerSocket();
	virtual ~CServerSocket();
public :
	CPtrList m_listSockets;//用来保存服务器与所有客户端连接成功后的ClientSocket


public :
	virtual void OnAccept(int nErrorCode);
};
#include "stdafx.h"
#include "NetChatServer.h"
#include "ServerSocket.h"

CServerSocket::CServerSocket()
{

}

CServerSocket::~CServerSocket()
{

}

void CServerSocket::OnAccept(int nErrorCode)
{
	//接受到一个连接请求
	CClientSocket* theClientSock(0);
	theClientSock = new CClientSocket(&m_listSockets);
	if(!theClientSock)
	{
		AfxMessageBox(_T("内存不足,客户连接服务器失败!"));
		return;
	}
	Accept(*theClientSock);
	//加入list中便于管理
	m_listSockets.AddTail(theClientSock);
	CSocket::OnAccept(nErrorCode);
}
我们可以看到在CServerSocket中 又出现了一个CClientSocket的类,这个类和CServerSocket一样,也是派生于CSocket类,但是专门用于客户端的Socket。
在这里必须重载OnAccept(int nErrorCode)函数,这样CServerSocket才能接收到客户端的请求,并且必须在OnAccept中调用Accept()函数对连接请求进行响应。
在OnAccept()我们用一个List 将ClientSocket指针保存,以便以后调用访问。
///////////////////////////////////////////////////////////////////////////////////////////////////////////////////////////////////////////////////////////////////////////////////////////////////////////////////////////////////////////////////////////////////////////////////////////////////////////
接着 我们再来看看CClientSocket类
#pragma once

#include "stdafx.h"
/////////////////////////////////////////////////
///说明,该类用于和客户端建立通信的Socket
/////////////////////////////////////////////////

class CClientSocket : public CSocket
{
public:
	CClientSocket(CPtrList* pList);
	virtual ~CClientSocket();
public:
	CPtrList* m_pList;//保存服务器ClientSocket中List的东西,这个是中CServerSocket中传过来的
	CString m_strName; //连接名称
public:
	virtual void OnClose(int nErrorCode);
	virtual void OnReceive(int nErrorCode);
	void OnLogoIN(char* buff,int nlen);//处理登录消息
	void OnMSGTranslate(char* buff,int nlen);//转发消息给其他聊天群
	CString UpdateServerLog();//服务器端更新、记录日志
	void UpdateAllUser(CString strUserInfo);//更新服务器端的在线人员列表
private:
	BOOL WChar2MByte(LPCWSTR srcBuff, LPSTR destBuff, int nlen);//多字节的转换
};
可以看到 我们重载了OnClose()、OnReceive()函数,这样当套接字关闭、有数据到达时,就会自动调用这两个函数,我们便可以在这两个函数中响应、处理事件。
由于本人使用的是VS2010,并且采用的Unicode编码,所以,经常要涉及Unicode转多字节的情况,于是就写了WChar2MByte()进行转换
#include "stdafx.h"
#include "NetChatServer.h"
#include "ClientSocket.h"
#include "Header.h"
#include "NetChatServerDlg.h"

CClientSocket::CClientSocket(CPtrList* pList)
	:m_pList(pList),m_strName(_T(""))
{

}

CClientSocket::~CClientSocket()
{
}

/////////////////////////////////////////////////////////////////////
 void CClientSocket::OnReceive(int nErrorCode)
 {
	 //有消息接收
	 //先得到信息头
	 HEADER head;
	 int nlen = sizeof HEADER;
	 char *pHead = NULL;
	 pHead = new char[nlen];
	 if(!pHead)
	 {
		 TRACE0("CClientSocket::OnReceive 内存不足!");
		 return;
	 }
	 memset(pHead,0, sizeof(char)*nlen );
	 Receive(pHead,nlen);
	 head.type = ((LPHEADER)pHead)->type;
	 head.nContentLen = ((LPHEADER)pHead)->nContentLen;
	 delete pHead;
	 pHead = NULL;

	 //再次接收,这次是数据类容
	 pHead = new char[head.nContentLen];
	 if(!pHead)
	 {
		 TRACE0("CClientSocket::OnRecive 内存不足!");
		 return;
	 }
	if( Receive(pHead, head.nContentLen)!=head.nContentLen)
	{
		AfxMessageBox(_T("接收数据有误!"));
		delete pHead;
		return;
	}
	 ////////////根据消息类型,处理数据////////////////////
	 switch(head.type)
	 {
	 case MSG_LOGOIN:
		 OnLogoIN(pHead, head.nContentLen);
		 break;
	 case MSG_SEND:
		 OnMSGTranslate(pHead, head.nContentLen);
		 break;
	 default : break;
	 }

	 delete pHead;
	 CSocket::OnReceive(nErrorCode);
 }

 //关闭连接
 void CClientSocket::OnClose(int nErrorCode)
 {
	  CTime time;
	 time = CTime::GetCurrentTime();
	 CString strTime = time.Format("%Y-%m-%d  %H:%M:%S  ");
	 strTime = strTime + this->m_strName + _T("  离开...\r\n");
	 ((CNetChatServerDlg*)theApp.GetMainWnd())->DisplayLog(strTime);
	 m_pList->RemoveAt(m_pList->Find(this));
	 //更改服务器在线名单
	 CString str1 = this->UpdateServerLog();
	 //通知客户端刷新在线名单
	 this->UpdateAllUser(str1);
	 this->Close();
	 //销毁该套接字
	 delete this;
	CSocket::OnClose(nErrorCode);
 }

 //登录
 void CClientSocket::OnLogoIN(char* buff, int nlen)
 {
	 //对得接收到的用户信息进行验证
	 //... (为了简化这步省略)
	 //登录成功
	 CTime time;
	 time = CTime::GetCurrentTime();
	 CString strTime = time.Format("%Y-%m-%d %H:%M:%S  ");

	 CString strTemp(buff);
	 strTime = strTime + strTemp + _T("  登录...\r\n");
	//记录日志
	 ((CNetChatServerDlg*)theApp.GetMainWnd())->DisplayLog(strTime);
	 m_strName = strTemp;
	 //更新服务列表
	 CString str1 = this->UpdateServerLog();
	 //更新在线所有客服端
	 this->UpdateAllUser(str1);
 }

//转发消息
 void CClientSocket::OnMSGTranslate(char* buff, int nlen)
 {
	 HEADER head;
	 head.type = MSG_SEND;
	 head.nContentLen = nlen;
	 POSITION ps = m_pList->GetHeadPosition();

	 while(ps!=NULL)
	 {
		CClientSocket* pTemp = (CClientSocket*)m_pList->GetNext(ps);
		pTemp->Send(&head,sizeof(HEADER));
		pTemp->Send(buff, nlen);
	 }
 }


 BOOL CClientSocket::WChar2MByte(LPCWSTR srcBuff, LPSTR destBuff, int nlen)
 {
	 int n = 0;
	 n = WideCharToMultiByte(CP_OEMCP,0, srcBuff, -1, destBuff,0, 0, FALSE );
	 if(n<nlen)
		return FALSE;

	 WideCharToMultiByte(CP_OEMCP, 0, srcBuff, -1, destBuff, nlen, 0, FALSE);

	 return TRUE;
 }

 //跟新所有在线用户
 void CClientSocket::UpdateAllUser(CString strUserInfo)
 {
	  HEADER _head;
	 _head.type = MSG_UPDATE;
	 _head.nContentLen = strUserInfo.GetLength()+1;
	 char *pSend = new char[_head.nContentLen];
	 memset(pSend, 0, _head.nContentLen*sizeof(char));
	if( !WChar2MByte(strUserInfo.GetBuffer(0), pSend, _head.nContentLen))
	{
		AfxMessageBox(_T("字符转换失败"));
		delete pSend;
		return;
	}
	POSITION ps = m_pList->GetHeadPosition();
	while(ps!=NULL)
	{
		 CClientSocket* pTemp = (CClientSocket*)m_pList->GetNext(ps);
		 //发送协议头
		 pTemp->Send((char*)&_head, sizeof(_head));
		 pTemp->Send(pSend,_head.nContentLen );
	}

	delete pSend;

 }

 //跟新服务器在线名单
 // 返回在线用户列表的String
CString CClientSocket::UpdateServerLog()
 {
	 CString strUserInfo = _T("");

	 POSITION ps = m_pList->GetHeadPosition();

	 while(ps!=NULL)
	 {
		 CClientSocket* pTemp = (CClientSocket*)m_pList->GetNext(ps);
		 strUserInfo += pTemp->m_strName + _T("#");
	 }
	((CNetChatServerDlg*)theApp.GetMainWnd())->UpdateUserInfo(strUserInfo);

	return strUserInfo;
 }
///////////////////////////////////////////////////////////////////////////////////////////////////////////////////////////////////////////////////////////////////////////////////////////////////////////////////////////////////////////////////////////////////////////////////////////////////////
在上面的代码中 还涉及到一个HEADER struct 这是一个我们自定义的一个头结构,相当于自定义的一个协议,不过这个很简化。在这个协议里我们要指定我们本次要发送数据
的type,既是我们发送的那种消息的数据。还有数据的长度。为了不浪费空间,我们选择2次发送。每次给服务器发数据时都 先发送一个协议头,然后再发送数据本身。
其实也可以既不浪费空间,也只发送一次。但是那就在发送之前,对数据进行序列化。在接收端接收到数据后又反序列化。但是C++中并没有提供相应的方法,所以我们要么自己写,要么用第三方的库类。但是这种方法代价比,我们分两次发送代价高得多,所以为了方便我们就分2次发送。
//////////////////////////////////////////////////////////////////////////////////////////////////////////////
////定义协议头 因为直接要传输的类容中有不确定长的的类容
///为了避免浪费空间选择分两部分传输,故定义一个头
////////////////////////////////////////////////////////////////////////////////////////////////////////////
#pragma once
////////////自定义协议///////////////////
const int MSG_LOGOIN = 0x01; //登录
const int MSG_SEND = 0x11; //发送消息
const int MSG_CLOSE = 0x02; //退出
const int MSG_UPDATE = 0x21; //更新信息
#pragma pack(push,1)
typedef struct tagHeader{
int type ;//协议类型
int nContentLen; //将要发送内容的长度
}HEADER ,*LPHEADER;
#pragma pack(pop)
这里面涉及了一个字节对齐的知识,请查看 http://blog.csdn.net/lh844386434/article/details/6680549
//////////////////////////////////////////////////////////////////////////////////////////////////////////////////////////////////////////////////////////////////////////////////////////////////////////////////////////////////////////////////////////////////////////////////////////////////////////
到这里基本服务器端基本有关发送的框架全部搭建完毕,剩下的就是一些界面编程,比如什么显示之类的工作,在这里我就不贴这些代码,但是呢我会在最后给出整个工程的下载地址,下面我们就简单看看客户端的代码
////////////////////////////////////////////////////////客户端//////////////////////////////////////////////////////////////
客户端相对来说要简单的多,他只涉及一个CClientSocket,但是呢,这个类并不是和服务器端那个一样的,只是名字相同而已。
首先还是要初始化socket库 不多说。位置和添加方法和客户端一样、接着创建客户端的套接字、然后连接服务器。
if(!AfxSocketInit())
	{
		AfxMessageBox(_T("初始化Socket库失败!"));
		return false;
	}

	m_pSocket = new CClientSocket();
	if(!m_pSocket)
	{
		AfxMessageBox(_T("内存不足!"));
		return false;
	}

	if(!m_pSocket->Create())
	{
		AfxMessageBox(_T("创建套接字失败!"));
		return false;
	}

	CLogoInDlg* pLogoinDlg;//登录对话框
	pLogoinDlg = new CLogoInDlg();

	if(pLogoinDlg->DoModal()==IDOK)//这里其实是点击了推出的按钮,只是ID我用的是IDOK的,没有修改
	{
		//不登录
		delete pLogoinDlg;
		m_pSocket->Close();
		return false;
	}
	else
	{
		delete pLogoinDlg;
	}
(上面还有一个CLogoInDlg类,那是一个登录对话框的类,在后面会给出他的部分代码。)
接着和服务器端一样,重载ExitInstance();
int CNetChatClientApp::ExitInstance()
{
	if(m_pSocket)
	{
		delete m_pSocket;
		m_pSocket = NULL;
	}

	return CWinApp::ExitInstance();
}

CClientSocket* CNetChatClientApp::GetMainSocket() const
{
	return m_pSocket;
}
//////////////////////////////////////////////////////////////////////////////////////////////////////////////////////////////////////////////////////////////////////////////////////////////////////////////////////////////////////////////////////////////////////////////////////////////////////////
然后 看看客户端的CClientSocket的实现
#pragma once

class CClientSocket : public CSocket
{
public:
	CClientSocket();
	virtual ~CClientSocket();
public:
	virtual void OnReceive(int nErrorCode);//客户端接收消息
	BOOL SendMSG(LPSTR lpBuff, int nlen);//客户端发送消息
	BOOL LogoIn(LPSTR lpBuff, int nlen);//客户端登录
	CString m_strUserName;//用户姓名
};
显然我们必须重载OnReceive函数,来处理接收到的数据,其他函数是一些事件处理函数,和说明一样
#include "stdafx.h"
#include "NetChatClient.h"
#include "ClientSocket.h"
#include "Header.h"
#include "NetChatClientDlg.h"
// CClientSocket

CClientSocket::CClientSocket()
	:m_strUserName(_T(""))
{

}

CClientSocket::~CClientSocket()
{
}


void CClientSocket::OnReceive(int nErrorCode)
{
	//首先接受head头
	HEADER head ;
	char* pHead = NULL;
	pHead =  new char[sizeof(head)];
	memset(pHead, 0, sizeof(head));
	Receive(pHead, sizeof(head));

	head.type =((LPHEADER)pHead)->type;
	head.nContentLen = ((LPHEADER)pHead)->nContentLen;
	delete pHead;
	pHead = NULL;

	char* pBuff = NULL;
	pBuff = new char[head.nContentLen];
	if(!pBuff)
	{
		AfxMessageBox(_T("内存不足!"));
		return;
	}
	memset(pBuff, 0 , sizeof(char)*head.nContentLen);
	if(head.nContentLen!=Receive(pBuff, head.nContentLen))
	{
		AfxMessageBox(_T("收到数据有误!"));
		delete pBuff;
		return;
	}
	CString strText(pBuff);
	switch(head.type)
	{
	case MSG_UPDATE:
		{
			CString strText(pBuff);
			((CNetChatClientDlg*)(AfxGetApp()->GetMainWnd()))->UpdateUserInfo(strText);
		}
		break;
	case MSG_SEND:
		{
			//显示接收到的消息
			CString str(pBuff);
			((CNetChatClientDlg*)(AfxGetApp()->GetMainWnd()))->UpdateText(str);
			break;
		}
	default: break;
	}

	delete pBuff;
	CSocket::OnReceive(nErrorCode);
}

BOOL CClientSocket::SendMSG(LPSTR lpBuff, int nlen)
{
	//生成协议头
	HEADER head;
	head.type = MSG_SEND;
	head.nContentLen = nlen;

	if(Send(&head, sizeof(HEADER))==SOCKET_ERROR)
	{
		AfxMessageBox(_T("发送错误!"));
		return FALSE;
	};
	if(Send(lpBuff, nlen)==SOCKET_ERROR)
	{
		AfxMessageBox(_T("发送错误!"));
		return FALSE;
	};

	return  TRUE;
}

BOOL CClientSocket::LogoIn(LPSTR lpBuff, int nlen)
{
	HEADER _head;
	_head.type = MSG_LOGOIN;
	_head.nContentLen = nlen;
	int _nSnd= 0;
	if((_nSnd = Send((char*)&_head, sizeof(_head)))==SOCKET_ERROR)
		return false;
	if((_nSnd = Send(lpBuff, nlen))==SOCKET_ERROR)
		return false;

	return TRUE;
}
//////////////////////////////////////////////////////////////////////////////////////////////////////////////////////////////////////////////////////////////////////////////////////////////////////////////////////////////////////////////////////////////////////////////////////////////////
最后来看看 登录、和发送消息的部分代码,也是和服务器端一样,分成两步分发送,先发协议头,再发内容
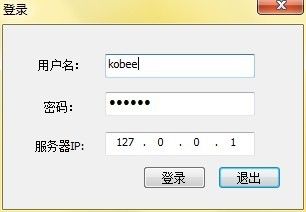
void CLogoInDlg::OnBnClickedBtnLogoin()
{
	//登录
	UpdateData();
	if(m_strUser.IsEmpty())
	{
		AfxMessageBox(_T("用户名不能为空!"));
		return;
	}

	if(m_dwIP==0)
	{
		AfxMessageBox(_T("无效IP地址"));
		return;
	}

	CClientSocket* pSock = theApp.GetMainSocket();
	IN_ADDR addr ;
	addr.S_un.S_addr = htonl(m_dwIP);
	CString strIP(inet_ntoa(addr));
	if(!pSock->Connect(strIP.GetBuffer(0),8989))
	{
		AfxMessageBox(_T("连接服务器失败!"));
		return ;
	}
	//发送
	pSock->m_strUserName = m_strUser;
	char* pBuff = new char[m_strUser.GetLength()+1];
	memset(pBuff, 0, m_strUser.GetLength());
	if(WChar2MByte(m_strUser.GetBuffer(0), pBuff, m_strUser.GetLength()+1))
		pSock->LogoIn(pBuff, m_strUser.GetLength()+1);
	delete pBuff;
	CDialogEx::OnCancel();
}


void CLogoInDlg::OnBnClickedOk()
{
	//退出
	CClientSocket* pSock = theApp.GetMainSocket();
	pSock->Close();
	CDialogEx::OnOK();
}
///消息发送
void CNetChatClientDlg::OnBnClickedBtnSend()
{
	//发送消息
	UpdateData();
	if(m_strSend.IsEmpty())
	{
		AfxMessageBox(_T("发送类容不能为空!"));
		return ;
	}

	CString temp ;
	CTime time = CTime::GetCurrentTime();
	temp = time.Format("%H:%M:%S");
	//姓名 +_T("\n\t") 时间
	m_strSend = theApp.GetMainSocket()->m_strUserName+_T("  ") + temp +_T("\r\n   ") + m_strSend +_T("\r\n");

	char* pBuff = new char[m_strSend.GetLength()*2];
	memset(pBuff, 0, m_strSend.GetLength()*2);
	//转换为多字节
	WChar2MByte(m_strSend.GetBuffer(0), pBuff, m_strSend.GetLength()*2);
	//
	theApp.GetMainSocket()->SendMSG(pBuff, m_strSend.GetLength()*2);

	delete pBuff;

	m_strSend.Empty();
	UpdateData(0);

}
void CNetChatClientDlg::UpdateUserInfo(CString strInfo)
{
	CString strTmp;
	CListBox* pBox = (CListBox*)GetDlgItem(IDC_LB_ONLINE);
	pBox->ResetContent();
	while(!strInfo.IsEmpty())
	{
		int n = strInfo.Find('#');
		if(n==-1)
			break;
		strTmp = strInfo.Left(n);
		pBox->AddString(strTmp);
		strInfo = strInfo.Right(strInfo.GetLength()-n-1);
	}
}

void CNetChatClientDlg::UpdateText(CString &strText)
{
	((CEdit*)GetDlgItem(IDC_ET_TEXT))->ReplaceSel(strText);
}
/////////////////////////////////////////以上都是部分代码,我会在后面给出工程下载地址//////////////////////////////////////////
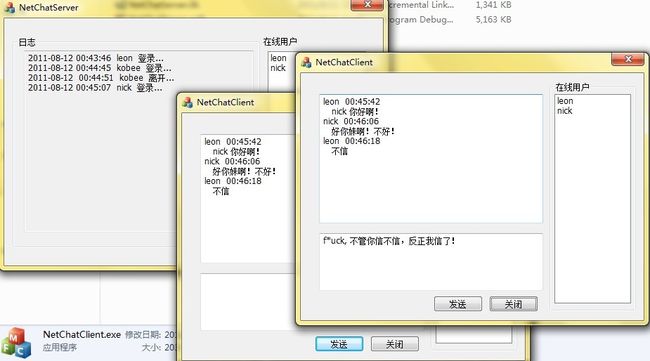
结束语: 我们简单的过了一下windows的网络编程,由于本人水平有限,又是刚开始学着写博客,所以其中错误难免。请大家见谅。其实上面的代码只是实现了,群聊天室。
并没有实现1对1的类似于QQ那种聊天,但是做到这一步,要实现QQ那种聊天那种应该很简单了,加一点代码就可以了。还有 由于最近时间比较紧我没有去写界面。那样的话又会添加更多的代码,但是我会在VC++重温笔记中,重温界面编程时,实现一个QQ2011 里面那种界面效果,在这里就不花时间了。
截图
登录:
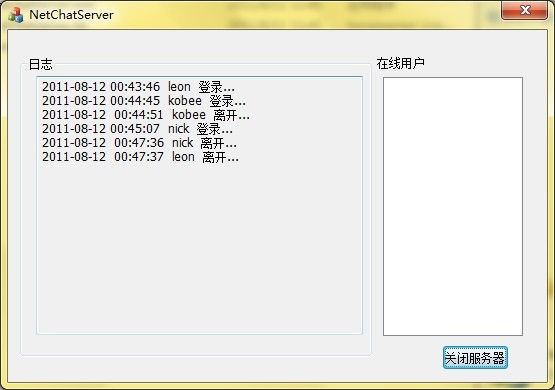
服务器记录日志:
两个用户聊天:
说明:本程序在vs2010+win7 X64中通过
工程下载地址: http://download.csdn.net/source/3513082


