android 完美的ListView实现【原创】
标签:自定义ListViw,android,
本文介绍如何自定义ListViw和设置ListView的样式。
转载请注明:QQ:273733055 [email protected] 来源于http://hi.baidu.com/adnroidorg/home
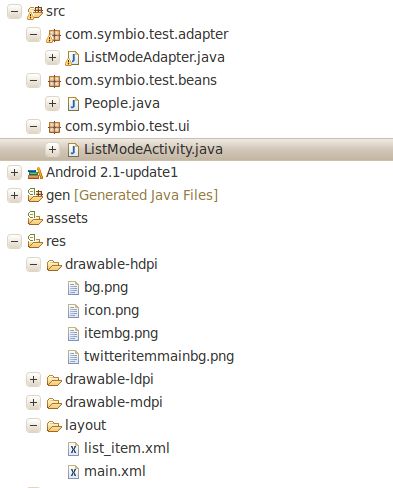
工程图:

转载请注明:QQ:273733055 [email protected] 来源于http://hi.baidu.com/adnroidorg/home
下图为初始的界面,下面我们就对他进行彻底的美化。
(效果图一)
上代码:
主布局文件:main.xml
<?xml version="1.0" encoding="utf-8"?>
<LinearLayout xmlns:ppwuyi="http://schemas.ppwuyi.com/apk/res/android"
ppwuyi:orientation="vertical" ppwuyi:layout_width="fill_parent"
ppwuyi:layout_height="fill_parent" ppwuyi:background="@drawable/bg">
<TextView ppwuyi:layout_width="fill_parent"
ppwuyi:layout_height="wrap_content" ppwuyi:text="@string/testList" />
<ListView ppwuyi:layout_width="fill_parent"
ppwuyi:layout_height="wrap_content" ppwuyi:id="@+id/listviews" />
</LinearLayout>
ListItem布局文件:
<?xml version="1.0" encoding="utf-8"?>
<RelativeLayout xmlns:ppwuyi="http://schemas.ppwuyi.com/apk/res/android"
ppwuyi:orientation="vertical" ppwuyi:layout_width="wrap_content"
ppwuyi:layout_height="wrap_content" ppwuyi:background="@drawable/itembg" >
<ImageView ppwuyi:layout_width="35dip" ppwuyi:layout_alignParentTop="true" ppwuyi:layout_alignParentLeft="true" ppwuyi:paddingLeft="4dip"
ppwuyi:layout_height="35dip" ppwuyi:id="@+id/avatar" ppwuyi:src="@drawable/icon"/>
<TextView ppwuyi:layout_width="wrap_content" ppwuyi:layout_alignParentTop="true" ppwuyi:layout_toRightOf="@+id/avatar" ppwuyi:paddingTop="10dip"
ppwuyi:layout_height="wrap_content" ppwuyi:id="@+id/username" ppwuyi:text="dsadsadsadsa"/>
<TextView ppwuyi:layout_width="wrap_content" ppwuyi:layout_below="@+id/avatar" ppwuyi:layout_alignParentLeft="true" ppwuyi:paddingLeft="4dip"
ppwuyi:layout_height="wrap_content" ppwuyi:id="@+id/description" ppwuyi:text="dsadsadsadsa" />
</RelativeLayout>
主文件代码:ListModeActivty.class
转载请注明:QQ:273733055 [email protected] 来源于http://hi.baidu.com/adnroidorg/home
/* */
* **
* __ __ __ __ __ __ __ _____ **
** | | | | | | / / / / / / / / |_ _| **
** | | | | | | / / / / / /___/ / | | **
** | |__| |___| | / /____/ / /_ _/ | | @author: [email protected] [email protected] **
** |____________| /__________/ | | _| |_ @version: 2010-07-25 下午05:43:35 **
/* |_| |_____| */
package com.symbio.test.ui;
import java.util.ArrayList;
import java.util.List;
import android.app.Activity;
import android.os.Bundle;
import android.util.Log;
import android.widget.ListView;
import com.symbio.test.adapter.ListModeAdapter;
import com.symbio.test.beans.People;
/***
* 实现list的自定义样式
*
* @author [email protected] [email protected]
*
*/
public class ListModeActivity extends Activity {
private static final String TAG=ListModeActivity.class.getName();
private ListView listviews;
@Override
public void onCreate(Bundle savedInstanceState) {
super.onCreate(savedInstanceState);
setContentView(R.layout.main);
Log.v(TAG,"onCreate .......");
InitView();
}
/***
* 初始化布局属性
*/
private void InitView() {
listviews = (ListView) findViewById(R.id.listviews);
List<People> listPeople = new ArrayList<People>(20);
ListModeAdapter mAdapter =new ListModeAdapter(this);
//-----------模拟一点数据哈哈----------------
for(int i=0;i<10;i++){
People p = new People();
p.username="ppwuyi"+i;
p.description ="this list";
p.avatar = R.drawable.icon;
listPeople.add(p);
}
mAdapter.setListBeans(listPeople);
listviews.setAdapter(mAdapter);
}
@Override
protected void onDestroy() {
Log.v(TAG,"onDestroy .......");
super.onDestroy();
}
@Override
protected void onPause() {
Log.v(TAG,"onPause .......");
super.onPause();
}
@Override
protected void onRestart() {
Log.v(TAG,"onRestart .......");
super.onRestart();
}
转载请注明:QQ:273733055 [email protected] 来源于http://hi.baidu.com/adnroidorg/home
@Override
protected void onRestoreInstanceState(Bundle savedInstanceState) {
Log.v(TAG,"onRestoreInstanceState .......");
super.onRestoreInstanceState(savedInstanceState);
}
@Override
protected void onResume() {
Log.v(TAG,"onResume .......");
super.onResume();
}
@Override
protected void onStart() {
Log.v(TAG,"onStart .......");
super.onStart();
}
@Override
protected void onStop() {
Log.v(TAG,"onStop .......");
super.onStop();
}
}
其他的文件都是简单的就不上传代码了哈。
问题出来了:滑动ListView出现黑色的背景如下图

解决方法:在ListView布局文件中添加
android:dividerHeight="1px" //每个item间隔 1px
android:divider="#00000000" //间隔区的颜色为白色透明度为0
android:cacheColorHint="#00000000" //滑动ListView的颜色为 白色透明度为0
这样就解决了,但是新的问题来了我想改变一下,当用户按下某一Item时的背景色,见下图

解决方法:在ListView布局文件中添加 android:listSelector="@drawable/twitteritemmainbg" //当选中时屏蔽黄色背景(非常讨厌是不)
效果图如下:

还有跟多关于android的秘密就在:
转载请注明:QQ:273733055 [email protected] 来源于http://hi.baidu.com/adnroidorg/home
本文介绍如何自定义ListViw和设置ListView的样式。
转载请注明:QQ:273733055 [email protected] 来源于http://hi.baidu.com/adnroidorg/home
工程图:

转载请注明:QQ:273733055 [email protected] 来源于http://hi.baidu.com/adnroidorg/home
下图为初始的界面,下面我们就对他进行彻底的美化。
(效果图一)
上代码:
主布局文件:main.xml
<?xml version="1.0" encoding="utf-8"?>
<LinearLayout xmlns:ppwuyi="http://schemas.ppwuyi.com/apk/res/android"
ppwuyi:orientation="vertical" ppwuyi:layout_width="fill_parent"
ppwuyi:layout_height="fill_parent" ppwuyi:background="@drawable/bg">
<TextView ppwuyi:layout_width="fill_parent"
ppwuyi:layout_height="wrap_content" ppwuyi:text="@string/testList" />
<ListView ppwuyi:layout_width="fill_parent"
ppwuyi:layout_height="wrap_content" ppwuyi:id="@+id/listviews" />
</LinearLayout>
ListItem布局文件:
<?xml version="1.0" encoding="utf-8"?>
<RelativeLayout xmlns:ppwuyi="http://schemas.ppwuyi.com/apk/res/android"
ppwuyi:orientation="vertical" ppwuyi:layout_width="wrap_content"
ppwuyi:layout_height="wrap_content" ppwuyi:background="@drawable/itembg" >
<ImageView ppwuyi:layout_width="35dip" ppwuyi:layout_alignParentTop="true" ppwuyi:layout_alignParentLeft="true" ppwuyi:paddingLeft="4dip"
ppwuyi:layout_height="35dip" ppwuyi:id="@+id/avatar" ppwuyi:src="@drawable/icon"/>
<TextView ppwuyi:layout_width="wrap_content" ppwuyi:layout_alignParentTop="true" ppwuyi:layout_toRightOf="@+id/avatar" ppwuyi:paddingTop="10dip"
ppwuyi:layout_height="wrap_content" ppwuyi:id="@+id/username" ppwuyi:text="dsadsadsadsa"/>
<TextView ppwuyi:layout_width="wrap_content" ppwuyi:layout_below="@+id/avatar" ppwuyi:layout_alignParentLeft="true" ppwuyi:paddingLeft="4dip"
ppwuyi:layout_height="wrap_content" ppwuyi:id="@+id/description" ppwuyi:text="dsadsadsadsa" />
</RelativeLayout>
主文件代码:ListModeActivty.class
转载请注明:QQ:273733055 [email protected] 来源于http://hi.baidu.com/adnroidorg/home
/* */
* **
* __ __ __ __ __ __ __ _____ **
** | | | | | | / / / / / / / / |_ _| **
** | | | | | | / / / / / /___/ / | | **
** | |__| |___| | / /____/ / /_ _/ | | @author: [email protected] [email protected] **
** |____________| /__________/ | | _| |_ @version: 2010-07-25 下午05:43:35 **
/* |_| |_____| */
package com.symbio.test.ui;
import java.util.ArrayList;
import java.util.List;
import android.app.Activity;
import android.os.Bundle;
import android.util.Log;
import android.widget.ListView;
import com.symbio.test.adapter.ListModeAdapter;
import com.symbio.test.beans.People;
/***
* 实现list的自定义样式
*
* @author [email protected] [email protected]
*
*/
public class ListModeActivity extends Activity {
private static final String TAG=ListModeActivity.class.getName();
private ListView listviews;
@Override
public void onCreate(Bundle savedInstanceState) {
super.onCreate(savedInstanceState);
setContentView(R.layout.main);
Log.v(TAG,"onCreate .......");
InitView();
}
/***
* 初始化布局属性
*/
private void InitView() {
listviews = (ListView) findViewById(R.id.listviews);
List<People> listPeople = new ArrayList<People>(20);
ListModeAdapter mAdapter =new ListModeAdapter(this);
//-----------模拟一点数据哈哈----------------
for(int i=0;i<10;i++){
People p = new People();
p.username="ppwuyi"+i;
p.description ="this list";
p.avatar = R.drawable.icon;
listPeople.add(p);
}
mAdapter.setListBeans(listPeople);
listviews.setAdapter(mAdapter);
}
@Override
protected void onDestroy() {
Log.v(TAG,"onDestroy .......");
super.onDestroy();
}
@Override
protected void onPause() {
Log.v(TAG,"onPause .......");
super.onPause();
}
@Override
protected void onRestart() {
Log.v(TAG,"onRestart .......");
super.onRestart();
}
转载请注明:QQ:273733055 [email protected] 来源于http://hi.baidu.com/adnroidorg/home
@Override
protected void onRestoreInstanceState(Bundle savedInstanceState) {
Log.v(TAG,"onRestoreInstanceState .......");
super.onRestoreInstanceState(savedInstanceState);
}
@Override
protected void onResume() {
Log.v(TAG,"onResume .......");
super.onResume();
}
@Override
protected void onStart() {
Log.v(TAG,"onStart .......");
super.onStart();
}
@Override
protected void onStop() {
Log.v(TAG,"onStop .......");
super.onStop();
}
}
其他的文件都是简单的就不上传代码了哈。
问题出来了:滑动ListView出现黑色的背景如下图

解决方法:在ListView布局文件中添加
android:dividerHeight="1px" //每个item间隔 1px
android:divider="#00000000" //间隔区的颜色为白色透明度为0
android:cacheColorHint="#00000000" //滑动ListView的颜色为 白色透明度为0
这样就解决了,但是新的问题来了我想改变一下,当用户按下某一Item时的背景色,见下图

解决方法:在ListView布局文件中添加 android:listSelector="@drawable/twitteritemmainbg" //当选中时屏蔽黄色背景(非常讨厌是不)
效果图如下:

还有跟多关于android的秘密就在:
转载请注明:QQ:273733055 [email protected] 来源于http://hi.baidu.com/adnroidorg/home