openwrt luci界面修改
1. 多语言
1)检查:
opkg list | grep luci-i18n-
2)安装语言包:
opkg install luci-i18n-hungarian
2.uhttpd
这个是LuCI所在的Web Server。docroot在/www下边,index-html指向了/cgi-bin/luci,注意这是相对于docroot而言的路径。
openwrt中利用它作为web服务器,实现客户端web页面配置功能。对于request处理方式,采用的是cgi,而所用的cgi程序就是luci。
1)工作框架如下图所示:
Client端和serv端采用cgi方式交互,uhttpd服务器的cgi方式中,fork出一个子进程,子进程利用execl替换为luci进程空间,并通过setenv环境变量的方式,传递一些固定格式的数据(如PATH_INFO)给luci。另外一些非固定格式的数据(post-data)则由父进程通过一个w_pipe写给luci的stdin,而luci的返回数据则写在stdout上,由父进程通过一个r_pipe读取。
2)luci 文件(权限一般是 755 ) , luci 的代码如下:
#!/usr/bin/lua -- 执行命令的路径
require"luci.cacheloader" -- 导入 cacheloader 包
require"luci.sgi.cgi" -- 导入 sgi.cgi 包
luci.dispatcher.indexcache = "/tmp/luci-indexcache" --cache 缓存路径地址
luci.sgi.cgi.run() -- 执 行 run 方法,此方法位于 /usr/lib/lua/luci/sgi/cgi.lua中
3)web配置时的数据交互:
-
首次运行时,是以普通的file方式获得docroot/index.html,该文件中以meta的方式自动跳转到cgi的url,这是web服务器的一般做法。
-
然后第一次执行luci,path_info='/',会alise到'/admin'('/'会索引到 tree.rootnode,并执行其target方法,即alise('/admin'),即重新去索引adminnode,这在后面会详细描述),该节点需要认证,所以返回一个登录界面。
-
第3次交互,过程同上一次的,只是这时已post来了登录信息,所以serv端会生成一个session值,然后执行'/admin'的target(它的target为firstchild,即索引第一个子节点),最终返回/admin/status.html,同时会把session值以cookie的形式发给client。这就是从原始状态到得到显示页面的过程,之后主要就是点击页面上的连接,产生新的request。
-
每个链接的url中都会带有一个stok值(它是serv生成的,并放在html中的url里),并且每个新request都要带有session值,它和stok值一起供serv端联合认证。
初始阶段http报文,可以看到从第2次交互开始,所有request都是cgi方式(除一些css、js等resource文件外),且执行的cgi程序都是luci,只是带的参数不同,且即使所带参数相同(如都是'/'),由于需要认证,执行的过程也是不同的。
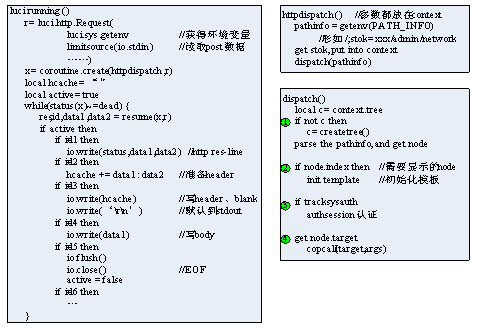
正是由于多种情况的存在,使得luci中需要多个判断分支,代码多少看起来有点乱,但openwrt还是把这些分支都糅合在了一个流程线中。下面首先给出整体流程,首先介绍一下lua语言中一个执行方式coroutine,它可以创造出另一个执行体,但却没有并行性,如下图所示,每一时刻只有一个执行体在执行,通过resume、yield来传递数据,且数据可以是任意类型,任意多个的。
Luci正是利用了这种方式,它首先执行的是running()函数,其中create出另一个执行体httpdispatch,每次httpdispatch执行yield返回一些数据时,running()函数就读取这些数据,做相应处理,然后再次执行resume(httpdispath),……如此直到httpdispatch执行完毕,如下图所示:
如上图所示,其实luci真正的主体部分正是dispatch,该函数中有多个判断分支,全部糅合在一起。
4)节点树node-tree
在controller目录下,每个.lua文件中,都有一个index()函数,其中主要调用entry()函数,形如entry(path,target,title,order),path形如{admin,network,wireless},entry()函数根据这些创建一个node,并把它放在全局node-tree的相应位置,后面的参数都是该node的属性,还可以有其他的参数。其中最重要的就是target。
Createtree()函数就是要找到controller目录下所有的.lua文件,并找到其中的index()函数执行,从而生成一个node-tree。这样做的io操作太多,为了效率,第一次执行后,把生成的node-tree放在/tmp/treecache文件中,以后只要没有更新(一般情况下,服务器里的.lua文件是不会变的),直接读该文件即可。生成的node-tree如下:
这里要注意的是,每次dispatch()会根据path_info逐层索引,且每一层都把找到的节点信息放在一个变量track中,这样做使得上层node的信息会影响下层node,而下层node的信息又会覆盖上层node。比如{/admin/system},最后的auto=false,target=aa,而由于admin有sysauth值,它会遗传给它的子节点,也即所有admin下的节点都需要认证。
5)target简介
对每个节点,最重要的属性当然是target,这也是dispatch()流程最后要执行的方法。target主要有:alise、firstchild、call、cbi、form、template。这几个总体上可以分成两类,前两种主要用于链接其它node,后一个则是主要的操作、以及页面生成。下面分别描述。
链接方法:在介绍初始登录流程时,已经讲到了这种方法。比如初始登录时,url中的path_info仅为'/',这应该会索引到rootnode节点。而该节点本身是没有内容显示的,所以它用alias('admin')方法,自动链接到admin节点。再比如,admin节点本身也没有内容显示,它用firstchild()方法,自动链接到它的第一个子节点/admin/status。
操作方法:这种方法一般用于一个路径的叶节点leaf,它们会去执行相应的操作,如修改interface参数等,并且动态生成页面html文件,传递给client。这里实际上是利用了所谓的MVC架构,这在后面再描述,这里主要描述luci怎么把生成的html发送给client端。
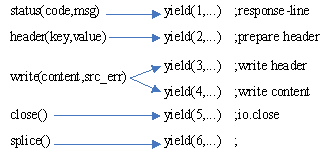
Call、cbi、form、template这几种方法,执行的原理各不相同,但最终都会生成完整的http-response报文(包括html文件),并调用luci.template.render(),luci.http.redirect()等函数,它们会调用几个特殊的函数,把报文内容返回给luci.running()流程。
如上图所示,再联系luci.running()流程,就很容易看出,生成的完整的http-response报文会通过io.write()写在stdout上,而uhttpd架构已决定了,这些数据将传递给父进程,并通过tcp连接返回给client端。
6)sysauth用户认证
由于节点是由上而下逐层索引的,所以只要一个节点有sysauth值,那么它所有的子节点都需要认证。不难想象,/admin节点有sysauth值,它以下的所有子节点都是需要认证才能查看、操作的;/mini节点没有sysauth值,那么它以下的所有子节点都不需要认证。
luci中关于登陆密码,用到的几个函数为:
可以看出它的密码是用的linux的密码,而openwrt的精简内核没有实现多用户机制,只有一个root用户,且开机时自动以root用户登录。要实现多用户,必须在web层面上,实现另外一套(user、passwd)系统。
另外,认证后,serv端会发给client一个session值,且它要一直以cookie的形式存在于request报文中,供serv端来识别用户。这是web服务器的一般做法,这里就不多讲了。
7)MVC界面生成
这其实是luci的精华所在,/usr/lib/lua/luci/下有三个目录model、view、controller,它们对应M、V、C。下面简单介绍生成界面的方法。
Call()方法会调用controller里的函数,主要通过openwrt系统的uci、network、inconfig等工具对系统进行设置,如果需要还会生成新界面。动态生成界面的方法有两种,一是通过cbi()/form()方法,它们利用model中定义的模板map,生成html文件;另一种是通过template()方法,利用view中定义的htm(一种类似html的文件),直接生成界面。
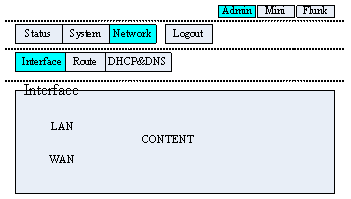
上面的标题是由node-tree生成的,下面的内容由每个node通过上面的方法来动态生成。这套系统是很复杂的,但只要定义好了,使用起来就非常方便,增加页面,修改页面某个内容等操作都非常简单。
8)启动:
/etc/init.d/uhttpd start
9)开机自启动:
/etc/init.d/uhttpd enable
代码分析
1,启动:
在浏览器中输入:http://192.168.1.1/ 会自动跳到http://192.168.1.1/cgi-bin/luci
luci\modules\base\htdocs\cgi-bin\luci
#!/usr/bin/lua -- 执行命令的路径
require"luci.cacheloader" -- 导入 cacheloader 包
require"luci.sgi.cgi" -- 导入 sgi.cgi 包
luci.dispatcher.indexcache = "/tmp/luci-indexcache" --cache 缓存路径地址
luci.sgi.cgi.run() -- 执 行 run 方法,此方法位于 luci\modules\base\luasrc\sgi\cgi.lua 中
run方法
luci\modules\base\luasrc\sgi\cgi.lua
function run()
	local r = luci.http.Request(
		luci.sys.getenv(),
		limitsource(io.stdin, tonumber(luci.sys.getenv("CONTENT_LENGTH"))),
		ltn12.sink.file(io.stderr)
	)

	local x = coroutine.create(luci.dispatcher.httpdispatch) //开启协助线程---->调用luci\modules\base\luasrc\dispatcher.lua里的httpdispatch函数
	local hcache = ""
	local active = true

	while coroutine.status(x) ~= "dead" do
		local res, id, data1, data2 = coroutine.resume(x, r)

		if not res then
			print("Status: 500 Internal Server Error")
			print("Content-Type: text/plain\n")
			print(id)
			break;
		end

		if active then
			if id == 1 then
				io.write("Status: " .. tostring(data1) .. " " .. data2 .. "\r\n")
			elseif id == 2 then
				hcache = hcache .. data1 .. ": " .. data2 .. "\r\n"
			elseif id == 3 then
				io.write(hcache)
				io.write("\r\n")
			elseif id == 4 then
				io.write(tostring(data1 or ""))
			elseif id == 5 then
				io.flush()
				io.close()
				active = false
			elseif id == 6 then
				data1:copyz(nixio.stdout, data2)
				data1:close()
			end
		end
	end
end
2,进入网页
在浏览器中输入:http://192.168.1.1/ 会自动跳到http://192.168.1.1/cgi-bin/luci 登陆默认root 密码是空,默认的几个一级菜单都是在modules\admin-full\luasrc\controller\admin\ 这个目录下,index.lua为执行文件
module("luci.controller.admin.index", package.seeall)           //声明一下这个模块, 模块入口为函数

function index()
	local root = node()   //定义了最外面的节点,也就是最上层的菜单显示
	if not root.target then
		root.target = alias("admin")
		root.index = true
	end

	local page   = node("admin")
	page.target  = firstchild() //----->luci\modules\base\luasrc\dispatcher.lua--->firstchild()
	page.title   = _("Administration")
	page.order   = 10
	page.sysauth = "root"
	page.sysauth_authenticator = "htmlauth" //---->luci\modules\base\luasrc\dispatcher.lua---->htmlauth() 找到哪个用户
        page.ucidata = true
	page.index = true

	-- Empty services menu to be populated by addons
	entry({"admin", "services"}, firstchild(), _("Services"), 40).index = true

	entry({"admin", "logout"}, call("action_logout"), _("Logout"), 90)
end
entry 定义了菜单下的一个子菜单。
entry(路径, 调用目标, _("显示名称"), 显示顺序)
entry(path, target, title=nil, order=nil)
第1项为菜单入口;
第2项为菜单对应的页面,可以是lua的源代码文件,也可以是html页面,甚至可以是以上两种页面的组合。(alias是指向别的entry的别名,from调用的某一个view,cbi调用某一个model,call直接调用函数)
第3项是菜单的文本,直接添加string不会国际化,_("string"),就国际化了
第4项是同级菜单下,此菜单项的位置,从大到小。
3,登陆
目录:luci\modules\base\luasrc\dispatcher.lua
function authenticator.htmlauth(validator, accs, default)
	local user = luci.http.formvalue("username")
	local pass = luci.http.formvalue("password")

	if user and validator(user, pass) then
		return user
	end

	require("luci.i18n")
	require("luci.template")
	context.path = {}
	luci.template.render("sysauth", {duser=default, fuser=user})
	return false

end
4.子菜单项
function _firstchild()
   local path = { unpack(context.path) }
   local name = table.concat(path, ".")   //当前目录下,既:luci\modules\admin-full\luasrc\controller\admin\
   local node = context.treecache[name]

   local lowest
   if node and node.nodes and next(node.nodes) then
	  local k, v
	  for k, v in pairs(node.nodes) do
		 if not lowest or
			(v.order or 100) < (node.nodes[lowest].order or 100)
		 then
			lowest = k
		 end
	  end
   end

   assert(lowest ~= nil,
		  "The requested node contains no childs, unable to redispatch")

   path[#path+1] = lowest
   dispatch(path)
end

--- Alias the first (lowest order) page automatically
function firstchild()
   return { type = "firstchild", target = _firstchild }
end
entry({"admin", "services"}, {"firstchild","network.lua system.lua ......"}, _("Services"), 40).index = true如上可以看出,登陆后第一级目录如下:luci\modules\admin-full\luasrc\controller\admin\下的xxx.lua文件
增加一个菜单:http://www.right.com.cn/forum/thread-131035-1-1.html


