eclipse+axis2+tomcat 进行web部署
原帖:http://hi.baidu.com/lxmxuelong/item/875464aa3ff11703a9cfb73f
我用的是eclipse indigo release2、axis2 1.6.2、 tomcat6.0。
jdk已经安装并成功配置。
第一步:下载eclipse indigo release2,下载地址:http://mirrors.ustc.edu.cn/eclipse/technology/epp/downloads/release/indigo/SR2/eclipse-jee-indigo-SR2-win32.zip
解压后直接可用。
第二步:下载并安装tomcat插件
http://www.fayea.com/apache-mirror/tomcat/tomcat-6/v6.0.35/bin/apache-tomcat-6.0.35.zip
eclipse tomcat插件:http://www.eclipsetotale.com/tomcatPlugin/tomcatPluginV33.zip
解压tomcatPluginV33.zip,将解压后的文件放到eclipse/plugins内,重启eclipse,可看见tomcat图标,在window/perference 下,
选择tomcat,tomcat version里选择version 6.x,tomcat home 中选择tomcat 的安装目录。按tomcat启动图标,
在浏览器里输入http://localhost:8080/,可以看见官网。说明已经成功了。
第二步:下载axis2,
http://apache.etoak.com//axis/axis2/java/core/1.6.2/axis2-1.6.2-bin.zip
http://apache.etoak.com//axis/axis2/java/core/1.6.2/axis2-1.6.2-war.zip
将axis2-1.6.2-bin.zip解压到电脑中的任意目录,
将axis2-1.6.2-war.zip解压后,放到tomcat的webapps目录下,重启tomcat,会发现webapps目录下多了axis2文件夹,
在浏览器里输入http://localhost:8080/axis2,会发现对应的网页,说明已经成功了。
在eclipse中进行配置,会出现Axis2 runtime loaded successfully,说明加载成功了。 再下载两个插件: http://apache.etoak.com/axis/axis2/java/core/1.6.2/axis2-eclipse-codegen-plugin-1.6.2.zip http://mirror.bit.edu.cn/apache/axis/axis2/java/core/1.6.2/axis2-eclipse-service-plugin-1.6.2.zip
解压后都放到eclipse的plugins目录下,在eclipse中,file-->new.-->others..里面会出现axis2 wizards
这样,axis2 配置完成了,可以进行web service开发了。。。
一、建立要发布的Web Service
1.1 解压所下载的axis2-1.6.0-bin.zip,在Eclipse中的Windows\Preferences下new一个User Libraries,命名为axis2,将解压后文件夹中 axis2-1.6.0\lib 下的包均添加进来。这一步操作的目的是为了以后工程方便添加axis2所需的 jar文件。
1.2 建立一个JavaProject,命名为sayHello,将axis2用户库加入到build path中
1.3 现在开始编写要发布的WebService,在src包中建包Hi,建立Hello类如下:
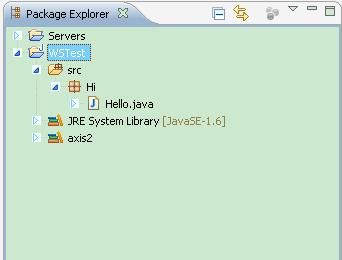
此时sayHello工程结构如下:
二、发布Web Service
2.1 编译刚刚建立的Hello类,类编译后,会在workspace中对应工程目录下的bin文件夹下生成Hello.class文件
2.2 打包要发布的Service, 点击Eclipse中New ——> File ——> Other ——> Axis2 wizards ——> Axis2 Services Archiver,按照向导选择刚建立的类编译后的class文件。
注意点:
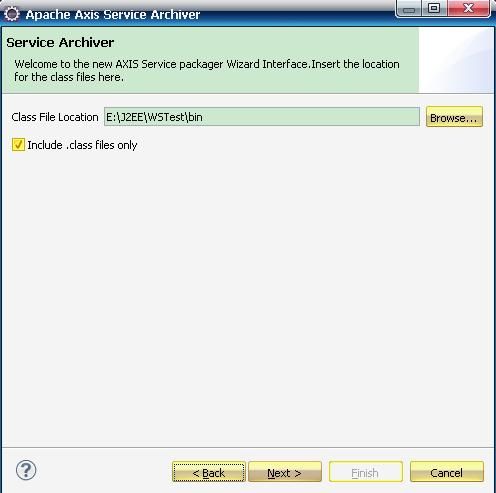
1、在我的工程中,workspace是E:\J2EE,选择class目录,本工程中class Hello是带包Hi的,因此我们不能选成E:\J2EE\sayHello\bin\Hi,而应该选择E:\J2EE\WSTest\bin,如图所示:
2、next后,默认选择Skip WSDL
3、继续next,这两步默认,什么都不选
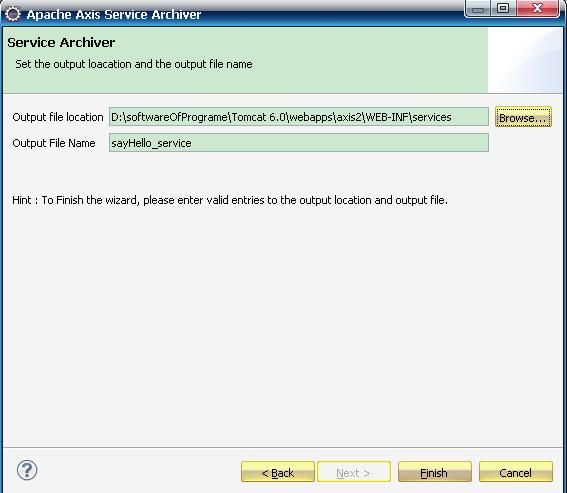
4、设定服务名称和所使用的类名,点击Load如下所示:
注意Class name请务必设为Hi.Hello,代表使用的类是E:\J2EE\sayHello\bin路径下,文件夹Hi下的Hello类,否则Load不上的。
5 设置输出路径为: \webapps\axis2\WEB-INF\services
6 点击Finish完成发布。
三、测试所发布的Web Service
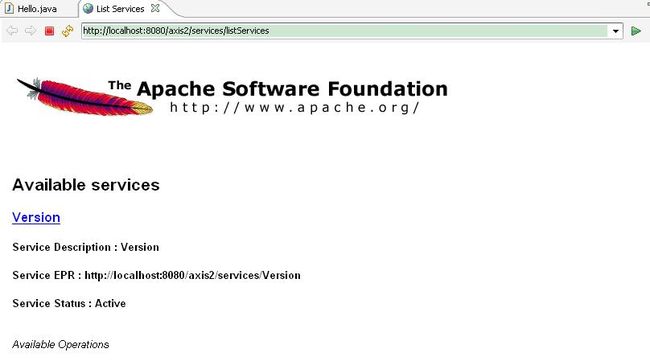
打开http://localhost:8080/axis2/services/listServices页面,可以看到sayHello服务:
点击进到sayHello的wsdl页面:http://localhost:8080/axis2/services/sayHello?wsdl,表明服务部署正确。
四、编写客户端代码调用WebService本文例子与其他例子最大的不同就在这里,其他例子一般需要根据刚才的服务wsdl生成客户端stub,然后通过stub来调用服务,这种方式显得比较单一,客户端必须需要stub存根才能够访问服务,很不方面。本例子的客户端不采用stub方式,而是一种实现通用的调用方式,不需要任何客户端存根即可访问服务。只需要指定对于的web servce地址、操作名、参数和函数返回类型即可。工程结构如下:

package Hi;
import javax.xml.namespace.QName;
import org.apache.axis2.AxisFault;
import org.apache.axis2.addressing.EndpointReference;
import org.apache.axis2.client.Options;
import org.apache.axis2.rpc.client.RPCServiceClient;
public class MyClient {
private RPCServiceClient serviceClient ;
private Options options;
private EndpointReference targetEPR;
public MyClient(String endPoint)throws AxisFault{
//使用RPC方式调用webService
serviceClient = new RPCServiceClient ();
//
options = serviceClient.getOptions();
//制定调用webservice的URL
targetEPR = new EndpointReference(endPoint);
//
options.setTo(targetEPR);
}
public Object[] invokeOP(String targetNameSpace, String opName,
Object[] opArgs, Class<?>[] opReturnType )throws AxisFault,ClassNotFoundException{
//制定要调用的example方法和wsdl文件的命名空间
QName opQName = new QName(targetNameSpace, opName);
//指定example方法并输出该方法的返回值
//参数:调用的方法名,调用的参数名,调用方法的返回类型
return serviceClient.invokeBlocking(opQName, opArgs, opReturnType);
}
public static void main(String args[])throws AxisFault,ClassNotFoundException{
final String endPointReference = "http://localhost:8080/axis2/services/sayHello";
final String targetNameSpace = "http://Hi";
MyClient client = new MyClient (endPointReference);
String opName = "sayHello";
//指定example方法的参数值
Object[] opArgs = new Object[]{"My Friends"};
//指定example方法返回数据值的数据类型的Class对象
Class<?>[] opReturnType = new Class[] {String[].class};
Object[] response = client.invokeOP(targetNameSpace, opName, opArgs, opReturnType);
System.out.println("result--->" + ((String[])response[0])[0]);
}
}
运行该程序,点击Run As->Java application,可以看到控制台端口的输出是:result--->Hello, My Friends,表明客户端调用成功。


