ant基础
1.ant安装:
配置环境变量:在path下面添加Ant解压后的bin目录
2.ant基础配置:build.xml
1>project--根目录,defaulte属性指明当执行ant时默认执行的任务
2>target-表示每一项具体的任务,当不同的任务之间有相应的关联时可以通过depends属性来设定
3>ant编译普通的java文件的流程:
a.创建文件夹--
build(所有的文件信息都保存在该文件夹中),
src(所有的源码信息都保存在这个文件夹中),
classes(编译好的所有文件都保存在这个文件夹中),
dist(编译好的jar文件保存在文件夹中)

b.将src文件夹的数据拷贝到build/src中

c.编译源代码
d.将源代码打包为jar

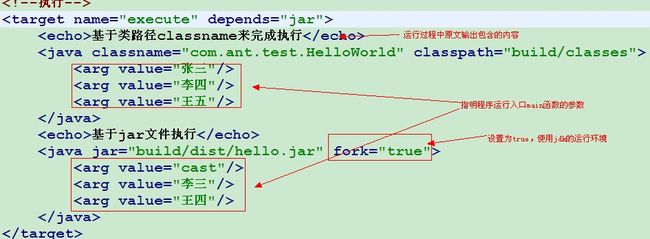
e.直接运行程序
3.ant的文件集、文件路径和属性:
1>ant的文件集:fieldset
fieldset可以设定一组文件集来进行操作,其中dir指明文件集要进行选择的路径,通过id可以指定这个文件的名称,在使用的时候进行直接引入,include和exclude可以设定包含返回和排除的范围,**/*.*指明所有目录中的所有文件

2>ant的属性:
a.自定义的属性:使用属性指明工程的构建路径

引用:
使用属性文件对属性进行定义:
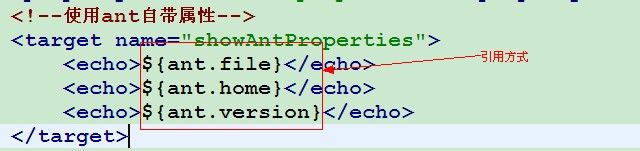
b.ant的属性:
os.name: 操作系统的名称。
basedir: 项目引用的根路径。
ant.home: Ant工具的根目录位置。
ant.file: 构件文件的绝对路径。
ant.version: ant的版本信息。
ant.java.version: ant检测到的JVM版本。
ant.project.name: 当前执行的项目名称及信息。
java.version: Java的版本信息。
java.home: Java的根目录位置。
java.class.path: Java类库的文件的位置。
line.separator: 换行符.
user.home: 用户的home目录,在Linux和UNIX中经常甬道。
c.ant使用环境变量:

4.ant进行测试的编译:
1>创建属性
<!--利用属性指定自动化构建的文件目录-->
	<property name="src.dir" location="src"></property>
	<property name="test.src.dir" location="test"></property>
	<property name="lib.dir" location="lib"></property>
	<property name="build.dir" location="build"></property>
	<property name="build.classes" location="${build.dir}/classes"></property>
	<property name="build.test.dir" location="${build.dir}/test"></property>
	<property name="build.test.classes" location="${build.test.dir}/classes"></property>
	<property name="build.test.report" location="${build.test.dir}/report"></property>
	<!--单个测试类配置,不灵活-->
	<!--<property name="run-test.class" value="com.junit.test.TestHelloWorld"></property>-->
	<!--批量测试目录指定-->
	<property name="run-test.class" value="**/Test*.class"></property>
	<!--编译时需要的外部jar包的路径-->
	<path id="compile-path">
		<fileset dir="${lib.dir}" includes="*.jar"></fileset>
	</path>
	<!--编译test中的文件需要依赖的源文件编译路径,同时需要引用jar包的路径-->
	<path id="compile-test-path">
		<path refid="compile-path"></path>
		<pathelement location="${build.classes}"/>
	</path>
	<!--运行测试时需要指明编译后的test路径-->
	<path id="run-test-path">
		<path refid="compile-test-path"></path>
		<pathelement location="${build.test.classes}"/>
	</path>
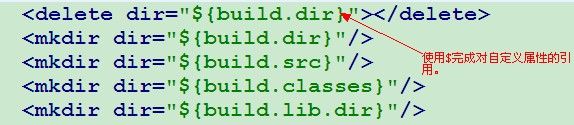
2>根据属性创建相应的文件夹,在创建之前先进行清空处理
<!--清空构建的所有目录-->
	<target name="clean">
		<echo>进行项目的清理工作</echo>
		<delete dir="${build.dir}"></delete>
	</target>

	<!--构建整个自动化的文件目录-->
	<target name="init">
		<echo>进行项目初始化</echo>
		<mkdir dir="${build.dir}"/>
		<mkdir dir="${build.classes}"/>
		<mkdir dir="${build.test.dir}"/>
		<mkdir dir="${build.test.classes}"/>
		<mkdir dir="${build.test.report}"/>
	</target>
3>编译源文件
<!--编译源文件-->
	<target name="compile" depends="init">
		<echo>编译源文件</echo>
		<javac encoding="gbk" includeantruntime="true"
			failonerror="true" destdir="${build.classes}"
			srcdir="${src.dir}" classpathref="compile-path"></javac>
	</target>
3>编译测试文件
<!--编译测试源文件-->
	<target name="compileTest" depends="compile">
		<echo>编译测试源文件</echo>
		<javac encoding="gbk" includeantruntime="true"
			failonerror="true" destdir="${build.test.classes}"
			srcdir="${test.src.dir}" classpathref="compile-test-path"></javac>
	</target>
4>运行单元测试
<!--运行测试-->
	<target name="run-test" depends="compileTest">
		<echo>运行单元测试</echo>
		<junit printsummary="false" haltonfailure="false">
			<classpath refid="run-test-path"></classpath>
			<formatter type="brief" usefile="false"/>
			<formatter type="xml"/>
			<!--单个测试-->
			<!--<test name="${run-test.class}"></test>-->
			<!--批量测试-->
			<batchtest todir="${build.test.report}">
				<fileset dir="${build.test.classes}" includes="${run-test.class}"></fileset>
			</batchtest>
		</junit>
		<junitreport todir="${build.test.report}">
			<fileset dir="${build.test.report}" includes="TEST-*.xml">
			</fileset>
			<report format="frames" todir="${build.test.report}/html"/>
		</junitreport>
	</target>
5>生成单元测试报告
<junitreport todir="${build.test.report}">
			<fileset dir="${build.test.report}" includes="TEST-*.xml">
			</fileset>
			<report format="frames" todir="${build.test.report}/html"/>
		</junitreport>
5.ant生成doc文档
<!--生成javadoc文档 -->
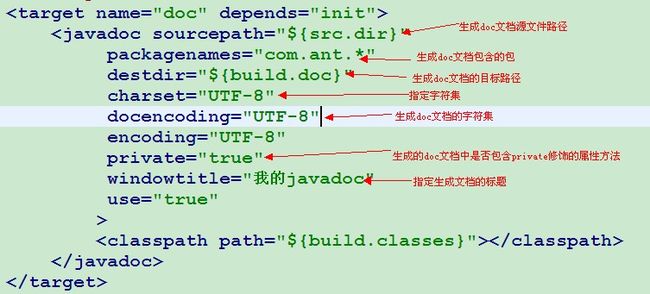
<target name="doc" depends="init">
<javadoc sourcepath="${src.dir}"
packagenames="com.ant.*"
destdir="${build.doc}"
charset="UTF-8"
docencoding="UTF-8"
encoding="UTF-8"
private="true"
windowtitle="我的javadoc"
use="true"
>
<classpath path="${build.classes}"></classpath>
</javadoc>
</target>
6.ant打包生成zip包
<!--打包 -->
	<target name="zip" depends="doc">
		<zip destfile="${zip.dir}/${zip.name}" duplicate="preserve">
			<zipfileset dir="${build.doc}" includes="**/*.*" prefix="${project.name}/doc/api"></zipfileset>
			<zipfileset dir="${src.dir}" includes="**/*.*" prefix="${project.name}/src"></zipfileset>
		</zip>
	</target>

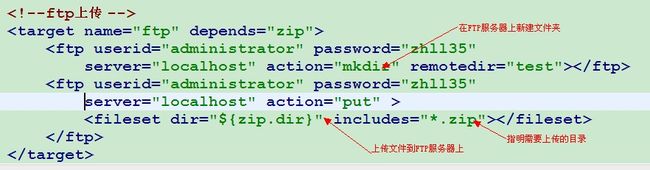
7.ant使用ftp上传:
<!--ftp上传 -->
<target name="ftp" depends="zip">
<ftp userid="administrator" password="zhll35" server="localhost" action="mkdir" remotedir="test"></ftp>
<ftp userid="administrator" password="zhll35" server="localhost" action="put" >
<fileset dir="${zip.dir}" includes="*.zip"></fileset>
</ftp>
</target>
8.完整的项目实例(基于普通的java程序)
1>创建属性
2>编译源码
3>编译测试代码
4>运行测试并生成报告
5>生成一个java的API DOC文档
6>生成jar文件
7>生成zip压缩包
8>通过邮件或ftp等方式直接发布项目