Android UI 利用Drawable Shape给控件加边框/立体效果
在软开中,经常需要对原生的控件UI进行修改,最近项目由于UI没到位,所有有些带边框的有立体效果的UI要自己实现,实现方法是用XML写Shape。
关于Drawable Shape XML的详细内容官方API doc提供的还是挺详细的:http://developer.android.com/guide/topics/resources/drawable-resource.html#Shape
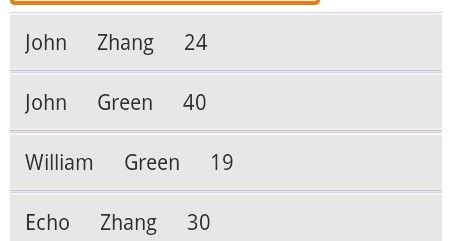
ListView Items加边框构成立体效果:
通过图像工具放大镜的帮助,其实可以发现一个Item背景其实是5个矩形组成:
所以我们可以通过5个矩形shape的top和bottom的挤压画出我们上图的效果:list_item_border.xml
<?xml version="1.0" encoding="UTF-8"?>
<layer-list xmlns:android="http://schemas.android.com/apk/res/android">
    <item>
        <shape android:shape="rectangle">
            <solid android:color="#D2D6D8" />
        </shape>
    </item>
    <item android:top="1dp">
        <shape android:shape="rectangle">
            <solid android:color="#C2C5C9" />
        </shape>
    </item>
    <item android:top="1dp" android:bottom="1dp">
        <shape android:shape="rectangle">
            <solid android:color="#F3F3F3" />
        </shape>
    </item>
    <item android:top="2dp" android:bottom="1dp">
        <shape android:shape="rectangle">
            <solid android:color="#EBEBEA" />
        </shape>
    </item>
    <item android:bottom="2dp" android:top="2dp">
        <shape android:shape="rectangle">
            <solid android:color="#E6E6E6"/>
        </shape>
    </item>
</layer-list>
最后把Item的背景设置成这个就可以了:
android:background="@drawable/list_item_border"

同样用放大镜可以看到分割线其实是4个矩形(或者是4条线),但是不能和上面一样写,不然会被最后一个矩形把图像颜色都占满(这个问题我纠结很久)。应该和画线条一下写矩形:
<?xml version="1.0" encoding="utf-8"?>
<layer-list xmlns:android="http://schemas.android.com/apk/res/android" >
    <item>
        <shape>
            <solid android:color="#E4E4E4"/>
            <size android:height="1dp"/>
        </shape>
    </item>
    <item android:top="1dp">
        <shape>
            <solid  android:color="#B8BDC2"/>
            <size android:height="1dp"/>
        </shape>
    </item>
    <item android:top="2dp">
        <shape>
            <solid  android:color="#EBECED"/>
            <size android:height="1dp"/>
        </shape>
    </item>
    <item android:top="3dp">
        <shape>
            <solid  android:color="#ECECEC"/>
            <size android:height="1dp"/>
        </shape>
    </item>
</layer-list>
就是给它们定好高度,然后一条条向下压。
补充下,圆角和可见边框的实现:其实很简单,分别采用Shape的<corners /> 和 <stroke />实现
圆角关键在于android:radius属性,这个是半径,数字越大,圆角越圆。
可见边框设置宽度就可以了,还有一个就是dash虚线的属性。这样实现边框都是全部的(矩形就是四边),如果想实现单边,那么你就只能用本文最开始的那个方法用两个(多个)矩形拼出只有一个边框的矩形。
