maven+snoatype nexus+jrebel+eclipse+tomcat整合的小例子
首先安装nexus做为maven的私服:[具体请看我的另一文章。]

点击install-nexus安装nexus为服务后,访问:http://localhost:8081/nexus/
点击后上角的log in输入默认用户名和密码:admin/admin123,然后点击左侧的菜单repositories,依次单击将右面显示的三个type为proxy的configure中的Download Remote Indexes设置为true;
这么做的目的是同步下载远程索引到本地,以便本地快速搜索。点击保存后依次右键这3个仓库将其repair index。以便更新本地索引。

2,配置maven,关于maven环境变量的设置就不说了。网上有的是。
<?xml version="1.0" encoding="UTF-8"?>
<settings xmlns="http://maven.apache.org/SETTINGS/1.0.0"
          xmlns:xsi="http://www.w3.org/2001/XMLSchema-instance"
          xsi:schemaLocation="http://maven.apache.org/SETTINGS/1.0.0 http://maven.apache.org/xsd/settings-1.0.0.xsd">
  <!-- localRepository
   | The path to the local repository maven will use to store artifacts.
   |
   | Default: ~/.m2/repository-->
  <localRepository>F:/mvn/repository</localRepository>


  <!-- interactiveMode
   | This will determine whether maven prompts you when it needs input. If set to false,
   | maven will use a sensible default value, perhaps based on some other setting, for
   | the parameter in question.
   |
   | Default: true
  <interactiveMode>true</interactiveMode>
  -->

  <!-- offline
   | Determines whether maven should attempt to connect to the network when executing a build.
   | This will have an effect on artifact downloads, artifact deployment, and others.
   |
   | Default: false
  <offline>false</offline>
  -->

  <!-- pluginGroups
   | This is a list of additional group identifiers that will be searched when resolving plugins by their prefix, i.e.
   | when invoking a command line like "mvn prefix:goal". Maven will automatically add the group identifiers
   | "org.apache.maven.plugins" and "org.codehaus.mojo" if these are not already contained in the list.
   |-->
  <pluginGroups>
    <!-- pluginGroup
     | Specifies a further group identifier to use for plugin lookup.
    <pluginGroup>com.your.plugins</pluginGroup>
    -->
  </pluginGroups>

  <!-- proxies
   | This is a list of proxies which can be used on this machine to connect to the network.
   | Unless otherwise specified (by system property or command-line switch), the first proxy
   | specification in this list marked as active will be used.
   |-->
  <proxies>
    <!-- proxy
     | Specification for one proxy, to be used in connecting to the network.
     |
    <proxy>
      <id>optional</id>
      <active>true</active>
      <protocol>http</protocol>
      <username>proxyuser</username>
      <password>proxypass</password>
      <host>proxy.host.net</host>
      <port>80</port>
      <nonProxyHosts>local.net|some.host.com</nonProxyHosts>
    </proxy>
    -->
  </proxies>

  <!-- servers
   | This is a list of authentication profiles, keyed by the server-id used within the system.
   | Authentication profiles can be used whenever maven must make a connection to a remote server.
   |-->
  <servers>
  <server>
      <id>nexus-releases</id>
      <username>admin</username>
      <password>admin123</password>
    </server>
    <server>
      <id>nexus-snapshots</id>
      <username>admin</username>
      <password>admin123</password>
    </server>
    <!-- server
     | Specifies the authentication information to use when connecting to a particular server, identified by
     | a unique name within the system (referred to by the 'id' attribute below).
     |
     | NOTE: You should either specify username/password OR privateKey/passphrase, since these pairings are
     |       used together.
     |
    <server>
      <id>deploymentRepo</id>
      <username>repouser</username>
      <password>repopwd</password>
    </server>
    -->

    <!-- Another sample, using keys to authenticate.
    <server>
      <id>siteServer</id>
      <privateKey>/path/to/private/key</privateKey>
      <passphrase>optional; leave empty if not used.</passphrase>
    </server>
    -->
  </servers>

  <!-- mirrors
   | This is a list of mirrors to be used in downloading artifacts from remote repositories.
   |
   | It works like this: a POM may declare a repository to use in resolving certain artifacts.
   | However, this repository may have problems with heavy traffic at times, so people have mirrored
   | it to several places.
   |
   | That repository definition will have a unique id, so we can create a mirror reference for that
   | repository, to be used as an alternate download site. The mirror site will be the preferred
   | server for that repository.
   |-->
  <mirrors>
    <!-- mirror
     | Specifies a repository mirror site to use instead of a given repository. The repository that
     | this mirror serves has an ID that matches the mirrorOf element of this mirror. IDs are used
     | for inheritance and direct lookup purposes, and must be unique across the set of mirrors.
     |
    <mirror>
      <id>mirrorId</id>
      <mirrorOf>repositoryId</mirrorOf>
      <name>Human Readable Name for this Mirror.</name>
      <url>http://my.repository.com/repo/path</url>
    </mirror>
     -->
	 <mirror>
      <id>nexus</id>
      <mirrorOf>*</mirrorOf>
      <name>Nexus Mirror</name>
      <url>http://localhost:8081/nexus/content/groups/public</url>
    </mirror>
  </mirrors>

  <!-- profiles
   | This is a list of profiles which can be activated in a variety of ways, and which can modify
   | the build process. Profiles provided in the settings.xml are intended to provide local machine-
   | specific paths and repository locations which allow the build to work in the local environment.
   |
   | For example, if you have an integration testing plugin - like cactus - that needs to know where
   | your Tomcat instance is installed, you can provide a variable here such that the variable is
   | dereferenced during the build process to configure the cactus plugin.
   |
   | As noted above, profiles can be activated in a variety of ways. One way - the activeProfiles
   | section of this document (settings.xml) - will be discussed later. Another way essentially
   | relies on the detection of a system property, either matching a particular value for the property,
   | or merely testing its existence. Profiles can also be activated by JDK version prefix, where a
   | value of '1.4' might activate a profile when the build is executed on a JDK version of '1.4.2_07'.
   | Finally, the list of active profiles can be specified directly from the command line.
   |
   | NOTE: For profiles defined in the settings.xml, you are restricted to specifying only artifact
   |       repositories, plugin repositories, and free-form properties to be used as configuration
   |       variables for plugins in the POM.
   |
   |-->
  <profiles>
  <profile>
      <id>nexus</id>
      <repositories>
        <repository>
          <id>nexus-releases</id>
          <name>local private nexus</name>
          <url>http://localhost:8081/nexus/content/groups/public</url>
		  <releases><enabled>true</enabled></releases>
          <snapshots><enabled>false</enabled></snapshots>
        </repository>
		<repository>
          <id>nexus-snapshots</id>
          <name>local private nexus</name>
          <url>http://localhost:8081/nexus/content/groups/public-snapshots</url>
		  <releases><enabled>false</enabled></releases>
          <snapshots><enabled>true</enabled></snapshots>
        </repository>
      </repositories>
	  <pluginRepositories>
         <pluginRepository>
                <id>nexus-releases</id>
                 <name>local private nexus</name>
                 <url>http://localhost:8081/nexus/content/groups/public</url>
                 <releases><enabled>true</enabled></releases>
                 <snapshots><enabled>false</enabled></snapshots>
               </pluginRepository>
               <pluginRepository>
                 <id>nexus-snapshots</id>
                  <name>local private nexus</name>
                  <url>http://localhost:8081/nexus/content/groups/public-snapshots</url>
                <releases><enabled>false</enabled></releases>
                 <snapshots><enabled>true</enabled></snapshots>
             </pluginRepository>
         </pluginRepositories>
    </profile>
    <!-- profile
     | Specifies a set of introductions to the build process, to be activated using one or more of the
     | mechanisms described above. For inheritance purposes, and to activate profiles via <activatedProfiles/>
     | or the command line, profiles have to have an ID that is unique.
     |
     | An encouraged best practice for profile identification is to use a consistent naming convention
     | for profiles, such as 'env-dev', 'env-test', 'env-production', 'user-jdcasey', 'user-brett', etc.
     | This will make it more intuitive to understand what the set of introduced profiles is attempting
     | to accomplish, particularly when you only have a list of profile id's for debug.
     |
     | This profile example uses the JDK version to trigger activation, and provides a JDK-specific repo.
    <profile>
      <id>jdk-1.4</id>

      <activation>
        <jdk>1.4</jdk>
      </activation>

      <repositories>
        <repository>
          <id>jdk14</id>
          <name>Repository for JDK 1.4 builds</name>
          <url>http://www.myhost.com/maven/jdk14</url>
          <layout>default</layout>
          <snapshotPolicy>always</snapshotPolicy>
        </repository>
      </repositories>
    </profile>
    -->

    <!--
     | Here is another profile, activated by the system property 'target-env' with a value of 'dev',
     | which provides a specific path to the Tomcat instance. To use this, your plugin configuration
     | might hypothetically look like:
     |
     | ...
     | <plugin>
     |   <groupId>org.myco.myplugins</groupId>
     |   <artifactId>myplugin</artifactId>
     |
     |   <configuration>
     |     <tomcatLocation>${tomcatPath}</tomcatLocation>
     |   </configuration>
     | </plugin>
     | ...
     |
     | NOTE: If you just wanted to inject this configuration whenever someone set 'target-env' to
     |       anything, you could just leave off the <value/> inside the activation-property.
     |
    <profile>
      <id>env-dev</id>

      <activation>
        <property>
          <name>target-env</name>
          <value>dev</value>
        </property>
      </activation>

      <properties>
        <tomcatPath>/path/to/tomcat/instance</tomcatPath>
      </properties>
    </profile>
    -->
  </profiles>

  <!-- activeProfiles
   | List of profiles that are active for all builds.
   |
  <activeProfiles>
    <activeProfile>alwaysActiveProfile</activeProfile>
    <activeProfile>anotherAlwaysActiveProfile</activeProfile>
  </activeProfiles>
  -->
  <activeProfiles>
    <activeProfile>nexus</activeProfile>
  </activeProfiles>
</settings>
主要是配置repository。它的ID对应的是maven中的repository.以便maven能使用nexus搜索和管理组件,极大节约带宽,加速开发。
maven的配置如下:
<project xmlns="http://maven.apache.org/POM/4.0.0" xmlns:xsi="http://www.w3.org/2001/XMLSchema-instance" xsi:schemaLocation="http://maven.apache.org/POM/4.0.0 http://maven.apache.org/maven-v4_0_0.xsd">
	<modelVersion>4.0.0</modelVersion>
	<groupId>com.tudou</groupId>
	<artifactId>tudouSystem</artifactId>
	<packaging>war</packaging>
	<version>0.0.1-SNAPSHOT</version>
	<name>tudouSystem Maven Webapp</name>
	<!--<url>http://maven.apache.org</url> -->
	<properties>
		<project.build.sourceEncoding>UTF-8</project.build.sourceEncoding>
		<tomcatPath>D:\progra\tomcat6</tomcatPath>
	</properties>
	<distributionManagement>
		<repository>
			<id>nexus-releases</id>
			<name>Nexus Release Repository</name>
			<url>http://localhost:8081/nexus/content/repositories/releases/</url>
		</repository>
		<snapshotRepository>
			<id>nexus-snapshots</id>
			<name>Nexus Snapshot Repository</name>
			<url>http://localhost:8081/nexus/content/repositories/snapshots/
			</url>
		</snapshotRepository>
	</distributionManagement>
	<dependencies>
		<dependency>
			<groupId>javax.servlet</groupId>
			<artifactId>javax.servlet-api</artifactId>
			<version>3.0.1</version>
		</dependency>
	</dependencies>
	<build>
		<plugins>
			<!-- Run As Maven build : clean package 就可以发布到tomcat下了,并按照<warName>命名 访问应用时,访问该地址即可:http://IP:Port/warName/ -->
			<plugin>
				<artifactId>maven-war-plugin</artifactId>
				<version>2.2</version>
				<configuration>
					<!--默认打包名为项目名称,生成的WAR存放在target下-->
					<warName>tudouSystem</warName>
					<outputDirectory>${tomcatPath}\webapps</outputDirectory>
					<!--修改JSP文件后不能重新编译发布-->
					<webappDirectory>${basedir}/src/main/webapp</webappDirectory>
					<warSourceDirectory>${basedir}/src/main/webapp</warSourceDirectory>
				</configuration>
			</plugin>
		</plugins>
	</build>
</project>
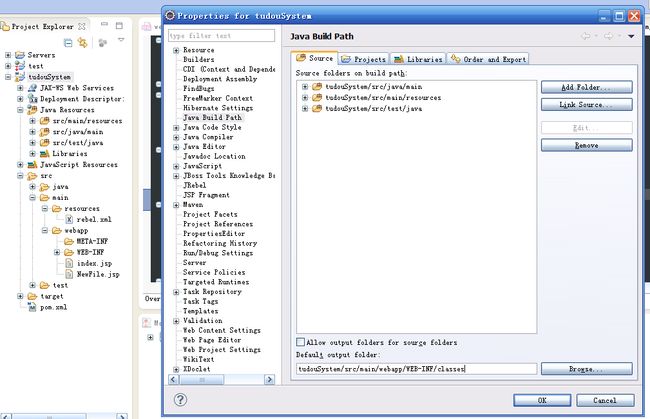
3,建立你的maven项目。完整的项目结构如图所示,注意它的default-output
这是还必须配置tomcat,<Context docBase="E:\java\newwork\tudouSystem\src\main\webapp" path="/tudouSystem" reloadable="false" />
项目的WEB.XML
<?xml version="1.0" encoding="UTF-8"?>
<web-app version="2.5" xmlns="http://java.sun.com/xml/ns/javaee"
	xmlns:xsi="http://www.w3.org/2001/XMLSchema-instance"
	xsi:schemaLocation="http://java.sun.com/xml/ns/javaee
    http://java.sun.com/xml/ns/javaee/web-app_2_5.xsd">
	<servlet>
		<servlet-name>TestServlet</servlet-name>
		<servlet-class>com.tudou.web.servlet.TestServlet</servlet-class>
	</servlet>
	<servlet-mapping>
		<servlet-name>TestServlet</servlet-name>
		<url-pattern>/TestServlet</url-pattern>
	</servlet-mapping>

	<welcome-file-list>
		<welcome-file>/TestServlet</welcome-file>
	</welcome-file-list>
	<display-name>Archetype Created Web Application</display-name>
</web-app>
项目的servlet:
package com.tudou.web.servlet;

import java.io.IOException;

import javax.servlet.ServletException;
import javax.servlet.http.HttpServlet;
import javax.servlet.http.HttpServletRequest;
import javax.servlet.http.HttpServletResponse;

/**
 * @className:TestServlet.java
 * @classDescription:
 * @author:很拽の土豆
 * @createTime:2012-8-25 上午4:31:48
 */
public class TestServlet extends HttpServlet {
	@Override
	protected void doGet(HttpServletRequest req, HttpServletResponse resp) throws ServletException, IOException {
		this.doPost(req, resp);
	}

	@Override
	protected void doPost(HttpServletRequest req, HttpServletResponse resp) throws ServletException, IOException {
		req.setAttribute("YouName", "很拽の土豆");
		req.getRequestDispatcher("/index.jsp").forward(req, resp);
	}
}
JSP页面:
<%@ page language="java" contentType="text/html; charset=UTF-8"
    pageEncoding="UTF-8"%>
<!DOCTYPE html PUBLIC "-//W3C//DTD HTML 4.01 Transitional//EN" "http://www.w3.org/TR/html4/loose.dtd">
<html>
<head>
<meta http-equiv="Content-Type" content="text/html; charset=UTF-8">
<title>Insert title here</title>
</head>
<body>
<h2>欢迎:${YouName}</h2>
</body>
</html>
右键:debug as ->maven clean ->package这是项目可以正常访问了。但是修改Servlet后必须重启服务。
3,安装jrebel
eclipse菜单help->eclipse market->install jrebel。next安装完之后会提示你重启。此时不要重启。因为jrebel是付费版。下载破解版jrebel.jar5.0。在eclipse/plugins下面搜索jrebel.jar然后定位到其所在的文件夹,复制进去覆盖。启动eclipse后选中项目debug as ->debug configurion,点击apache tomcat后会看到最后面的jrebel,勾选enabled jrebel。点击run.
此时修改servlet后发现不用重启tomcat了~!~~~