布局管理器(二)
10.7 CardLayout类
CardLayout布局管理器与其他的布局管理器十分不同。其他的布局管理器尝试一次显示容器中的所有组件,而CardLayout一次只显示一个组件。这个组件可以是一个组件或是一个容器,而后者会让我们看到布局在基于嵌入容器的布局管理器之上的多个组件。
现在可以使用JTabbedPane组件了(会在下一章描述),CardLayout很少使用。
10.8 BoxLayout类
Swing的BoxLayout管理允许我们在我们自己的容器中在一个水平行或一个垂直列中布局组件。除了在我们自己的容器中使用BoxLayout,Box类(在下一章描述)提供了一个使用BoxLayout作为其默认布局管理器的容器。
相对于FlowLayout或GridLayout,使用BoxLayout的好处在于BoxLayout会考虑到每一个组件的x与y对齐属性及其最大尺寸。比起GridBagLayout,BoxLayout的使用要容易得多。图10-8显示了使用BoxLayout的样子。而在前面的GridBagLayout使用中,我们需要配置必须的布局约束来使得GridBagLayout达到类似的效果。
10.8.1 创建BoxLayout
BoxLayout只有一个构造函数:
public BoxLayout(Container target, int axis)
构造函数需要两个参数。第一个参数是布局管理器实例要关联到的容器,而第二个是布局方向。可用的方法有:用于由左到至右布局的BoxLayout.X_AXIS与由上到下布局的BoxLayout.Y_AXIS。
注意,尝试将坐标设置为其他的值会抛出AWTError。如果布局管理器关联的容器并不是传递给构造函数的容器,则在布局管理器尝试布局其他的容器时抛出AWTError。
一旦我们创建了BoxLayout实例,我们可以将这个布局管理器关联到容器,类似于我们使用其他的布局管理器。
JPanel panel = new JPanel();
LayoutManager layout = new BoxLayout (panel, BoxLayout.X_AXIS);
panel.setLayout(layout);
与所有其他的系统提供的布局管理器不同,BoxLayout与容器是双向绑定在一起的,由管理器到容器同时也由容器到管理。
提示,我们在第11章将要描述的Box类可以使得我们一步创建容器并设置其布局管理器。
10.8.2 布局组件
一旦我们将容器的布局管理器设置为BoxLayout,我们就完成了直接使用布局管理器所需要做的全部工作。向容器添加组件可以通过add(Component component)或是add(Component component, int index)方法来实现。尽管BoxLayout实现了LayoutManager2接口,意味着约束的使用,但是当前并没有使用。所以,并不是必须使用add(Component component, Object constraints)。
当需要布局容器时,BoxLayout会完成其他。BoxLayout管理会尝试满足容器中组件的最小与最大尺寸以及x坐标与y坐标对齐。对齐值的范围由0.0f到1.0f。(对齐设置是浮点常量,而不是双精度,所以需要使用f。)
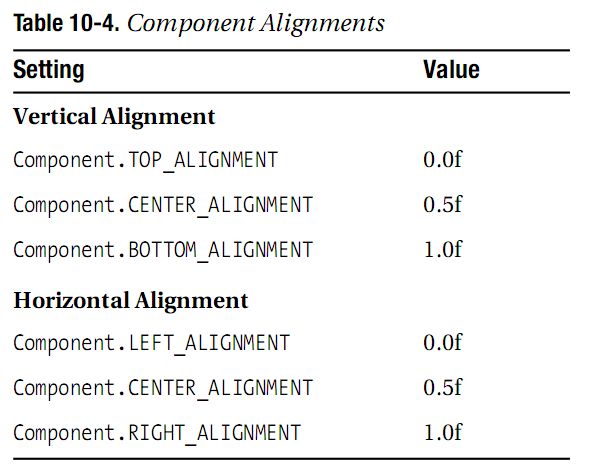
默认情况下,所有的Component子类都有一个Component.CENTER_ALIGNMENT的x坐标对齐以及Component.CENTER_ALIGNMENT的y坐标对齐。然而,所有的AbstractButton子类与JLabel都有一个默认的Component.LEFT_ALIGNMENT的x坐标对齐。表10-4显示了Component中可用的组件属性常量,这些属性可以通过setAlignmentX(float newValue)或是setAlignmentY(float newValue)方法进行设置。不同的对齐工作方式相同,除非是在不同的方向上。在水平对齐的情况下,这类似于左对齐,中间对齐或右对齐调整段落的情况。
使用相同的对齐布局组件
BoxLayout管理器依据被管理的容器内的组件的对齐而进行不同的处理。如果所有的对齐都相同,则最大尺寸小于容器尺寸的组件会依据对齐设置进行对齐。例如,如果我们有一个使用垂直BoxLayout的宽区域,而在其内是小按钮,则水平对齐将会左对齐,中间对齐或是右对齐调整按钮。图10-9显示了调整的样子。
在这里演示的关键点在于如果所有的组件共享相同的对齐设置,则被管理的容器内的所有组件的实际对齐就是组件对齐设置。
列表10-2显示在生成图10-9的源码。
package swingstudy.ch10;

import java.awt.Component;
import java.awt.Container;
import java.awt.EventQueue;
import java.awt.FlowLayout;

import javax.swing.BorderFactory;
import javax.swing.BoxLayout;
import javax.swing.JButton;
import javax.swing.JFrame;
import javax.swing.JPanel;

public class YAxisAlignX {

	private static Container makeIt(String title, float alignment) {
		String labels[] = {"--", "----", "------", "--------"};

		JPanel container = new JPanel();
		container.setBorder(BorderFactory.createTitledBorder(title));
		BoxLayout layout = new BoxLayout(container, BoxLayout.Y_AXIS);
		container.setLayout(layout);

		for(int i=0, n=labels.length; i<n; i++) {
			JButton button = new JButton(labels[i]);
			button.setAlignmentX(alignment);
			container.add(button);
		}
		return container;
	}
	/**
	 * @param args
	 */
	public static void main(String[] args) {
		// TODO Auto-generated method stub

		Runnable runner = new Runnable() {
			public void run() {
				JFrame frame = new JFrame("Alignment Example");
				frame.setDefaultCloseOperation(JFrame.EXIT_ON_CLOSE);

				Container panel1 = makeIt("Left", Component.LEFT_ALIGNMENT);
				Container panel2 = makeIt("Center", Component.CENTER_ALIGNMENT);
				Container panel3 = makeIt("Right", Component.RIGHT_ALIGNMENT);

				frame.setLayout(new FlowLayout());
				frame.add(panel1);
				frame.add(panel2);
				frame.add(panel3);

				frame.pack();
				frame.setVisible(true);
			}
		};

		EventQueue.invokeLater(runner);
	}

}
当所有组件具有相同的垂直对齐时,x坐标的BoxLayout的作用类似。组件将会显示在容器的顶部,中部或是底,而不是左对齐,中间对齐或是右对齐调整。图10-10显示了这种外观。
显示在图10-10中的示例源码只需要对列表10-2的代码进行小量的修改即可。列表10-3提供了完整的代码。
package swingstudy.ch10;

import java.awt.Component;
import java.awt.Container;
import java.awt.EventQueue;
import java.awt.GridLayout;

import javax.swing.BorderFactory;
import javax.swing.BoxLayout;
import javax.swing.JButton;
import javax.swing.JFrame;
import javax.swing.JPanel;

public class XAxisAlignY {

	private static Container makeIt(String title, float alignment) {
		String labels[] = {"-", "-", "-"};

		JPanel container = new JPanel();
		container.setBorder(BorderFactory.createTitledBorder(title));
		BoxLayout layout = new BoxLayout(container, BoxLayout.X_AXIS);
		container.setLayout(layout);

		for(int i=0, n=labels.length; i<n; i++) {
			JButton button = new JButton(labels[i]);
			button.setAlignmentY(alignment);
			container.add(button);
		}
		return container;
	}
	/**
	 * @param args
	 */
	public static void main(String[] args) {
		// TODO Auto-generated method stub

		Runnable runner = new Runnable() {
			public void run() {
				JFrame frame = new JFrame("Alignment Example");
				frame.setDefaultCloseOperation(JFrame.EXIT_ON_CLOSE);

				Container panel1 = makeIt("Top", Component.TOP_ALIGNMENT);
				Container panel2 = makeIt("Center", Component.CENTER_ALIGNMENT);
				Container panel3 = makeIt("Bottom", Component.BOTTOM_ALIGNMENT);

				frame.setLayout(new GridLayout(1,3));
				frame.add(panel1);
				frame.add(panel2);
				frame.add(panel3);

				frame.setSize(423, 171);
				frame.setVisible(true);
			}
		};
		EventQueue.invokeLater(runner);
	}

}

使用不同的对齐布局组件
使用具有相同对齐的小组件是相对简单的。然而,如果BoxLayout管理的容器中的组件具有不同的对齐,事情就会变得更为复杂。另外,组件并不是必须按着我们所希望的样子进行显示。对于垂直box,组件的显示按如下方式显示:
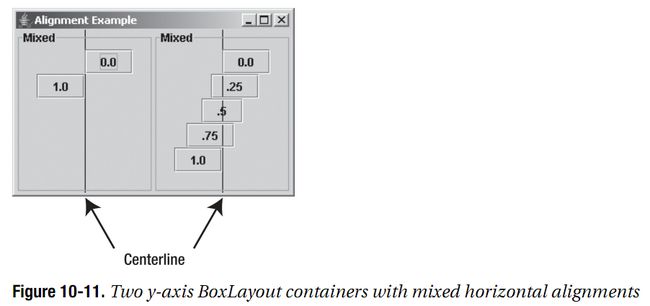
- 如果组件的x对齐设置为Component.LEFT_ALIGNMENT,组件的左边将与容器的中间对齐。
- 如果组件的x对齐设置为Component.RIGHT_ALIGNMENT,组件的右将会与容器的中间对齐。
- 如果组件的x对齐设置为Component.CENTER_ALIGNMENT,组件将会位于容器的中间。
- 其他的设置值会使得组件被设置相对于容器中间的变化位置上(依据值而不同)。
为了帮助我们理解这种混合的对齐行为,图10-11显示了两个BoxLayout容器。左边的容器具有两个组件,一个为左对齐(标识为0.0的按钮),而另一个为右对齐(标识为1.0的按钮)。在这里我们可以看到右边组件的左边与左边组件的右边相对齐。右边的容器显示了在0.0与1.0对齐设置之间的额外组件放置。每一个按钮的标签表示了其对齐设置。
对于水平box,y对齐相对于x坐标上的组件顶部与底部的工作方式类似。
布局大组件
到目前为止的示例中,组件的尺寸总是小于可用空间的大小。这些示例演示了Swing组件与原始AWT组件之间的细微区别。Swing组件的默认最大尺寸为组件的最优尺寸。对于AWT组件,默认的最大尺寸为具有Short.MAX_VALUE宽与高的维度。如果前面的例子使用了AWT Button组件而不是Swing的JButton组件,我们就会看到不同的结果。如果我们手动将组件的最大尺寸属性设置为比BoxLayout的屏幕还要宽或高的值,我们也会看到不同的结果。使用AWT组件会使得事情的演示更为容易。
图10-9显示了三个y坐标BoxLayout,容器中的组件共享相同的水平对齐,而每个按钮的最大尺寸是有约束的。如果组件的最大尺寸没有约束,或者是比容器略大,我们就会看到图10-13的结果,其中y坐标BoxLayout容器中有四个具有相同水平对齐的Button组件。注意,组件并没有左对齐,中间对齐或是右对齐,组件会增长以适应可用的空间。
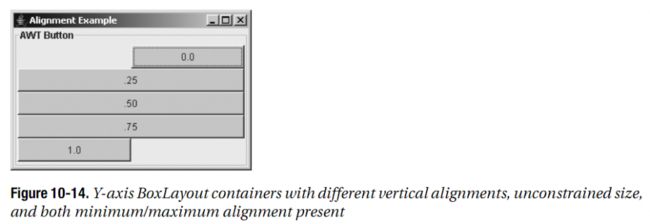
如果组件具有不同的对齐以及无限制的最大尺寸,我们就会得到另一种行为。对齐设置不为最小(0,0f)或是最大(1.0f)的组件将会增长以适应整个空间。如果同时指定了最小与最大对齐设置,这两个组件的中间边将会在中间对齐,如图10-14所示。
然而,如果只有一个组件的边设置为(0.0或1.0),并且位于一个具有其他对齐设置的容器中,则具有边设置的组件将背离容器中间增长。图10-15显示了这种行为。x坐标BoxLayout容器在不同的水平对齐的情况下作用类似。
10.9 OverlayLayout类
正如其名字所暗示的,OverlayLayout类用于位于其他组件之上的布局管理。当使用add(Component component)时,我们将组件添加到由OverlayLayout管理器管理的容器中的顺序决定了组件层次。相反,如果我们使用add(Component component, int index),我们可以以任意顺序添加组件。尽管OverlayLayout实现了LayoutManager2接口,类似于BoxLayout,OverlayLayout并没有使用任何约束。
确定组件的二维位置需要布局管理器检测所包含组件的x与y对齐属性。只要组件的x与y对齐属性定义了一个所有组件都可以共享的点,称之为布局管理器的坐标点,那么组件就可以进行放置。如果我们在相应的方向上将对齐值乘以组件的尺寸,我们就可以获得组件的坐标点的所有部分。
在为每一个组件确定了坐标点以后,OverylayLayout管理器计算容器内这个共享点的位置。为了计算这个位置,布局管理器平均组件的不同对齐属性,然后将每一个设置乘以容器的宽度或高度。这个位置就是布局管理器放置坐标点的位置,然后组件可以被放置在这个点上。
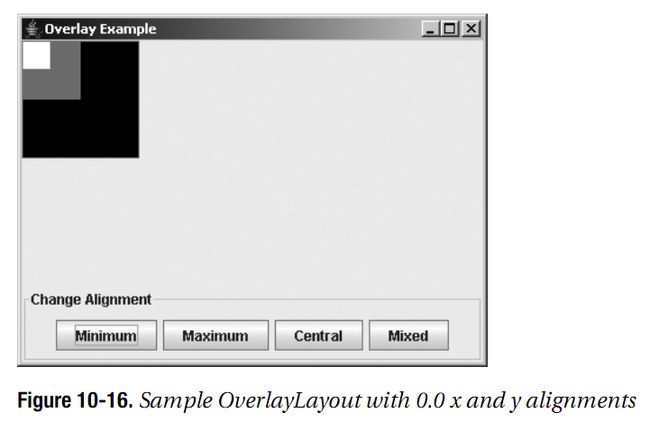
例如,假定我们有三个按钮:一个100x100的黑色按钮,其上是一个50x50的灰色按钮,其上是一个25x25的白色按钮。如果每一个按钮的x与y对齐是0.0f,则三个组件的共享坐标点是他们的左上角,而组件位于容器的左上角。如图10-16所示。
如果每个按钮的x与y对齐为1.0f,三个组件的坐标点是他们的右下解,而组件位于容器的右下角。如图10-17所示。
如果每个按钮的x与y对齐为0.5f,三个组件的坐标点为他们的中间,而且组件位于容器中间。如图10-18所示。
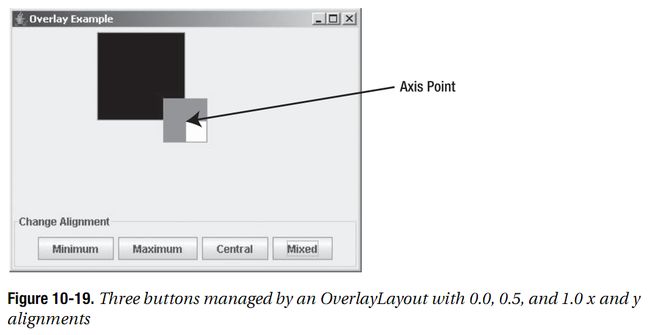
所有的组件具有相同的对齐要相对容易理解,但是如果组件具有不同的对齐时会怎么样呢?例如,如果小按钮的x与y对齐为0.0f,而中型按钮的x与y对齐为0.5f,大按钮的x与y对齐为1.0f,那么这些组件如何显示呢?那么首先,布局管理器要计算坐标点。基于每个按钮的特定对齐,坐标点将是小按钮的左上角。容器内的坐标点将会对齐值的平均乘以容器的维度。两个方向上的0,0.5与1的平均将坐标点放在容器的中间。然后由这个位置进行组件的放置与布局,如图10-19所示。
当我们设置重叠组件时,要保证组件容器的optimizedDrawingEnabled属性设置为false。这可以保证属性重绘与事件传播。
要尝试OverlayLayout管理器,可以使用列表10-4中的源码。他提供了可选中的按钮来演示变化对齐值的效果。初始时,程序会有将所有组件放在中间。
package swingstudy.ch10;

import java.awt.BorderLayout;
import java.awt.Color;
import java.awt.Dimension;
import java.awt.EventQueue;
import java.awt.LayoutManager;
import java.awt.event.ActionEvent;
import java.awt.event.ActionListener;

import javax.swing.BorderFactory;
import javax.swing.JButton;
import javax.swing.JComponent;
import javax.swing.JFrame;
import javax.swing.JPanel;
import javax.swing.OverlayLayout;

public class OverlaySample {

	public static final String SET_MINIMUM = "Minimum";
	public static final String SET_MAXIMUM = "Maximum";
	public static final String SET_CENTRAL = "Central";
	public static final String SET_MIXED = "Mixed";

	static JButton smallButton = new JButton();
	static JButton mediumButton = new JButton();
	static JButton largeButton = new JButton();

	public static void setupButtons(String command) {
		if (SET_MINIMUM.equals(command)) {
			smallButton.setAlignmentX(0.0f);
			smallButton.setAlignmentY(0.0f);
			mediumButton.setAlignmentX(0.0f);
			mediumButton.setAlignmentY(0.0f);
			largeButton.setAlignmentX(0.0f);
			largeButton.setAlignmentY(0.0f);
		} else if (SET_MAXIMUM.equals(command)) {
			smallButton.setAlignmentX(1.0f);
			smallButton.setAlignmentY(1.0f);
			mediumButton.setAlignmentX(1.0f);
			mediumButton.setAlignmentY(1.0f);
			largeButton.setAlignmentX(1.0f);
			largeButton.setAlignmentY(1.0f);
		} else if (SET_CENTRAL.equals(command)) {
			smallButton.setAlignmentX(0.5f);
			smallButton.setAlignmentY(0.5f);
			mediumButton.setAlignmentX(0.5f);
			mediumButton.setAlignmentY(0.5f);
			largeButton.setAlignmentX(0.5f);
			largeButton.setAlignmentY(0.5f);
		} else if (SET_MIXED.equals(command)) {
			smallButton.setAlignmentX(0.0f);
			smallButton.setAlignmentY(0.0f);
			mediumButton.setAlignmentX(0.5f);
			mediumButton.setAlignmentY(0.5f);
			largeButton.setAlignmentX(1.0f);
			largeButton.setAlignmentY(1.0f);
		} else {
			throw new IllegalArgumentException("Illegal Command: " + command);
		}
		// redraw panel
		((JPanel) largeButton.getParent()).revalidate();
	}

	/**
	 * @param args
	 */
	public static void main(String[] args) {
		// TODO Auto-generated method stub

		final ActionListener generalActionListener = new ActionListener() {
			public void actionPerformed(ActionEvent event) {
				JComponent comp = (JComponent) event.getSource();
				System.out.println(event.getActionCommand() + " : "
						+ comp.getBounds());
			}
		};

		final ActionListener sizingActionListener = new ActionListener() {
			public void actionPerformed(ActionEvent event) {
				setupButtons(event.getActionCommand());
			}
		};

		Runnable runner = new Runnable() {
			public void run() {
				JFrame frame = new JFrame("Overlay Example");
				frame.setDefaultCloseOperation(JFrame.EXIT_ON_CLOSE);

				JPanel panel = new JPanel() {
					public boolean isOptimizedDrawingEnabled() {
						return false;
					}
				};
				LayoutManager overlay = new OverlayLayout(panel);
				panel.setLayout(overlay);

				Object settings[][] = {
						{"Small", new Dimension(25,25), Color.white},
						{"Medium", new Dimension(50,50), Color.gray},
						{"Large", new Dimension(100,100), Color.black}
				};

				JButton buttons[] = {smallButton, mediumButton, largeButton};

				for(int i=0, n=settings.length; i<n; i++) {
					JButton button = buttons[i];
					button.addActionListener(generalActionListener);
					button.setActionCommand((String)settings[i][0]);
					button.setMaximumSize((Dimension)settings[i][1]);
					button.setBackground((Color)settings[i][2]);
					panel.add(button);
				}
				setupButtons(SET_CENTRAL);

				JPanel actionPanel = new JPanel();
				actionPanel.setBorder(BorderFactory.createTitledBorder("Change Alignment"));
				String actionSettings[] = {SET_MINIMUM, SET_MAXIMUM, SET_CENTRAL, SET_MIXED};

				for(int i=0, n=actionSettings.length; i<n; i++) {
					JButton button = new JButton(actionSettings[i]);
					button.addActionListener(sizingActionListener);
					actionPanel.add(button);
				}

				frame.add(panel, BorderLayout.CENTER);
				frame.add(actionPanel, BorderLayout.SOUTH);

				frame.setSize(400, 300);
				frame.setVisible(true);
			}
		};

		EventQueue.invokeLater(runner);
	}

}
10.10 SizeRequirements类
BoxLayout与OverlayLayout管理器依赖于SizeRequirements类来决定所包含组件的确切位置。SizeRequirements类包含各种静态方法来协助将组件放在管理器中所需要的计算。布局管理器使用这个类来计算他们组件的x坐标与宽度以及y坐标与高度。每一对值都是单独计算的。如果相关联的布局管理器需要放置的所有属性集合,布局管理器会单独请求SizeRequirements类。
10.11 ScrollPanelLayout类
JScrollPane类,将会在第11章描述的一个容器类,使用ScrollPanelLayout管理器。试图在JScrollPane之外使用布局管理器是不可能的,因为布局管理器会检测与布局管理器相关联的容器对象是否是一个JScrollPane实例。查看第11章可以获得关于这个布局管理器的完整描述。
10.12 ViewportLayout类
ViewportLayout管理器为JViewport类所使用,JViewport类是我们将会在第11章描述的一个容器类。JViewport同时也可以使用ScrollPaneLayout/JScrollPane组合中。类似于ScrollPaneLayout,ViewportLayout管理器是与其组件紧密结合在一起的,在这种情况下是JViewport类,并且不可以在组件之外使用,除非是在子类中。另外,JViewport类很少用在JScrollPane之外。ViewportLayout管理器及其容器JViewport类,将会在第11章讨论。
10.13. SpringLayout类
最新添加到Java布局管理器前端的就是SpringLayout管理器,这是在J2SE 1.4版本中添加的。这个布局管理器可以允许我们将"springs"关联到组件,从而他们可以相对于其他的组件布局。例如,使用SrpingLayout,我们可以将一个按钮与右边框相关联,而不论用户如何调整屏幕尺寸。
SpringLayout管理器依赖于SpringLayout.Constraints进行组件约束。这类似于作为GridBagLayout管理器补充的GridBagConstraints类。添加到容器中的每一个组件都具有相关联的SpringLayout.Constraints。在这一点两种约束类型具有相似性。
我们通常并不需要添加带有约束的组件。相反,我们可以添加组件,然后单独关联约束。并没有什么可以阻止我们向组件添加约束,但是SpringLayout.Constraints并不是一个简单类。他是一个Spring对象集合,每一个Spring对象都是组件的不同约束。我们需要将每一个Spring约束单独添加到SpringLayout.Constraints。我们可以通过在每一个组件的边设置特定的约束来实现这一操作。使用SpringLayout的四个常量EAST, WEST, NORTH与SOUTH,我们可以调用SpringLayout.Constraints的setConstraints(String edge, Spring spring)方法,其中String是四个常量之一。
例如,如果我们希望将一个组件添加到容器的左上方,我们可以设置一个组件尺寸的两个Spring,将其组合在一起,然后通过组合的set方法将组件以容器,如下面的代码所示:
Component left = ...;
SpringLayout layout = new SpringLayout();
JPanel panel = new JPanel(layout);
Spring xPad = Spring.constant(5);
Spring yPad = Spring.constant(25);
SpringLayout.Constraints constraint = new SpringLayout.Constraints();
constraint.setConstraint(SpringLayout.WEST, xPad);
constraint.setConstraint(SpringLayout.NORTH, yPad);
frame.add(left, constraint);
这看起来并不是太复杂,但是当我们需要添加下一个组件,前一个组件的右边或是下边时,事情就会变得更为困难。我们不能仅是将组件添加额外的n个像素。我们必须实际的向前一个组件的边添加填充。要确定前一个组件的边,我们可以使用getConstraint()查询布局管理器,并传递我们所希望的边与组件,例如在layout.getConstraint(SpringLayout.EAST, left)来获得前一个组件右边的位置。由这个位置起,我们可以添加必须的填充,并将其关联到其他组件的边,如下面的代码所示:
Component right = ...;
Spring rightSideOfLeft = layout.getConstraint(SpringLayout.EAST, left);
Spring pad = Spring.constant(20);
Spring leftEdgeOfRight = Spring.sum(rightSideOfLeft, pad);
constraint = new SpringLayout.Constraints();
constraint.setConstraint(SpringLayout.WEST, leftEdgeOfRight);
constraint.setConstraint(SpringLayout.NORTH, yPad);
frame.add(right, constraint);
上面的方法可以工作得很好,但是随着组件数的增加,上面的方法就会变得十分繁琐。要减少其中的步骤,我们可以添加没有约束的组件,然后单独添加,通过SpringLayout的putConstraint()方法连接组件。
public void putConstraint(String e1, Component c1, int pad, String e2,
  Component c2)
public void putConstraint(String e1, Component c1, Spring s, String e2,
  Component c2)
这样,我们不需要查询边并亲自添加填充,putConstraint()调用可以为我们组合这些任务。为了演示,下面的代码片段为右边的组件添加了相同的组件约束,但是所用的是putConstraint()方法而是直接使用SpringLayout.Constraints:
Component left = ...;
Component right = ...;
SpringLayout layout = new SpringLayout();
JPanel panel = new JPanel(layout);
panel.add(left);
panel.add(right);
layout.putConstraint(SpringLayout.WEST, left, 5, SpringLayout.WEST, panel);
layout.putConstraint(SpringLayout.NORTH, left, 25, SpringLayout.NORTH, panal);
layout.putConstraint(SpringLayout.NORTH, right, 25, SpringLayout.NORTH, panel);
layout.putConstraint(SpringLayout.WEST, right, 20, SpringLayout.EAST, left);
为了有助于我们理解SpringLayout的使用,Sun有一个名为The Bean Builder的工作,https://bean-builder.dev.java.nt/。这个工具最初是要用于使用JavaBean组件的工作,但是也可以用于SpringLayout。图10-20显示了通过Java WebStart启动时的样子。
每一个组件边的周围有一个四个盒子的集合,分别用于NORTH, SOURTH, EAST与WEST。我们可以由一个盒子拖动箭头并将其连接到其他盒子。这个工具有一些复杂,可以允许我们为spring指定间隔距离,但是在屏幕设计时,屏幕看起来有一些像图20-21。所创建的每一个箭头都被映射到putConstraint()方法的一个特定调用。
列表10-5提供了生成图10-21的源码。注意,我们必须直接使用JFrame的内容面板,因为putConstraint()需要这个容器,而是窗体本身。
package swingstudy.ch10;

import java.awt.Component;
import java.awt.Container;
import java.awt.EventQueue;

import javax.swing.JFrame;
import javax.swing.JLabel;
import javax.swing.JTextField;
import javax.swing.SpringLayout;

public class SpringSample {

	/**
	 * @param args
	 */
	public static void main(String[] args) {
		// TODO Auto-generated method stub

		Runnable runner = new Runnable() {
			public void run() {
				JFrame frame = new JFrame("SpringLayout");
				frame.setDefaultCloseOperation(JFrame.EXIT_ON_CLOSE);
				Container contentPane = frame.getContentPane();

				SpringLayout layout = new SpringLayout();
				contentPane.setLayout(layout);

				Component left = new JLabel("Left");
				Component right = new JTextField(15);

				contentPane.add(left);
				contentPane.add(right);

				layout.putConstraint(SpringLayout.WEST, left, 10, SpringLayout.WEST, contentPane);
				layout.putConstraint(SpringLayout.NORTH, left, 25, SpringLayout.NORTH, contentPane);
				layout.putConstraint(SpringLayout.NORTH, right, 25, SpringLayout.NORTH, contentPane);
				layout.putConstraint(SpringLayout.WEST, right, 20, SpringLayout.EAST, left);

				frame.setSize(300, 100);
				frame.setVisible(true);
			}
		};

		EventQueue.invokeLater(runner);
	}

}
10.14 小结
本章介绍了AWT的预定义布局管理器FlowLayout,BorderLayout,GridLayout,GridBagLayout与CardLayout,以及Swing的预定义布局管理器BoxLayout,OverlayLayout,ScrollPaneLayout,ViewportLayout与SpringLayout。我们了解了当我们使用一个布局管理器时,例如BoxLayout或OverlayLayout,各种对齐设置如何影响容器内的组件。另外,我们还了解了SizeRequirements类,这是BoxLayout与OverlayLayout所用的类。
在第11章,我们将会了解使用ScrollPaneLayout与ViewportLayout管理器的JScrollPane与JViewport容器,以及其他一些高级Swing容器类。
