初探DeepEarth控件
DeepEarth是一个地图控件,它将微软的Virtual Earth与Silverlight 2.0联合起来。该开源项目由其创建者(一群.NET的狂热爱好者)在CodePlex上发布。这句话已经在一年前就已经在网上随处可见了,去年12月InfoQ的张龙老师就翻译了一篇关于DeepEarth的文章资料《DeepEarth:使用Silverlight的地图控件》,当时我也又关注不过一直都没有花时间去研究它,最近写Bing Maps开发文章很多朋友都问我有研究过DeepEarth的话题,为了帮助这些朋友解决一些困扰特把DeepEarth简单学习了下特此分享给大家,关于DeepEarth的最新信息可访问:http://deepearth.codeplex.com/进行了解。
DeepEarth的最新版本是1.1,功能上可以说是很强大和完善了,提供了对多种地图数据服务的支持,包括Google Maps,YaHoo,Bing Maps,MapInfo以及amazonaws等等。本文通过DeepEarth加载amazonaws的卫星地图的示例程序初步探索下DeepEarth的基本使用方法。
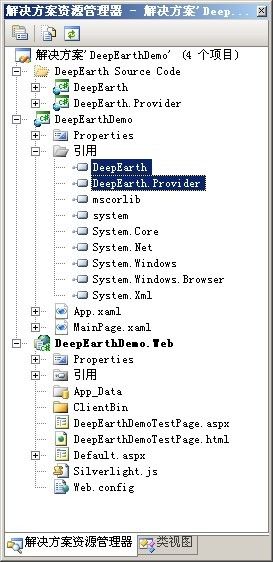
首先建立Silverlight项目以及Siverlight宿主Web应用程序,附加DeepEarth源代码项目到解决方案中,并添加项目引用到新建的Siverlight应用,项目解决方案如下。
到这里一个基本的入门工作已经准备好了,接下来就是如何使用DeepEarth,首先得在新建的Silverlight的MainPage.xaml里声明DeepEarth的引用如下:
2 xmlns:DeepBlueMarble="clr-namespace:DeepEarth.Provider.BlueMarble;assembly=DeepEarth.Provider"
3 xmlns:DeepControls="clr-namespace:DeepEarth.Controls;assembly=DeepEarth"
有了引用的声明下面就可以使用DeepEarth控件以及其他的一些辅助控件(功能导航控件),具体使用如下代码块:
2 < DeepEarth:Map x:Name ="map" >
3 < DeepControls:NavControl Canvas.ZIndex ="1003" >
4 </ DeepControls:NavControl >
5 < DeepControls:CoordControl />
6 </ DeepEarth:Map >
7 </ Grid >
前端开发就这样了,现在转到后台代码视图并编写如下代码:
2 {
3 public MainPage()
4 {
5 InitializeComponent();
6 if (HtmlPage.IsEnabled)
7 {
8 map.BaseLayer.Source = new BmTileSource(BmMapModes.BlueMarbleWeb);
9 map.Events.MapLoaded += PageLoad;
10 }
11 }
12
13 protected void PageLoad(Map m, MapEventArgs args)
14 {
15 // 定位地图的经度和纬度坐标
16 double longitude = double .Parse( " 106.5883 " );
17 double latitude = double .Parse( " 29.5345 " );
18 m.SetViewCenter( new Point(longitude, latitude), 8 );
19 }
20 }
或许有人会说,代码我都能看懂,这到底代表什么意思呢?其实很简单这段后台代码就是给前端的DeepEarth控件初始化了一个地图图层,并为地图控件的加载事件委托了处理函数,当地图控件运行初始化时将地图定位到指定的经度和纬度,以及地图所显示的放大级别。
主要的实现还是在BmTileSource这个地图图层源里,也可以叫他地图图片系统源或地图图片映射系统源吧。关于TileSource可查看我的另一篇文章:【Silverlight】Bing Maps学习系列(七):使用Bing Maps的图片系统(Tile System)
现在我们将目光转移到BmTileSource类里去,位于DeepEarth.Provider.BlueMarble目录下,你将会看到这样一句代码:
这就是amazonaws卫星地图数据的Tile System(图片系统)的映射Url,通过这个Url我们就可以使用DeepEarth控件去加载amazonaws的卫星地图,这里需要注意的就是BmTileSource类里的GetTile方法,它就是用于计算地图图片系统的图片映射Url的。
2 {
3 if (IsInitialized)
4 {
5 int zoom = TileToZoom(tileLevel);
6 _IsTileDownloadStarted = true ;
7
8 string url = string .Empty;
9
10 switch (MapMode)
11 {
12 case BmMapModes.BlueMarbleWeb:
13 url = TilePathBlueMarbleWeb;
14 url = string .Format(url, zoom, tilePositionX, tilePositionY);
15 break ;
16
17 case BmMapModes.BlueMarbleLocal:
18 url = TilePathBlueMarbleLocal;
19 int port = Application.Current.Host.Source.Port;
20 url = string .Format(url, zoom, tilePositionX, tilePositionY, port);
21 break ;
22 }
23 return new Uri(url);
24 }
25 return null ;
26 }
根据不同的参数,组合为一个又一个完整的地图底片映射地址,然后组合在一起就显示出了完整的地图。编译运行这个示例我们可看到如下效果:
本篇就介绍到这里,关于DeepEarth的更多开发介绍请.....
DeepEarth加载微软Bing Maps在线示例:http://deepearth.soulsolutions.com.au/
本文示例代码下载:DeepEarthDemo.rar

