在 NetBeans IDE 中编写 JUnit 测试
JUnit是一款由Erich Gamma(《设计模式》的作者)和Kent Beck(极限编程的提出者)编写的开源的回归测试框架,供Java编码人员做单元测试之用,可以从www.junit.org网站上免费获得。本文使用的是NetBeans自带的JUnit
一,创建一个测试套件项目:
1,创建整个项目:
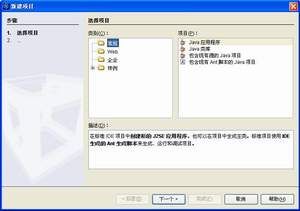
打开NetBeans,然后点击菜单“文件”->“新建项目”,打开“新建项目”对话框
在“类别”中选择“常规”,再从“项目”中选择“Java应用程序”,然后点击“下一步”,进入“新建Java应用程序”对话框:
在这个对话框中需要设置项目的名称以及项目所在目录,我为自己的项目起名为JUnitTest,“项目位置”为D:\JUnit\NetBeans,此外,请将“创建主类”前的对号去掉。项目创建好后,已经自带了JUnit 。
2,创建待测程序:
用于测试的JavaBean很简单,名为Program,只有id和name两个属性,这两个属性将分别用于两个用例当中。下面开始编写该JavaBean。
请点击“文件”->“新建文件”,打开“新建文件”对话框:
确保“项目”选择的是JUnitTest,然后在“类别”中选中Java类,在“文件类型”中选中Java类,点击“下一个”,进入下一窗口:
设置类名为Program,包为junit.test,设置完成后点击“完成”,修改代码如下:
public class Program
{
    //初始化私有字段
    private String id = null;
    private String name = null;

    //定义公共属性
    public String getID()
    {
        return id;
    }

    public void setID(String id)
    {
        this.id = id;
    }

    public String getName()
    {
        return name;
    }

    public void setName(String name)
    {
        this.name = name;
    }
}
至此,用于测试的JavaBean编写完成。
3,创建测试用例:
这里只用了一个类进行测试,名为ProgramTest,该类继承自junit.framework.TestCase类。ProgramTest类包含两个用例,分别对应该类的testId和testName方法,即每个方法实现了一个测试用例。注意,在JUnit中,junit.framework.TestCase的子类中每个用来实现测试用例的方法都必须以testXXX的格式来命名,这些方法在运行时会被执行。此外,ProgramTest还包括setUp和tearDown这两个方法,前者在每个测试方法开始之前执行,多用来做初始化;后者在每个测试方法完成之后执行,多用来清理资源。下面开始编写ProgramTest。
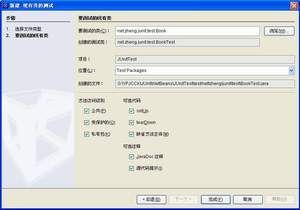
请点击“文件”->“新建文件”,打开“新建文件”对话框:
确保“项目”选择的是JUnitTest,然后在“类别”中选中JUnit类,在“文件类型”中选中现有类的测试,点击“下一个”,进入下一窗口:
选择要测试的类,点击“完成”,修改代码如下:
/*
 * To change this template, choose Tools | Templates
 * and open the template in the editor.
 */
package Junit.test;

import junit.framework.TestCase;
import junit.framework.Assert;
import org.junit.After;
import org.junit.AfterClass;
import org.junit.Before;
import org.junit.BeforeClass;
import org.junit.Test;
import static org.junit.Assert.*;

/**
 *
 * @author steven
 */
public class ProgramTest extends TestCase
{
    Program Program = null;
    //调用超类TestCase的构造函数为测试类创建构造函数
    public ProgramTest(String name)
    {
        super(name);
    }

    //@符号是JAVA的一种特殊注释,类似于C#中的特性标签,利用反射机制,动态地实例化对象。
    //即,在别的程序中,如果遇到这个注释/标签,则执行标签紧挨着的那些代码。
    @BeforeClass
    public static void setUpClass() throws Exception {
    }

    @AfterClass
    public static void tearDownClass() throws Exception {
    }

    //测试开始前的setup阶段
    @Before
    public void setUp() throws Exception{
        super.setUp();//调用超类的setup(),以确保测试环境被初始化
        System.out.println("开始测试!");
        Program = new Program();//初始化一个Program实例
        System.out.println("Program对象被初始化!");
    }

    //测试结束后的cleanup阶段
    @After
    public void tearDown() throws Exception{
        System.out.println("Program对象将被清理!");
        Program = null;
        System.out.println("测试结束!");
        //调用超类的tearDown(),以确保测试环境被清理
        super.tearDown();
    }

    /**
     * Test of getID method, of class Program.
     */
//    @Test
//    public void testGetID() {
//        System.out.println("getID");
//        Program instance = new Program();
//        String expResult = "";
//        String result = instance.getID();
//        assertEquals(expResult, result);
//        // TODO review the generated test code and remove the default call to fail.
//        fail("The test case is a prototype.");
//    }
//
//    /**
//     * Test of setID method, of class Program.
//     */
//    @Test
//    public void testSetID() {
//        System.out.println("setID");
//        String id = "";
//        Program instance = new Program();
//        instance.setID(id);
//        // TODO review the generated test code and remove the default call to fail.
//        fail("The test case is a prototype.");
//    }
    @Test
    public void testID() {
        System.out.println("执行指定ID的测试用例");
        Program.setID("001");//设置测试用例id属性的值为001
        //使用Assert查看id属性的值是否为001
        Assert.assertEquals("001", Program.getID());
        //原型为assertEquals(expResult, result);
        System.out.println("id属性被测试!");
    }
    @Test
    public void testName()
    {
        Program.setName("ASP");//设置name属性的值为ASP
        //使用Assert查看name属性的值是否为JSP,这是个必然出现错误的测试
        Assert.assertEquals("JSP", Program.getName());
        System.out.println("name属性被测试!");
    }
    /**
     * Test of getName method, of class Program.
     */
//    @Test
//    public void testGetName() {
//        System.out.println("getName");
//        Program instance = new Program();
//        String expResult = "";
//        String result = instance.getName();
//        assertEquals(expResult, result);
//        // TODO review the generated test code and remove the default call to fail.
//        fail("The test case is a prototype.");
//    }
//
//    /**
//     * Test of setName method, of class Program.
//     */
//    @Test
//    public void testSetName() {
//        System.out.println("setName");
//        String name = "";
//        Program instance = new Program();
//        instance.setName(name);
//        // TODO review the generated test code and remove the default call to fail.
//        fail("The test case is a prototype.");
//    }
}
这里setUp和tearDown方法没什么好说的,就是执行了对Program对象的初始化和清理,不过testId和testName需要说明一下。前者是在对Program的id属性进行测试,首先赋值为”001”,然后使用Assert的assertEquals方法查看id属性中存放的值是否是期待的值,由于我的期待值也是”001”,所以执行后这个用例应该是成功的;后者则是对Program的name属性进行测试,也是首先赋值为”ASP”,然后使用Assert的assertEquals方法查看其值是否是期待的,由于我特意将期待值设定为根本不可能的”JSP”,因此这个用例执行后会出现一个错误。但请注意,由于我是特意要让测试出现错误,所以将期待值设定成了不可能的值,如果你是测试人员,请千万不要这么做,否则如果别的地方导致了错误,很容易给自己造成不必要的麻烦。
下面简单介绍一下上边用到的静态类junit.framework.Assert。该类主要包含8个方法:
1.assertEquals()方法,用来查看对象中存的值是否是期待的值,与字符串比较中使用的equals()方法类似;
2.assertFalse()和assertTrue()方法,用来查看变量是是否为false或true,如果assertFalse()查看的变量的值是false则测试成功,如果是true则失败,assertTrue()与之相反;
3.assertSame()和assertNotSame()方法,用来比较两个对象的引用是否相等和不相等,类似于通过“==”和“!=”比较两个对象;
4.assertNull()和assertNotNull()方法,用来查看对象是否为空和不为空;
5.fail ()方法,意为失败,用来抛出错误。我个人认为有两个用途:首先是在测试驱动开发中,由于测试用例都是在被测试的类之前编写,而写成时又不清楚其正确与否,此时就可以使用fail方法抛出错误进行模拟;其次是抛出意外的错误,比如要测试的内容是从数据库中读取的数据是否正确,而导致错误的原因却是数据库连接失败。
4,运行测试用例:
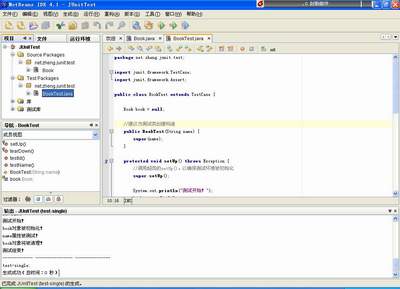
运行ProgramTest
编写好ProgramTest后,就可以运行了。请在“项目”栏中选中BookTest,点击鼠标右键,选择“运行文件”,测试信息会从“输出”窗口输出:
5,创建测试套件
当有多个测试类需要一次性进行测试时,可以使用测试套件来完成这项工作。在NetBeans中,点击“文件”->“新建文件”,打开“新建文件”对话框:
确保“项目”选择的是JUnitTest,然后在“类别”中选中JUnit类,在“文件类型”中选中测试套件,点击“下一个”,进入下一窗口:
修改“类名”为AllTests,点击“完成”,然后修改代码如下:
/*
 * To change this template, choose Tools | Templates
 * and open the template in the editor.
 */
package Junit.test;

import junit.framework.*;
import org.junit.After;
import org.junit.AfterClass;
import org.junit.Before;
import org.junit.BeforeClass;
import org.junit.runner.RunWith;
import org.junit.runners.Suite;

/**
 *
 * @author steven
 */
public class AllTests extends TestCase
{
    public AllTests(String testName)
    {
        super(testName);
    }
    public static Test  RunSuite()
    {
        //TestSuite用来组织测试类
        TestSuite ts = new TestSuite("AllTest");
        //addTestSuite()方法讲测试类添加到ts对象,凡是添加到ts中的测试类都将在运行文件时被执行。
        /*此外,您也可以在定义ts对象时利用其构造函数将测试类添加给ts对象,例如:
         * TestSuite ts = new TestSuite(BookTest.class);
         * 这并不会影响到后续使用addTestSuite()方法。测试套件的运行方法与之前一样。
         */
        ts.addTestSuite(BookTest.class);
        return ts;
    }
    @BeforeClass
    public static void setUpClass() throws Exception {
    }

    @AfterClass
    public static void tearDownClass() throws Exception {
    }

    @Before
    public void setUp() throws Exception {
    }

    @After
    public void tearDown() throws Exception {
    }
}
上面的代码中TestCase与TestSuite这两个类全部定义在junit.framework这个类库里。Test是一个接口,也定义在 junit.framework这个类库里。
此外,JUnit自身也提供了运行测试的环境,但需要在NetBeans中做一些改动,所以就不作详细介绍了,这里只将代码给出:
import junit.framework.*;
public class Test {
public static void main(String[] args) {
//使用TestSuite组装测试类
TestSuite ts = new TestSuite();
ts.addTestSuite(TestBook.class);
//textui,命令行方式
junit.textui.TestRunner.run(ts);
//swingui,Swing方式
//junit.swingui.TestRunner.run(ts.getClass());
//awtui,AWT方式
//junit.awtui.TestRunner.run(ts.getClass());
}
}
以上内容主要参考http://java.chinaitlab.com/JUnit/350516_2.html,更加详细的内容,请参考http://netbeans.org/kb/docs/java/junit-intro_zh_CN.html


