ExtJS 4 官方指南翻译:Grid组件(下)
原文:http://docs.sencha.com/ext-js/4-0/#!/guide/grid
翻译:frank/sp42 转载请保留本页信息
选区模型 Selection Models
有时 Grid 面板被用于只是在屏幕上显示的数据,但更多的是进行交互动作或执行更新数据的任务。所有 Grid 面板都有一个选择模型(SelectionModel),以确定数据如何被选中。选择模型的两个主要类型是“整行选择模型”,抑或是“单元格选择模型”,也就是一行行地被选择,还是单个单元格被选中的问题。
Sometimes Grid Panels are use only to display data on the screen, but usually it is necessary to interact with or update that data. AllGrid Panels have aSelection Model which determines how data is selected. The two main types of Selection Model areRow Selection Model, where entire rows are selected, and Cell Selection Model, where individual cells are selected.
Grid 面板默认使用行选择模型,但它很容易切换为单元格选择模型:
Grid Panels use aRow Selection Model by default, but it's easy to switch to a Cell Selection Model:
Ext.create('Ext.grid.Panel', {
    selType: 'cellmodel',
    store: ...
});
使用单元格选择模型的话,得改变几件事情。首先,点击一个单元格,选择的只是那个单元格(如使用行选择模型,将选择整个行);其次,键盘导航不是行与行之间的移动,而是单元格之间的。单元格为基础的选择模型通常与编辑控件一起使用。
Using a Cell Selection Model changes a couple of things. Firstly, clicking on a cell now selects just that cell (using aRow Selection Modelwill select the entire row), and secondly the keyboard navigation willwalk from cell to cell instead of row to row. Cell-based selectionmodels are usually used in conjunction with editing.
编辑 Editing
Grid 面板支持行编辑。我们要看看编辑的两个主要模式——行编辑和单元格编辑。
Grid Panel has build in support for editing. We're going to look at the two main editing modes - row editing and cell editing
单元格编辑 Cell Editing
单元格编辑就是允许你在 Grid 面板中针对某个单元格中的数据进行编辑。执行单元格编辑的第一步是配置每个 Grid 面板都应该是可编辑的列。以下就是编辑器的配置。最简单的方法是指定那个字段的 editor 为组件的 xtype:
Cell editing allows you to edit the data in a Grid Panel one cell at a time. The first step in implementing cell editing is to configure an editor for eachColumn in yourGrid Panel that should be editable. This is done using the editor config. The simplest way is to specify just the xtype of the field you want to use as an editor:
Ext.create('Ext.grid.Panel', {
    ...
    columns: [
        {
            text: 'Email Address',
            dataIndex: 'email',
            editor: 'textfield'
       }
    ]
});
如果您需要更多的控制如何编辑字段的行为,编辑器配置也可以为字段的配置对象。例如,如果我们使用的是一个文本字段,我们需要一个值:
If you need more control over how the editor field behaves, the editor config can also take a config object for a Field. For example if we are using aText Field and we want to require a value:
columns: [
    text: 'Name',
    dataIndex: 'name',
    editor: {
        xtype: 'textfield',
        allowBlank: false
    }
]
作为一个编辑字段,您可以使用在Ext.form.field包的任何类。让我们假设我们要编辑一列包含日期。我们可以使用一个日期字段编辑器:
You can use any class in the Ext.form.field package as an editor field. Lets suppose we want to edit a column that contains dates. We can use aDate Field editor:
columns: [
    {
        text: 'Birth Date',
        dataIndex: 'birthDate',
        editor: 'datefield'
    }
]
不配置编辑器的任何一个Grid面板Ext.grid.column.Columns不会编辑。
Any Ext.grid.column.Columns in a Grid Panel that do not have a editor configured will not be editable.
现在,我们已经配置了哪些可编辑的列,将使用的编辑器编辑数据字段,下一步是要指定一个选择模型。让我们用在我们的Grid面板配置的小区选择模型:
Now that we've configured which columns we want to be editable, and theeditor fields that will be used to edit the data, the next step is tospecify a selection model. Let's use aCell Selection Model in our Grid Panel config:
Ext.create('Ext.grid.Panel', {
    ...
    selType: 'cellmodel'
});
最后打开编辑功能,我们为 Grid 面板配置上一个单元格编辑插件:
Finally, to enable editing we need to configure the Grid Panel with a Cell Editing Plugin:
Ext.create('Ext.grid.Panel', {
    ...
    selType: 'cellmodel',
    plugins: [
        Ext.create('Ext.grid.plugin.CellEditing', {
            clicksToEdit: 1
        })
    ]
});
而这一切都需要创建一个使用单元格编辑的 Grid,。请参阅单元格编辑实例。
And that's all it takes to create an editable grid using cell editing. See Cell Editing for a working example.
行编辑 Row Editing
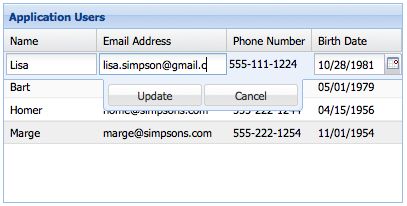
行编辑就是说,让您同时编辑编辑单元格,而不是整个行。行编辑的效果完全与单元格编辑的方式相同,于是我们所需要做的的是改变插件类型为 Ext.grid.plugin.RowEditing 并设置 selType 为 rowmodel。
Row editing enables you to edit an entire row at a time, rather thanediting cell by cell. Row editing works in exactly the same way as cellediting - all we need to do is change the plugin type toExt.grid.plugin.RowEditing and set the selType to rowmodel.
Ext.create('Ext.grid.Panel', {
    ...
    selType: 'rowmodel',
    plugins: [
        Ext.create('Ext.grid.plugin.RowEditing', {
            clicksToEdit: 1
        })
    ]
});
行编辑的在线例子 Row Editing - Live Example
分页 Paging
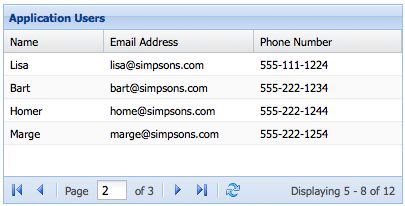
有时你的数据量太大,恰恰又要在一张页面上显示这些所有的数据,怎么办呢?Grid 面板支持两个不同方式的分页:1、使用“上一页/下一页”按钮的分页工具栏;2、使用滚动条进行上下翻页。
Sometimes your data set is too large to display all on one page. Grid Panel supports two different methods of paging - Paging Toolbar which loads pages using previous/next buttons, and Paging Scroller which loads new pages inline as you scroll.
设置 Store Store Setup
在设置Grid 两种类型的分页之前,我们必须要让 Store 支持分页。在下面的例子中,我们添加一个有 pageSize的Store,以及带有 totalProperty 配置项的 Reader 对象:
Before we can set up either type of paging on a Grid Panel, we have to configure the Store to support paging. In the below example we add a pageSize to the Store, and we configure our Reader with a totalProperty:
Ext.create('Ext.data.Store', {
    model: 'User',
    autoLoad: true,
    pageSize: 4,
    proxy: {
        type: 'ajax',
        url : 'data/users.json',
        reader: {
            type: 'json',
            root: 'users',
            totalProperty: 'total'
        }
    }
});
配置项 totalProperty 指定了从 JSON 结构中哪里可以获取结果的总数。该 Store 为 JsonStore 类型的,所以看起来像这样:
The totalProperty config tells the Reader where to get the total number of results in the JSON response. This Store is configured to consume a JSON response that looks something like this:
{
    "success": true,
    "total": 12,
    "users": [
        { "name": "Lisa", "email": "[email protected]", "phone": "555-111-1224" },
        { "name": "Bart", "email": "[email protected]", "phone": "555-222-1234" },
        { "name": "Homer", "email": "[email protected]", "phone": "555-222-1244" },
        { "name": "Marge", "email": "[email protected]", "phone": "555-222-1254" }
    ]
}
有关 Store、Proxy 用法,读者请参阅数据手册。
For more on Stores, Proxies, and Readers refer to the Data Guide.
分页工具栏 Paging Toolbar
现在,我们已设置了 Store及其分页,所有剩下的工作就是配置一个分页工具栏。你可以把分页工具栏定位在你应用程序的任何地方,但通常是停靠在 Grid 面板旁边:
Now that we've setup our Store to support paging, all that's left is to configure a Paging Toolbar. You could put the Paging Toolbar anywhere in your application layout, but typically it is docked to theGrid Panel:
Ext.create('Ext.grid.Panel', {
    store: userStore,
    columns: ...,
    dockedItems: [{
        xtype: 'pagingtoolbar',
        store: userStore,   // same store GridPanel is using
        dock: 'bottom',
        displayInfo: true
    }]
});

分页工具栏示例 Paging Toolbar Example
分页滚动 Paging Scroller
Grid 作为替代使用分页工具栏支持无限滚动。您的用户可以通过滚动数以千计的记录,却没有过多渲染记录而带来的性能损失。应指定Grid 其 Store 的 pageSize 的大小如何。
Grid supports infinite scrolling as an alternative to using a pagingtoolbar. Your users can scroll through thousands of records without theperformance penalties of renderering all the records on screen at once.The grid should be bound to a store with a pageSize specified.
Ext.create('Ext.grid.Panel', {
    // 使用PagingGridScroller (代替 PagingToolbar)Use a PagingGridScroller (this is interchangeable with a PagingToolbar)
    verticalScrollerType: 'paginggridscroller',
    // 当刷新试图时不复位滚动条 do not reset the scrollbar when the view refreshs
    invalidateScrollerOnRefresh: false,
    // 无限滚动不支持选择 infinite scrolling does not support selection
    disableSelection: true,
    // ...
});
无限滚动示例 Infinite Scrolling Example
