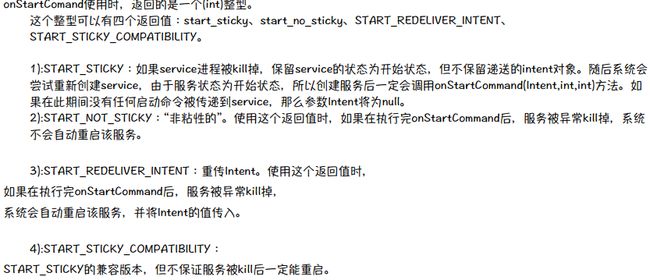
扣丁学堂——Service
扣丁学堂Service【源码下载】
测试代码:
xml就两个Button,主文件就Start和Stop单击事件,调用MyService
例:
//启动service服务 :开启后会一直在后台运行
public  void startClick(View v){
    Intent intent = new Intent(this,MyService.class);
    startService(intent);
}
MyService.jave
/*
    stared service
    1.服务同时只会被创建一次,可以通过外部调用stopService或调用stopSelf来终止服务
    2.当执行一个已启动的服务,会直接调用onStartCommand方法来执行业务
    3.默认情况下服务与主线程在同一线程,执行耗时,我们必须使用在线程来完成工作
      避免主线程阻塞
    4.使用Started service启动的一个服务,在没有关闭之前一直在后台运行
 */

public class MyService extends Service {
    public MyService() {
    }
    @Override
    public void onCreate() {
        super.onCreate();
        Log.i("msg", "my service create");
    }
    //在该方法中实现核心业务
    @Override
    public int onStartCommand(Intent intent, int flags, int startId) {
        //使用线程完成长时间的工作
        new Thread(new Runnable() {
            @Override
            public void run() {
                //直接使用会占主服务资源
                for (int i=0;i<50;i++){
                    Log.i("print","onstartcommand"+i);
                    try {
                        Thread.sleep(500);
                    } catch (InterruptedException e) {
                        e.printStackTrace();
                    }
                    if(i==30){
                        MyService.this.stopSelf();//终止服务
                        break;
                    }
                }
            }
        }).start();
        return super.onStartCommand(intent, flags, startId);
    }

    @Override
    public IBinder onBind(Intent intent) {
        throw new UnsupportedOperationException("Not yet implemented");
    }
    @Override
    public void onDestroy() {
        super.onDestroy();
        Log.i("destroy","销毁服务");
    }
}
创建MyService时自动生成配置文件:
<service
    android:name=".MyService"
    android:enabled="true"
    android:exported="true" >
</service>
配置文件中添加一句可使进程独立
android:process=":removte"
创建IntentService 添加启动IntentService单击事件
IntentService.java
/**  * IntentService  * 1.内部有一个工作线程来完成耗时的操作。只需要实现onHandleIntent 方法即可  * 2.完成工作后会自动停止服务  * 3.如果同时执行多个任务时,会以工用对列的方式依次执行。  * 4.通过使用该类完成本APP中的内部耗时工作  */ public class MyIntentService extends IntentService {
    public MyIntentService(){
        super("myIntentService");
    }
    @Override
    protected void onHandleIntent(Intent intent) {
        for (int i=0;i<50;i++){
            Log.i("MSG", "打印for" + i);
            try {
                Thread.sleep(500);
            } catch (InterruptedException e) {
                e.printStackTrace();
            }
        }
    }
}
部分代码及注释:
1.客户端
MainActivity.java
public class MainActivity extends AppCompatActivity {
    private  ICat cat;
    private  boolean mbound = false;//是否绑定
    @Override
    protected void onCreate(Bundle savedInstanceState) {
        super.onCreate(savedInstanceState);
        setContentView(R.layout.activity_main);
    }
    //启动service服务 :开启后会一直在后台运行
    public  void startClick(View v){
        Intent intent = new Intent(this,MyService.class);
        startService(intent);
    }
    //停止service服务
    public  void stopClick(View v){
        Intent intent = new Intent(this,MyService.class);
        stopService(intent);
    }
    //启动 intenService服务:只执行一次,并自动结束
    public  void startIntenClick(View v){
        Intent intent = new Intent(this,MyIntentService.class);
        startService(intent);
    }
    //绑定服务的连接回调接口
    private ServiceConnection conn = new ServiceConnection() {
        //绑定成功后回调的方法
        @Override
        public void onServiceConnected(ComponentName name, IBinder service) {
            //这里的IBinder:就是 aidl 的具体实现业务类
            cat = ICat.Stub.asInterface(service);//返回的是CatImpl的对象(业务实现对象),
            //说明在同一下进程当中
            //在清单文件中配置  android:process=":removte" 时,则返回Icat的代理对象,
            // 因为正在MyBService服务类已经在一个独立的进程中运行这个服务,需要网络传输,所以需要代理。
            // 当ipc调用时,就会将传入的值,传到另一个进程中去了,
            // 这样就形成了远程的调用服务,调用的是单独的一个进程中的服务
            mbound = true;
            Toast.makeText(MainActivity.this,"绑定成功", Toast.LENGTH_SHORT).show();
        }

        //服务异常中止,会自动调用这个方法
        @Override
        public void onServiceDisconnected(ComponentName name) {
            mbound = false;
        }
    };
    //客户端解除一个服务
    public void unBoundClick(View v){
        if (mbound) {
            unbindService(conn);
            Toast.makeText(MainActivity.this, "解除绑定成功", Toast.LENGTH_SHORT).show();
        }
    }
    //  绑定服务
    public void clickIPC(View v) {
        if(cat==null){
            return;
        }
        try {
            cat.setName("猫猫");
            Toast.makeText(this,cat.desc()+cat.getPerson().toString(),Toast.LENGTH_SHORT).show();
        } catch (RemoteException e) {
            e.printStackTrace();
        }
    }
    //只有当服务绑定的时候才能调用
    public  void boundClick(View view){
        Intent intent = new Intent(this,MyBroundService.class);
        //异步绑定
        bindService(intent,conn, Context.BIND_AUTO_CREATE);//没有绑定自动创建
        if (mbound) {
            unbindService(conn);
            Toast.makeText(MainActivity.this, "解除绑定成功", Toast.LENGTH_SHORT).show();
        }
    }
}
2.服务类
MyBroundService.java
/****  * 绑定服务:  * 1.客户端通过bindService方法来绑定一个服务对象,如果绑定成功,会回调用ServiceConnection 接口方法 onServiceConnected  * 2.通过Service 组件来暴露 业务接口,  * 3.业务接口应该符合 onBind的规则  * 4.服务端通过一个*.aidl 文 件业定义一个可以被客户端调用的业务接口  * 5.一个aidl文件:  * 1.不能有修饰符,类似接口的写法  * 2.支持类型有:8种基本数据类型, String ,CharSequence ,List<String>,MAP,自定义类型  *4.服务端需要提供一个业务接口的实现类,通过我们会 extends Stub类  * 5.通过Service 的onBind 方法返回被绑定的业务对象  * 6.客启端如果绑定成功,就可以像调用自己的方法一样调用远程的业务对象方法  * 自定定类型 :  * 1.实现Parcelable接口  * 2.定义一个aidl文件声明该类型  3.在其它adild文件中导入  started启动的服务,会长期存在,只要不停,  bind启动的服务,通常会在解绑时停止  技巧:  先started,后bind  *  *  */  //bind service 服务类
public class MyBroundService extends Service {
    public MyBroundService() {
    }
    @Override
    public void onCreate() {
        super.onCreate();
    }
    @Override
    public IBinder onBind(Intent intent) {
        return new CatImpl();//具体实现的业务类
    }
    @Override
    public boolean onUnbind(Intent intent) {
        return super.onUnbind(intent);
    }
    @Override
    public void onDestroy() {
        super.onDestroy();
    }
}
3.两aidl定义声明
ICat.aidl
import com.jin.administrator.myapplication1209.Person;
interface ICat {
    Person getPerson();
     void setName(String name);
    String desc();
    /**  * Demonstrates some basic types that you can use as parameters  * and return values in AIDL.  */  void basicTypes(int anInt, long aLong, boolean aBoolean, float aFloat,
            double aDouble, String aString);
}
Person.aidl
// Person.aidl
package com.jin.administrator.myapplication1209;
parcelable Person;
4.业务类
Person.java
public class Person implements Parcelable{
    String name;
    String work;
    @Override
    public String toString() {
        return "Person{" +
                "name='" + name + '\'' +
                ", work='" + work + '\'' +
                '}';
    }
    public static final Parcelable.Creator<Person> CREATOR = new Parcelable.Creator<Person>() {
        @Override
        public Person createFromParcel(Parcel source) {
            Person p =new Person();
            p.name = source.readString();
            p.work = source.readString();
            return p;
        }
        @Override
        public Person[] newArray(int size) {
            return new Person[size];
        }
    };
    @Override
    public int describeContents() {
        return 0;
    }
    @Override
    public void writeToParcel(Parcel dest, int flags) {

        dest.writeString(name);
        dest.writeString(work);
    }
}
CatImpl.java
public class CatImpl extends ICat.Stub {
    private String name;
    @Override
    public Person getPerson() throws RemoteException {
        Person p =  new Person();
        p.name = "猫猫的主人";
        p.work = "强盗";
        return  p;
    }
    @Override
    public void setName(String name) throws RemoteException {
        this.name=name;
    }
    @Override
    public String desc() throws RemoteException {
        return name;
    }
    @Override
    public void basicTypes(int anInt, long aLong, boolean aBoolean, float aFloat, double aDouble, String aString) throws RemoteException {

    }
}
通过IPC调用业务方法,是通过服务类来绑定的,service为一个中间人
public class MassengerService extends Service {
    public  static  final int say_hello = 0x1;//消息的标记
    public MassengerService() {
    }
    @Override
    public IBinder onBind(Intent intent) {
        return messenger.getBinder();
    }
    //服务端接收并处理信息
    private Handler handler = new Handler(){
        @Override
        public void handleMessage(Message msg) {
            switch (msg.what){
                case say_hello://当为这个标记时,处理这个信息
                    String info = (String) msg.obj;
                    Toast.makeText(getApplicationContext(), info, Toast.LENGTH_SHORT).show();
                    break;
            }
        }
    };
    private Messenger messenger = new Messenger(handler);
}
MainActivity后面添加代码
Messenger mService;
boolean flag = false;
private ServiceConnection conn2 = new ServiceConnection() {
    @Override
    public void onServiceConnected(ComponentName name, IBinder service) {
        mService = new Messenger(service);
        flag = true;
    }
    @Override
    public void onServiceDisconnected(ComponentName name) {
        flag = false;
    }
};
//一启动的时侯就绑定服务
@Override
protected void onStart() {
    super.onStart();
    Intent service = new Intent(this, MassengerService.class);
    bindService(service, conn2, Context.BIND_AUTO_CREATE);
}
@Override
protected void onStop() {
    super.onStop();
    if (flag) {
        unbindService(conn2);
        flag = false;
    }
}
//单击按钮发送信息
public void messageClick(View v) {
    //获取(创建) 一个消息对象
    Message msg = Message.obtain();
    msg.what = MassengerService.say_hello;
    msg.obj = "这是一个message信息!";
    try {
        mService.send(msg);//发送消息
    } catch (RemoteException e) {
        e.printStackTrace();
    }
关于Service后期再加强,确实似懂非懂的,只有在实战项目中才会知道掌握程度


