0K6410学习之linux移植nand flash
环境:
PC机系统:Redhat6.1
目标板: OK6410
目标板系统:linux3.0.101
编译器: arm-linux-gcc4.3.2
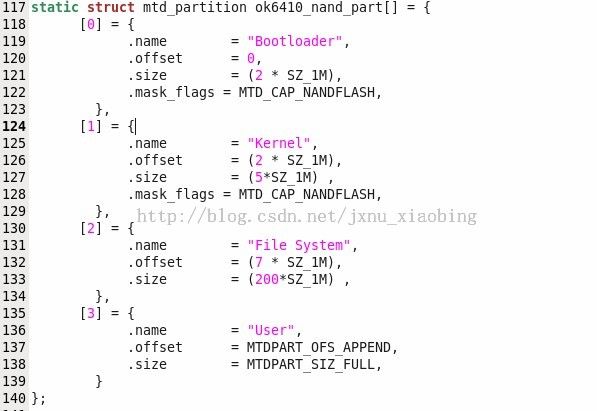
1. 进入linux-3.0.101/arch/arm/mach-s3c64xx/mach-ok6410.c文件,找到nand分区的那个结
构体。如下:
修改nand分区如下:
2. 在开发板提供的内核源码中找到s3c_nand.c这个文件,然后执行命令mv s3c_nand.c drivers/mtd/nand/ 将他拷贝到我们的内核目录下,然后修改该目录下的makefile,将文件添加进去,如下图示
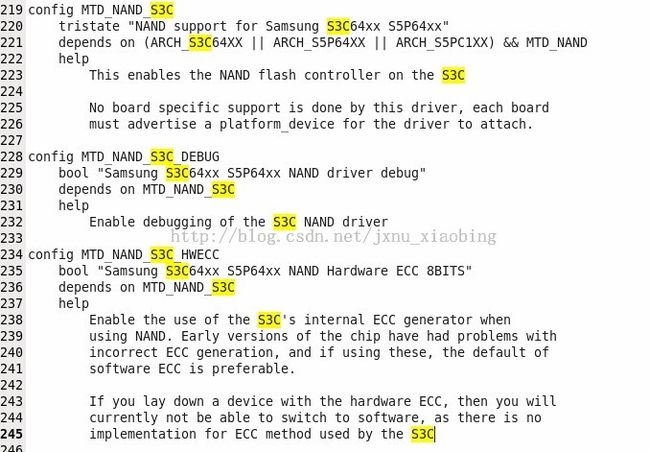
3. 同时要加入该驱动的话,还应该在该目录下的Kconfig文件中添加对该驱动的支持,添加如下内容:
4. 因为在我们的s3c_nand.c文件中使用到了,相关的寄存器宏定义,所以在arch/arm/plat-samsung/include/plat/regs_nand.h要加入寄存器定义,内容如下:
#define S3C_NFCONF  S3C2410_NFREG(0x00)
#define S3C_NFCONT  S3C2410_NFREG(0x04)
#define S3C_NFCMMD S3C2410_NFREG(0x08)
#define S3C_NFADDR  S3C2410_NFREG(0x0c)
#define S3C_NFDATA8 S3C2410_NFREG(0x10)
#define S3C_NFDATA   S3C2410_NFREG(0x10)
#define S3C_NFMECCDATA0      S3C2410_NFREG(0x14)
#define S3C_NFMECCDATA1      S3C2410_NFREG(0x18)
#define S3C_NFSECCDATA  S3C2410_NFREG(0x1c)
#define S3C_NFSBLK   S3C2410_NFREG(0x20)
#define S3C_NFEBLK   S3C2410_NFREG(0x24)
#define S3C_NFSTAT    S3C2410_NFREG(0x28)
#define S3C_NFMECCERR0 S3C2410_NFREG(0x2c)
#define S3C_NFMECCERR1 S3C2410_NFREG(0x30)
#define S3C_NFMECC0       S3C2410_NFREG(0x34)
#define S3C_NFMECC1       S3C2410_NFREG(0x38)
#define S3C_NFSECC   S3C2410_NFREG(0x3c)
#define S3C_NFMLCBITPT  S3C2410_NFREG(0x40)

#define S3C_NF8ECCERR0  S3C2410_NFREG(0x44)
#define S3C_NF8ECCERR1  S3C2410_NFREG(0x48)
#define S3C_NF8ECCERR2  S3C2410_NFREG(0x4c)


#define S3C_NFM8ECC0      S3C2410_NFREG(0x50)
#define S3C_NFM8ECC1      S3C2410_NFREG(0x54)
#define S3C_NFM8ECC2      S3C2410_NFREG(0x58)
#define S3C_NFM8ECC3      S3C2410_NFREG(0x5c)

#define S3C_NFMLC8BITPT0     S3C2410_NFREG(0x60)
#define S3C_NFMLC8BITPT1     S3C2410_NFREG(0x64)

#define S3C_NFCONF_NANDBOOT   (1<<31)
#define S3C_NFCONF_ECCCLKCON (1<<30)
#define S3C_NFCONF_ECC_MLC      (1<<24)
#define S3C_NFCONF_ECC_1BIT      (0<<23)
#define S3C_NFCONF_ECC_4BIT      (2<<23)
#define S3C_NFCONF_ECC_8BIT      (1<<23)
#define S3C_NFCONF_TACLS(x)       ((x)<<12)
#define S3C_NFCONF_TWRPH0(x)    ((x)<<8)
#define S3C_NFCONF_TWRPH1(x)    ((x)<<4)
#define S3C_NFCONF_ADVFLASH    (1<<3)
#define S3C_NFCONF_PAGESIZE      (1<<2)
#define S3C_NFCONF_ADDRCYCLE (1<<1)
#define S3C_NFCONF_BUSWIDTH    (1<<0)

#define S3C_NFCONT_ECC_ENC      (1<<18)
#define S3C_NFCONT_LOCKTGHT   (1<<17)
#define S3C_NFCONT_LOCKSOFT    (1<<16)
#define S3C_NFCONT_MECCLOCK   (1<<7)
#define S3C_NFCONT_SECCLOCK    (1<<6)
#define S3C_NFCONT_INITMECC     (1<<5)
#define S3C_NFCONT_INITSECC      (1<<4)
#define S3C_NFCONT_nFCE1     (1<<2)
#define S3C_NFCONT_nFCE0     (1<<1)
#define S3C_NFCONT_INITECC (S3C_NFCONT_INITSECC | S3C_NFCONT_INITMECC)

#define S3C_NFSTAT_ECCENCDONE       (1<<7)
#define S3C_NFSTAT_ECCDECDONE       (1<<6)
#define S3C_NFSTAT_BUSY       (1<<0)
5. 3.修改drivers/mtd/nand/nand_base.c文件,加入
static struct nand_ecclayout nand_oob_218 ={
   .eccbytes = 104,
   .eccpos = {
       24,25,26,27,28,29,30,31,32,33,
       34,35,36,37,38,39,40,41,42,43,
       44,45,46,47,48,49,50,51,52,53,
       54,55,56,57,58,59,60,61,62,63,
       64,65,66,67,68,69,70,71,72,73,
       74,75,76,77,78,79,80,81,82,83,
       84,85,86,87,88,89,90,91,92,93,
       94,95,96,97,98,99,100,101,102,103,
       104,105,106,107,108,109,110,111,112,113,
       114,115,116,117,118,119,120,121,122,123,
       124,125,126,127
   },
   .oobfree = {
       {
           .offset = 2,
           .length = 22
       }
    }
};
再找到intnand_scan_tail(struct mtd_info *mtd)这个函数,在switch (mtd->oobsize) 里面加入
case 218:
chip->ecc.layout = &nand_oob_218;
break;
找到if(!chip->ecc.strength) {
pr_warn("Driver must set ecc.strengthwhen using hardware ECC\n");
BUG();
}把BUG();屏蔽掉
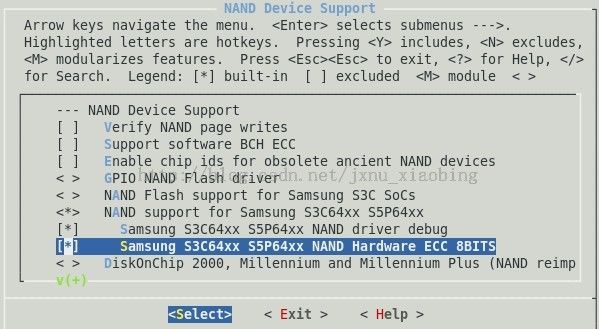
6. 到这里为止,我们的nand flash移植工作初步完成了,当然还要进行配置了,进入顶层目录,makemenuconfig Device Drivers ---> Memory Technology Device (MTD) support ---> NAND Device Support ---> 取消NAND Flash support for Samsung S3CSoCs 选中
NAND support for Samsung S3C64xx S5P64xx (NEW),如下图示:
然后,保存配置,编译内核make zImage
编译有可能会出现如下错误:
这是因为内核版本不同,导致add_mtd_partitions这个函数在include/linux/mtd/partitions.h里面没有声明,我们加上这个声明就可以了
int add_mtd_partitions(struct mtd_info *,const struct mtd_partition *, int);
int del_mtd_partitions(struct mtd_info *);如下:
最终烧写进内核后,能看到如下的启动信息:
显示已经能够正常读取nand分区了。
到这里nand flash驱动移植就已经完成了。


