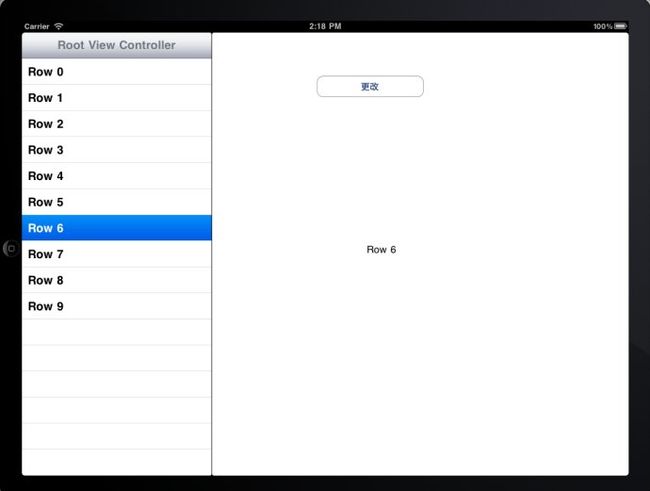
iPhone之UISplitViewController
转自:http://blog.sina.com.cn/s/blog_4adf31ea0100qxoh.html
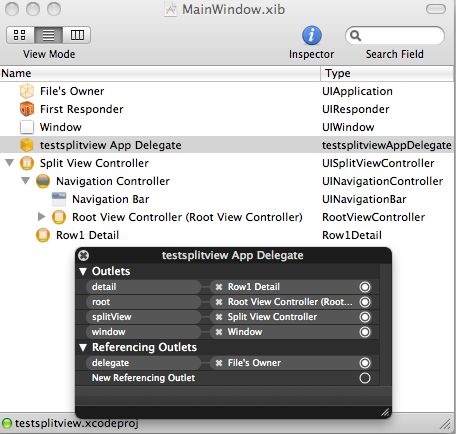
@interfacetestsplitviewAppDelegate : NSObject<UIApplicationDelegate> {
UIWindow *window;
UISplitViewController *splitView;
RootViewController *root;
Row1Detail *detail;
}
@property (nonatomic,retain) IBOutlet UIWindow *window;
@property (nonatomic, retain) IBOutlet UISplitViewController*splitView;
@property (nonatomic,retain)IBOutlet RootViewController*root;
@property (nonatomic,retain) IBOutlet Row1Detail *detail;
@end
实现类:
-(BOOL)application:(UIApplication *)applicationdidFinishLaunchingWithOptions:(NSDictionary *)launchOptions {
// Override point for customization afterapp launch.
[self.windowaddSubview:splitView.view];
[self.windowmakeKeyAndVisible];
return YES;
}
RootViewController的代码如下:
@interface RootViewController :UITableViewController {
Row1Detail *detail;
}
@property (nonatomic,retain)IBOutlet Row1Detail*detail;
@end
实现代码:
#import"RootViewController.h"
@implementationRootViewController
@synthesize detail;
#pragma mark -
#pragma mark View lifecycle
-(void)viewDidLoad {
[superviewDidLoad];
self.clearsSelectionOnViewWillAppear= NO;
self.contentSizeForViewInPopover = CGSizeMake(320.0,600.0);
}
#pragma mark -
#pragma mark Table view data source
-(NSInteger)numberOfSectionsInTableView:(UITableView*)aTableView {
return 1;
}
-(NSInteger)tableView:(UITableView *)aTableViewnumberOfRowsInSection:(NSInteger)section {
return 10;
}
-(UITableViewCell*)tableView:(UITableView*)tableViewcellForRowAtIndexPath:(NSIndexPath *)indexPath {
static NSString *CellIdentifier = @"CellIdentifier";
UITableViewCell *cell = [tableViewdequeueReusableCellWithIdentifier:CellIdentifier];
if (cell == nil) {
cell = [[[UITableViewCell alloc] initWithStyle:UITableViewCellStyleDefaultreuseIdentifier:CellIdentifier]autorelease];
cell.accessoryType = UITableViewCellAccessoryNone;
}
cell.textLabel.text = [NSString stringWithFormat:@"Row %d", indexPath.row];
return cell;
}
#pragma mark -
#pragma mark Table view delegate
-(void)tableView:(UITableView *)aTableViewdidSelectRowAtIndexPath:(NSIndexPath *)indexPath {
detail.detailItem = [NSString stringWithFormat:@"Row %d", indexPath.row];
}
Row1Detail的代码
@interface Row1Detail :UIViewController<UISplitViewControllerDelegate>{
UILabel *Text1;
id detailItem;
}
@property (nonatomic,retain)IBOutlet UILabel *Text1;
@property (nonatomic,retain) id detailItem;
-(IBAction) click;
@end
实现代码如下:
#import "Row1Detail.h"
@implementation Row1Detail
@synthesize Text1;
@synthesize detailItem;
-(IBAction) click
{
NSLog(@"%@",Text1.text);
UIAlertView *alert=[[UIAlertView alloc] initWithTitle:@"标题"message:@"22" delegate:selfcancelButtonTitle:@"关"otherButtonTitles:nil];
[alert show];
[alert release];
Text1.text=@"11111111111";
}
-(void)setDetailItem:(id)newDetailItem
{
if (detailItem != newDetailItem) {
[detailItemrelease];
detailItem =[newDetailItem retain];
Text1.text =[detailItem description];
}
}
// Implement viewDidLoad to do additional setup after loading theview, typically from a nib.
-(void)viewDidLoad
{
[superviewDidLoad];
}
-(BOOL)shouldAutorotateToInterfaceOrientation:(UIInterfaceOrientation)interfaceOrientation{
// Overriden to allow anyorientation.
return YES;
}

