iOS绘图系统UIKit与Core Graphics
概述
iOS主要的绘图系统有UIKit,Core Graphics,Core Animation,Core Image,Open GL等,本片博文主要介绍UIKit与Core Graphics的绘图系统。
关于UIKit
iOS中的原生控件以UI前缀开头的类名都是由UIKit绘制的。可以说我们进行开发打交道最多的就是UIKit这个框架。
关于Core Graphics
Core Graphics是iOS主要的绘图系统,可以在屏幕,图层,位图,PDF或者打印机上绘制。在iOS中以CG前缀的类都属于Core Graphics框架。
UIKit绘图系统
视图绘制
- 视图绘制的周期
所有绘制的视图都发生在主线程,如果在主线程进行耗时操作的话会阻碍绘制的更新,不能把主视图的绘图操作放到其他线程中,这对于当前的UIKit是线程不安全的。如果在其他线程对主视图进行绘制会导致绘制出错或崩溃。 - 视图绘制的方法
setNeedsDispaly如果对视图调用setNeedsDispaly方法,它会标记成为需要刷新并且在下一绘图周期中重新绘制,不过大部分UIKit视图会在数据发生变化时自动进行重绘操作,因此除非想要在视图上自定义绘图,其他情况并不需要调用setNeedsDispaly方法。
通过UIKit绘图
UIKit通过UIRectFrame和UIRectFill可以进行一些简单的绘制矩形的方法,如果想要绘制任意图形需要用到UIBezierPath进行绘制,但是UIKit对一些高级的特性依然无能为力比如阴影、渐变等效果。UIBezierPath可以绘制任意的曲线和线条,因为UIBezierPath拥有处理大部分线条、弧线、矩形、椭圆的简单方法,因此UIBezierPath可以快速绘制大部分形状。- 绘图在系统提供的图形上下文中完成后会调用
drawRect:方法,所以我们自定义绘图操作需要写在drawRect:方法里。
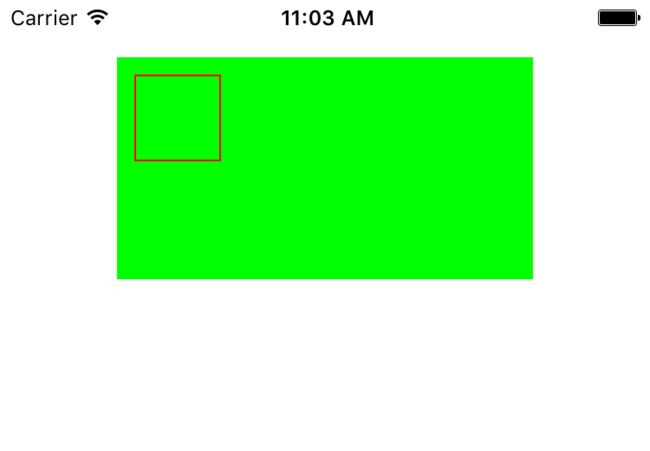
UIRectFrame与UIRectFill简单的实现
- (void)drawRect:(CGRect)rect { [[UIColor greenColor] setFill]; //设置填充颜色
    UIRectFill(rect);   //设置填充区域
    [[UIColor redColor] setStroke]; //设置线条颜色
    UIRectFrame(CGRectMake(10, 10, 50, 50)); //设置矩形区域
}
实现效果
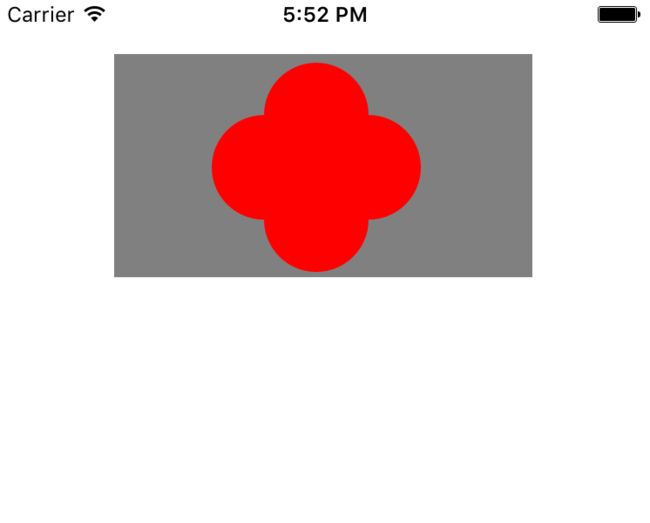
UIBezierPath的实现
- (void)drawRect:(CGRect)rect {
    CGSize size = rect.size;
    [[UIColor grayColor] setFill];
    UIRectFill(rect);       //设置一个背景色
    CGFloat margin = 10;    //图像距离矩形上下边框宽度
    CGFloat radius = rintf(MIN(size.height-margin, size.width-margin)/4);
    //确保圆弧能够完整的画在矩形框内,以矩形框最小的边长1/4画为半径画圆弧
    CGFloat xOffset,yOffset;
    CGFloat offset = rintf((size.height - size.width)/2);
    if (offset>0) {
        xOffset = rint(margin/2);
        yOffset = offset;
    }
    else
    {
        xOffset = -offset;
        yOffset = rint(margin/2);
    }
    [[UIColor redColor] setFill];
    UIBezierPath *path = [UIBezierPath bezierPath];
    [path addArcWithCenter:CGPointMake(radius * 2+xOffset, radius+yOffset)  //圆弧的中心
                    radius:radius   //圆弧的角度
                startAngle:-M_PI    //开始的角度
                  endAngle:0        //结束的角度
                 clockwise:YES];    //画圆弧的方向(YES--顺时针,NO--逆时针)
    [path addArcWithCenter:CGPointMake(radius * 3+xOffset, radius*2+yOffset)
                    radius:radius
                startAngle:-M_PI_2
                  endAngle:M_PI_2
                 clockwise:YES];
    [path addArcWithCenter:CGPointMake(radius * 2+xOffset, radius*3+yOffset)
                    radius:radius
                startAngle:0
                  endAngle:M_PI
                 clockwise:YES];
    [path addArcWithCenter:CGPointMake(radius +xOffset, radius*2+yOffset)
                    radius:radius
                startAngle:M_PI_2
                  endAngle:-M_PI_2
                 clockwise:YES];
    [path closePath];
    [path fill];
}
实现效果
Core Graphics绘图系统
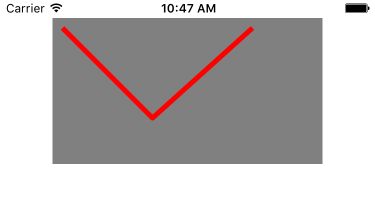
Core Graphics通过CGPath绘制简单的实现
-(void)drawRect:(CGRect)rect
{
    [[UIColor grayColor] setFill];
    UIRectFill(rect);   //设置背景色
    CGContextRef ctx = UIGraphicsGetCurrentContext();   //获取当前上下文
    CGContextSetStrokeColorWithColor(ctx, [[UIColor redColor] CGColor]);    //设置线条颜色
    CGContextSetLineJoin(ctx, kCGLineJoinRound);    //设置两条线条连接点样式
    CGContextSetLineWidth(ctx, 5);  //设置线条宽度
    CGMutablePathRef path = CGPathCreateMutable();  //创建路径
    CGPathMoveToPoint(path, nil, 10, 10);   //设置路径起始点
    CGPathAddLineToPoint(path, nil, 100, 100);  //移动到指定的Point
    CGPathAddLineToPoint(path, nil, 200, 10);
    CGContextAddPath(ctx, path);    //添加路径到当前上下文
    CGPathRelease(path);    //释放路径
    CGContextStrokePath(ctx);   // 绘制当前上下文
}
实现效果
注意
Core Graphics属于Core Fundation框架,Core Fundation不能ARC管理内存。所以Core Foundation对象需要手动释放,即便启用了ARC。
iOS绘图Tip
关于Core Graphics坐标
在drawRect:方法中,Core Graphics绘制的东西是上下颠倒的,我们正常是以左上角坐标原点,而Core Graphics默认的是以左下角为坐标原点。如果想让Core Graphics绘制的图像以我们常用的左上角坐标原点,只要在drawRect:方法中通过UIGraphicsGetCurrentContext()返回的上下文一切就正常了。如果使用自己创建的上下文,发现坐标是以左下角则需要进行以下操作:
CGContextTranslateCTM(ctx, 0,rect.size.height);    //rect.size.height --- 当前view的高度
CGContextScaleCTM(ctx,1,-1);    //x轴坐标不变,y轴坐标取反
管理图形上下文
CGContextSaveGState
绘图系统在调用drawRect:方法时创建的图形上下文中包括大量信息,绘图的颜色,线条的宽度,字体大小等。当此时某一时刻想更改这些信息,但是过后还想恢复之前的状态就需要用到CGContextSaveGState来保存之前的状态。CGContextRestoreGState
用来恢复之前由CGContextSaveGState保存的状态UIGraphicsPushContext
UIKit绘制时只会对栈顶的context进行操作,所以当要绘制一个上下文时要把这个上下文push到管理上下文堆栈的栈顶。UIGraphicsPopContext
当绘制一个上下时要进行Push后才能操作,当绘制结束时需要Pop出栈。UIGraphicsBeginImageContext
UIGraphicsBeginImageContext是对UIGraphicsPushContext和UIGraphicsPopContext操作的封装,负责将旧的上下文入栈,为新的上下文分配内存,创建新的上下文,翻转坐标系,并作为当前上下文使用。
CGContextSaveGState与CGContextRestoreGState简单实现
-(void)drawRect:(CGRect)rect { CGContextRef ctx = UIGraphicsGetCurrentContext();
    CGContextSetStrokeColorWithColor(ctx, [UIColor redColor].CGColor);  //设置绘制颜色
    CGContextSetLineWidth(ctx, 10);     //设置线条宽度
    CGContextMoveToPoint(ctx, 10, 10);
    CGContextAddLineToPoint(ctx, 100, 10);
    CGContextStrokePath(ctx);

    CGContextSaveGState(ctx);   //保存当前上下文状态

    CGContextSetStrokeColorWithColor(ctx, [UIColor blackColor].CGColor); //设置绘制颜色
    CGContextSetLineWidth(ctx, 5);      //设置线条宽度
    CGContextMoveToPoint(ctx, 10, 30);
    CGContextAddLineToPoint(ctx, 100, 30);
    CGContextStrokePath(ctx);

    CGContextRestoreGState(ctx);    //取出之前保存的上下文状态
    CGContextMoveToPoint(ctx, 10, 50);
    CGContextAddLineToPoint(ctx, 100, 50);
    CGContextStrokePath(ctx);
}
实现效果
UIGraphicsBeginImageContext使用
- (void)viewDidLoad {
    [super viewDidLoad];
    UIImageView *imageView = [[UIImageView alloc] initWithFrame:CGRectMake(100, 100, 100, 100)];
    imageView.image = [self creatImage];
    [self.view addSubview:imageView];
}
-(UIImage *)creatImage
{
    const CGFloat kImageWidth = 100;
    const CGFloat kImageHeight = 100;   //设置图片尺寸
    NSDictionary *attributeDic = @{NSFontAttributeName:[UIFont systemFontOfSize:14],NSForegroundColorAttributeName:[UIColor redColor]}; //设置字体属性
    UIGraphicsBeginImageContext(CGSizeMake(kImageWidth, kImageWidth)); //创建上下文
    [@"GGGHub" drawInRect:CGRectMake(0, 0, kImageWidth, kImageHeight)
           withAttributes:attributeDic];    //把文字绘制到当前上下文
    CGImageRef textImage = UIGraphicsGetImageFromCurrentImageContext().CGImage;
    UIGraphicsEndImageContext();    //绘制结束
    return [UIImage imageWithCGImage:textImage];
}
实现效果
本篇博文参考


