【MVC 4】2.使用 Razor
作者:[美]Adam Freeman 来源:《精通ASP.NET MVC 4》
Razor 是微软 MVC3 引入的视图引擎的名称,并在MVC 4 中进行了修订。视图引擎处理 ASP.NET内容,并查找指令,典型的是将动态内容插入到发送给浏览器的输出。
微软维持了两个视图引擎 —— 已经支持 ASP.NET 开发许多年的基于<% 和 %>标签的 ASPX 引擎,以及以@字符标注内容范围的 Razor 引擎。
1.创建示例项目
打开Microsoft Visual Studio 2012 ,新建MVC 4项目 Razor ,选择空模板。
1.1 定义模型
在 Models 文件夹下新建类文件 Product.cs
namespace Razor.Models
{
    public class Product
    {
        public int ProductID { get; set; }
        public string Name { get; set; }
        public string Description { get; set; }
        public decimal Price { get; set; }
        public string Category { get; set; }
    }
}
1.2 定义控制器
在 Controllers 文件夹下新建控制器 HomeController ,模板为空
namespace Razor.Controllers
{
    /**
     * 此类定义了一个叫做 Index 的动作方法,创建了一个Product 对象,并对其进行属性填充。
     * 将此Product 对象传递给了 View 方法,以便在渲染视图时使用它。
     * */
    public class HomeController : Controller
    {
        Product myProduct = new Product
        {
            ProductID = 1,
            Name = "Kayak",
            Description = "A boat for one person",
            Category = "Watersports",
            Price = 275M
        };

        public ActionResult Index()
        {
            return View(myProduct);
        }

    }
}
1.3 创建视图
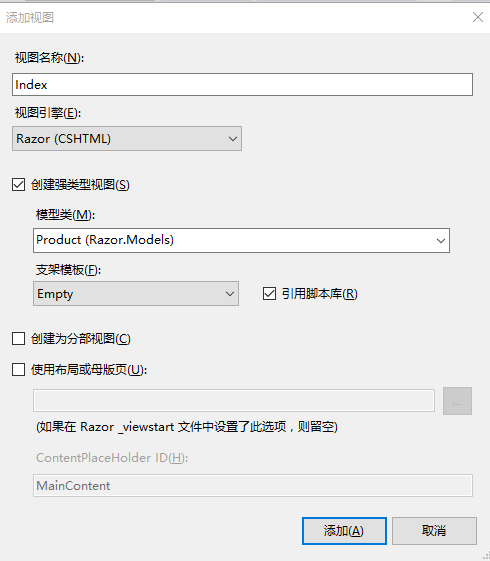
右击 HomeController 类的 Index 方法,添加视图文件 Index.cshtml ,模型类为 Razor.Models.Product
@model Razor.Models.Product

@{
    Layout = null;
}

<!DOCTYPE html>

<html>
<head>
    <meta name="viewport" content="width=device-width" />
    <title>Index</title>
</head>
<body>
    <div>

    </div>
</body>
</html>
2.使用模型对象
从视图第一行开始
...
@model Razor.Models.Product
...
Razor 语句以@字符开始。此处@model 语句声明了通过动作方法传递给该视图的模型对象的类型。这让用户能够通过@Model 来引用视图模型对象的方法、字段和属性。
@model Razor.Models.Product

@{
    Layout = null;
}

<!DOCTYPE html>

<html>
<head>
    <meta name="viewport" content="width=device-width" />
    <title>Index</title>
</head>
<body>
    <div>
        产品名称:@Model.Name
    </div>
    <div>
        产品说明:@Model.Description
    </div>
    <div>
        产品类别:@Model.Category
    </div>
</body>
</html>
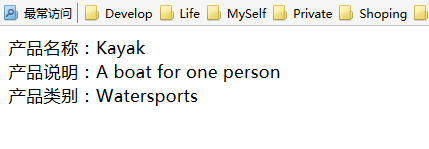
显示效果:
* 声明视图模型对象的类型使用@model (小写m),而访问Name 属性使用@Model (大写M)。
3.使用布局
Index.cshtml 视图文件中的另一个 Razor 表达式如下所示:
...
@{
    Layout = null;
}
...
这是一个 Razor 代码块的例子,这种代码块能够在视图中包含C#语句。这种代码块以@{开始,以}结束,而其中的语句会在视图被渲染时进行执行。
此处将Layout 设置为null的效果是告诉 MVC 框架,改视图是自包含的,并且会渲染返回给客户端所需要的全部内容。
3.1 创建布局
右击Views 文件夹新建 "MVC 4布局页(Razor)",文件名为 _BaseLayout.cshtml 。布局的最初内容如下:
<!DOCTYPE html>

<html>
<head>
    <meta name="viewport" content="width=device-width" />
    <title>@ViewBag.Title</title>
</head>
<body>
    <div>
        @RenderBody()
    </div>
</body>
</html>
布局是特殊形式的视图。对@RenderBody 方法的调用会将动作方法所指定的视图内容插入到布局标记中。布局中的另一个 Razor 表达式会在 ViewBag 中查找一个叫做 Title 的属性,目的是设置 title 元素的内容。
修改布局文件如下:
<!DOCTYPE html>

<html>
<head>
    <meta name="viewport" content="width=device-width" />
    <title>@ViewBag.Title</title>
</head>
<body>
    <div>
        <h1>Product Information</h1>
        <div style="padding:20px;border:solid medium black;font-size:20pt;">
            @RenderBody()
        </div>
        <h2>Visit <a href="http://apress.com">Apress</a></h2>
    </div>
</body>
</html>
3.2 运用布局
为了将布局文件运用于视图,只需要设置 Layout 属性的值。修改 Index.cshtml 如下:
@model Razor.Models.Product

@{
    ViewBag.Title = "Product Info";
    Layout = "~/Views/_BaseLayout.cshtml";
}
<div>
    产品名称:@Model.Name
</div>
<div>
    产品说明:@Model.Description
</div>
<div>
    产品类别:@Model.Category
</div>
<div>
    产品价格:[email protected]
</div>
显示效果如下图所示:
3.3 使用视图起始文件
还有个小问题要解决,这就是,必须在每一个视图中都要指定布局文件。这意味着,要重新命名布局文件,那么必须找出引用该布局的每一个视图并进行修改,这将是一个易错的过程。
通过使用视图起始文件可以解决此问题。在渲染一个视图时,MVC 框架会查找一个叫作 _ViewStart.cshtml 的文件。框架会将此文件的内容视为视图文件的一部分,于是用户可以使用这一特性为 Layout 属性自动的设置一个值。
同样,在Views 文件夹下新建"MVC 4布局页(Razor)",文件名为 _ViewStart.cshtml ,修改文件内容为:
@{
    Layout = "~/Views/_BaseLayout.cshtml";
}
此视图起始文件含有 Layout 属性的值,这意味着用户可以去除 Index.cshtml 文件中相应的语句:
@model Razor.Models.Product

@{
    ViewBag.Title = "Product Info";
}
<div>
    产品名称:@Model.Name
</div>
<div>
    产品说明:@Model.Description
</div>
<div>
    产品类别:@Model.Category
</div>
<div>
    产品价格:[email protected]
</div>
不必以任何方式指定希望使用的视图起始文件。MVC 框架会对此文件进行定位,并自动地使用其内容。若在视图文件中重新定义了 Layout 值,会覆盖视图起始文件中所指定的布局。
3.4 演示共享布局
在控制器文件 HomeController 中新建方法 NameAndPrice 如下:
        public ActionResult NameAndPrice()
        {
            return View(myProduct);
        }
添加对应的视图文件 NameAndPrice.cshtml 如下
@model Razor.Models.Product

@{
    ViewBag.Title = "NameAndPrice";
    Layout = "~/Views/_BaseLayout.cshtml";
}

<h2>NameAndPrice</h2>
The product name is @Model.Name and it costs [email protected]
启动并导航到 /Home/NameAndPrice ,显示效果如下:
4.使用 Razor 表达式
在一个好的MVC框架应用程序中,动作方法与视图所起的作用是清晰分离的。
| 动作方法与视图所起的作用 | ||
| 组件 | 要做的事 | 不做的事 |
| 动作方法 | 向视图传递一个视图模型 | 向视图传递格式化的数据 |
| 视图 | 使用视图模型对象向用户表现内容 | 修改视图模型对象的任何方面 |
4.1插入数据值
用 Razor 表达式能做的最简单的事情是将数据值插入到标记中。用户可以用@Model 表达式来做这件事情,以引用视图模型对象所定义的属性和方法,或者使用@Viewbag 表达式,以引用通过视图包特性动态定义的属性。
在 Home 控制器中新增动作方法 DemoExpressions
        public ActionResult DemoExpressions()
        {
            ViewBag.ProductCount = 1;
            ViewBag.ExpressShip = true;
            ViewBag.ApplyDiscount = false;
            ViewBag.Supplier = null;
            return View(myProduct);
        }
并创建对应的视图文件 DemoExpression.cshtml
@model Razor.Models.Product

@{
    ViewBag.Title = "DemoExpressions";
}
<table>
    <thead>
        <tr><th>Property</th><th>Value</th></tr>
    </thead>
    <tbody>
        <tr><th>Name</th><th>@Model.Name</th></tr>
        <tr><th>Price</th><th>@Model.Price</th></tr>
        <tr><th>Stock Level</th><th>@ViewBag.ProductCount</th></tr>
    </tbody>
</table>
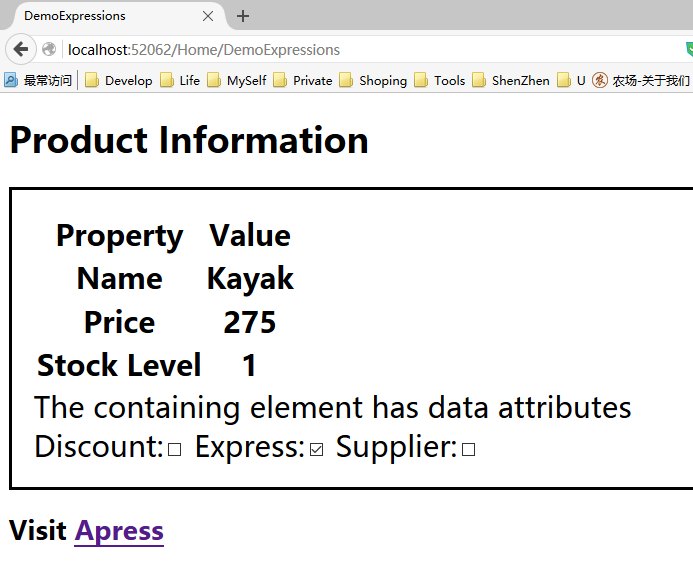
导航到对应的URL /Home/DemoExpressions ,显示效果如下:
4.2 设置标签属性的值
到此为止的所有例子都是设置元素内容,但用户也可以使用Razor 表达式来设置元素标签的值。修改视图文件 DemoExpressions.cshtml 文件如下:
@model Razor.Models.Product

@{
    ViewBag.Title = "DemoExpressions";
}
<table>
    <thead>
        <tr><th>Property</th><th>Value</th></tr>
    </thead>
    <tbody>
        <tr><th>Name</th><th>@Model.Name</th></tr>
        <tr><th>Price</th><th>@Model.Price</th></tr>
        <tr><th>Stock Level</th><th>@ViewBag.ProductCount</th></tr>
    </tbody>
</table>
<div data-discount="@ViewBag.ApplyDiscount" data-express="@ViewBag.ExpressShip" data-supplier="@ViewBag.Supplier">
    The containing element has data attributes
</div>
Discount:<input type="checkbox"  checked="@ViewBag.ApplyDiscount"/>
Express:<input type="checkbox" checked="@ViewBag.ExpressShip" />
Supplier:<input type="checkbox" checked="@ViewBag.Supplier" />
显示效果如下:
4.3 使用条件语句
修改视图文件 DemoExpressions.cshtml 文件如下:
@model Razor.Models.Product

@{
    ViewBag.Title = "DemoExpressions";
}
<table>
    <thead>
        <tr><th>Property</th><th>Value</th></tr>
    </thead>
    <tbody>
        <tr><th>Name</th><th>@Model.Name</th></tr>
        <tr><th>Price</th><th>@Model.Price</th></tr>
        <tr><th>Stock</th>
            <th>
                @switch ((int)ViewBag.ProductCount)
                {
                    case 0:
                        @:Out of Stock
                        break;
                        case 1:
                        <b>Low Stock (@ViewBag.ProductCount)</b>
                        break;
                    default:
                    @ViewBag.ProductCount
                        break;
                }
            </th>
        </tr>
    </tbody>
</table>
为了开始一个条件语句,要在C# 的条件关键字前放一个@字符。在此例中,此条件关键字 switch。就像在规则的C# 代码块中的一样,要以闭花括号{}来终止代码块
在 Razor 代码块的内部,只要通过定义HTML 以及Razor 表达式,就可以将HTML 元素和数值插入到视图输出,例如:
...
<b>Low Stock (@ViewBag.ProductCount)</b>
...
@ViewBag.ProductCount
...
不必将元素或表达式放在引号内或以特殊的方式来表示它们——Razor 引擎会将这些解释为正常方式处理的输出。然而,如果想将未包含在HTML 元素中的文字文本插入到视图,则需要使用Razor 的一个辅助工具,并以它作为这一行的前缀,例如:
...
@:Out of Stock
...
@:字符阻止Razor 将此行解释为一条C# 语句,这是Razor 遇到文本时的默认行为。
此例显示效果如下:
把此例的switch语句改成if语句,也可产生同样的效果:
@if (ViewBag.ProductCount == 0)
{
    @:Out of Stock
}
else if (ViewBag.ProductCount == 1)
{
    <b>Low Stock (@ViewBag.ProductCount)</b>
}
else
{
    @ViewBag.ProductCount
}
4.4 枚举数组和集合
在编写MVC 应用程序时,用户会经常希望枚举一个数组或一些其他形式对象集合的内容,并生成一种细节内容。
在 Home 控制器文件 HomeController.cs 中新建动作方法 DemoArray
        public ActionResult DemoArray()
        {
            Product[] array = {
                              new Product{Name="Kayak",Price=275M},
                              new Product{Name="Lifejacket",Price=48.95M},
                              new Product{Name="Soccer",Price=19.50M},
                              new Product{Name="Corner flag",Price=34.95M}
                              };
            return View(array);
        }
然后创建对应的视图文件DemoArray.cshtml
@model Razor.Models.Product[]

@{
    ViewBag.Title = "DemoArray";
}
@if (Model.Length > 0)
{
    <table>
        <thead><tr><th>Product</th><th>Price</th></tr></thead>
        <tbody>
            @foreach(Razor.Models.Product p in Model){
            <tr>
                <td>@p.Name</td>
                <td>[email protected]</td>
            </tr>
            }
        </tbody>
    </table>
}
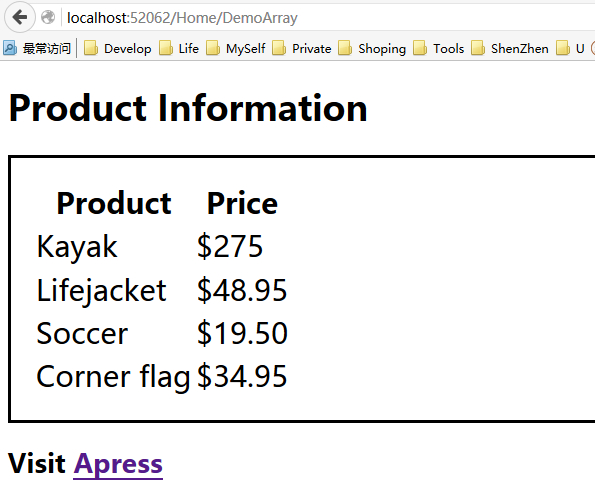
导航到对应的URL地址:/Home/DemoArray ,效果图如下:
4.5 处理命名空间
此例在最好的foreach 循环中使用了全限定名的Product 类:
...
@foreach(Razor.Models.Product p in Model)
...
可以对一个视图运用@using 表达式,以引入命名空间:
@using Razor.Models; @model Product[]

@{
    ViewBag.Title = "DemoArray";
}
@if (Model.Length > 0)
{
    <table>
        <thead><tr><th>Product</th><th>Price</th></tr></thead>
        <tbody>
            @foreach(Product p in Model){
            <tr>
                <td>@p.Name</td>
                <td>[email protected]</td>
            </tr>
            }
        </tbody>
    </table>
}


