Android ColorMatrix总结
颜色的一些基本概念:
色调:物体颜色,色彩效果,如红/黄/蓝/绿等。
饱和度:颜色的鲜艳程度,从0%到100%。
亮度:颜色明暗程度
RGBA模型:Red+Green+Blue+Alpha。RGBA模型描述了一个图片的颜色+透明度。
矩阵乘法的基本概念:
比如,矩阵[ 1, 2 和 矩阵 [ 2
2, 3 ] 1 ]
相乘,结果是
[ 1*2 + 2*1 [4
2*2 + 3*1] = 7]
用公式表示:
矩阵A:
[ a, b, c, d, e,
f, g, h, i, j,
k, l, m, n, o,
p, q, r, s, t]
矩阵B:
[ R
G
B
A
1 ]
两矩阵相乘,AB = C, 矩阵C为:
G' = f*R + g*G + h*B + i*A + j;
B' = k*R + l*G + m*B + n*A + o;
A' = p*R + q*G + r*B + s*A + t;
即:
[ R'
G'
B'
A']
以上的算式中,如果用矩阵B的值描述一个图形的RGBA的话,则矩阵A的第一行abcde影响这个图形的R值,第二行fghij影响这个图形的G值,同理,第三第四行分别影响这个图形的B和A。
Android中,用ColorMatrix这个类来代表矩阵A,一个图形的颜色信息可以用ColorMatrix这个类来改变。ColorMatrix是一个5*4的矩阵,它被存放在一个数组中。以上面矩阵A举例,存放形式为: [ a, b, c, d, e, f, g, h, i, j, k, l, m, n, o, p, q, r, s, t ]
ColorMatrix有一个方法 reset,这个方法使图形恢复原来的颜色水平,它将矩阵的值设置为:
[1 0 0 0 0
0 1 0 0 0
0 0 1 0 0
0 0 0 1 0 ]
这样,调用reset方法后,和[RGBA1]矩阵相乘,RGBA的分量保持不变。依然是RGBA
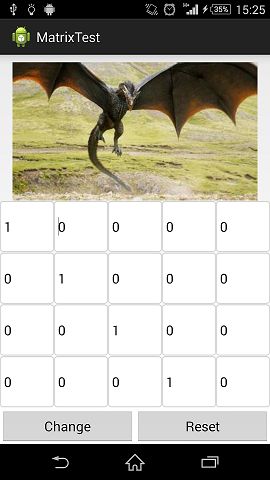
下面用一个例子说明以上内容:
创建一个Activity,布局文件:
<?xml version="1.0" encoding="utf-8"?>
<LinearLayout xmlns:android="http://schemas.android.com/apk/res/android"
    android:layout_width="match_parent"
    android:layout_height="match_parent"
    android:orientation="vertical" >

    <ImageView
        android:id="@+id/imageview"
        android:layout_width="match_parent"
        android:layout_height="0dp"
        android:layout_marginTop="10dp"
        android:layout_weight="2" />

    <GridLayout
        android:id="@+id/group"
        android:layout_width="match_parent"
        android:layout_height="0dp"
        android:layout_weight="3"
        android:columnCount="5"
        android:rowCount="4" >
    </GridLayout>

    <LinearLayout
        android:layout_width="match_parent"
        android:layout_height="wrap_content"
        android:orientation="horizontal" >

        <Button
            android:layout_width="0dp"
            android:layout_height="wrap_content"
            android:layout_weight="1"
            android:onClick="btnChange"
            android:text="Change" />

        <Button
            android:layout_width="0dp"
            android:layout_height="wrap_content"
            android:layout_weight="1"
            android:onClick="btnReset"
            android:text="Reset" />
    </LinearLayout>

</LinearLayout>
最上面是显示图片的ImageView,下方GridView中会通过代码增加5*4的EditText,用于控制Matrix的值。
Activity:
public class MainActivity extends ActionBarActivity {

	private ImageView mImageView;
	private GridLayout mGroup;
	private int mEtWidth, mEtHeight;
	private EditText[] mEts = new EditText[20];
	private float[] mColorMatrix = new float[20];
	private Bitmap originBitmap;

	@Override
	protected void onCreate(Bundle savedInstanceState) {
		super.onCreate(savedInstanceState);
		setContentView(R.layout.activity_main);

		mImageView = (ImageView) findViewById(R.id.imageview);
		mGroup = (GridLayout) findViewById(R.id.group);

		originBitmap = BitmapFactory.decodeResource(getResources(),
				R.drawable.dragon);
		mImageView.setImageBitmap(originBitmap);

		// GridView的大小确定后,
		// 计算其中每个EditText应有的大小(5*4),
		// 并添加到GridView中。
		mGroup.post(new Runnable() {

			@Override
			public void run() {
				mEtWidth = mGroup.getWidth() / 5;
				mEtHeight = mGroup.getHeight() / 4;
				addEts();
			}
		});
	}

	public void btnChange(View view) {
		getMatrix();
		setImageMatrix();
	}

	public void btnReset(View view) {
		initMatrix();
		getMatrix();
		setImageMatrix();
	}

	private void setImageMatrix() {

		Bitmap bmp = Bitmap.createBitmap(originBitmap.getWidth(),
				originBitmap.getHeight(), Bitmap.Config.ARGB_8888);
		// 设置新的ColorMatrix.
		ColorMatrix colorMatrix = new ColorMatrix();
		colorMatrix.set(mColorMatrix);
		// 使用新的ColorMatrix绘制Bitmap
		Canvas canvas = new Canvas(bmp);
		Paint paint = new Paint(Paint.ANTI_ALIAS_FLAG);
		paint.setColorFilter(new ColorMatrixColorFilter(colorMatrix));
		canvas.drawBitmap(originBitmap, 0, 0, paint);
		mImageView.setImageBitmap(bmp);
	}

	private void addEts() {
		for (int i = 0; i < 20; i++) {
			EditText editText = new EditText(MainActivity.this);
			editText.setBackground(getResources().getDrawable(
					R.drawable.common_textfield_background));
			editText.setInputType(InputType.TYPE_CLASS_NUMBER
					| InputType.TYPE_NUMBER_FLAG_DECIMAL);
			mEts[i] = editText;
			mGroup.addView(editText, mEtWidth, mEtHeight);
		}
	}

	private void getMatrix() {
		for (int i = 0; i < 20; i++) {
			String etNum = mEts[i].getText().toString();
			if (TextUtils.isEmpty(etNum)) {
				mEts[i].setText("0");
				etNum = "0";
			}
			mColorMatrix[i] = Float.valueOf(etNum);
		}
	}

	/**
	 * 初始化矩阵数组为: [ 1 0 0 0 0 0 1 0 0 0 0 0 1 0 0 0 0 0 1 0 ]
	 * */
	private void initMatrix() {
		for (int i = 0; i < 20; i++) {
			if (i % 6 == 0) {
				mEts[i].setText(String.valueOf(1));
			} else {
				mEts[i].setText(String.valueOf(0));
			}
		}
	}
}
以上代码,setImageMatrix方法通过用户输入,改变ColorMatrix内部数组的值(用mColorMatrix),并用这个ColorMatrix绘制Bitmap,来改变图片的颜色效果。getMatrix方法用于把EditText里面的数字赋值到 mColorMatrix数组中。
界面初始效果:
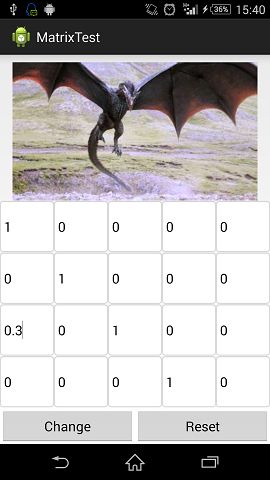
现在试着改变第一行的值,第二,第三个EditText的值改为0.5,点击Change按钮,查看图片变化。
可以看到,由于改变了ColorMatrix数组的第一行数值,图片的R值被增加,所以图片偏红,同理,改变第二行图片颜色会偏绿,改变第三行图片颜色会偏蓝,改变第四行透明度 会改变。
ColorMatrix这个类为图片调色提供了便捷方法。
setScale:设置R,G,B颜色分量的色调
源码:
    public void setScale(float rScale, float gScale, float bScale,
                         float aScale) {
        final float[] a = mArray;

        for (int i = 19; i > 0; --i) {
            a[i] = 0;
        }
        a[0] = rScale;
        a[6] = gScale;
        a[12] = bScale;
        a[18] = aScale;
    }
setRotate:设置R,G,B颜色分量的亮度
源码:
    public void setRotate(int axis, float degrees) {
        reset();
        float radians = degrees * (float)Math.PI / 180;
        float cosine = FloatMath.cos(radians);
        float sine = FloatMath.sin(radians);
        switch (axis) {
        // Rotation around the red color
        case 0:
            mArray[6] = mArray[12] = cosine;
            mArray[7] = sine;
            mArray[11] = -sine;
            break;
        // Rotation around the green color
        case 1:
            mArray[0] = mArray[12] = cosine;
            mArray[2] = -sine;
            mArray[10] = sine;
            break;
        // Rotation around the blue color
        case 2:
            mArray[0] = mArray[6] = cosine;
            mArray[1] = sine;
            mArray[5] = -sine;
            break;
        default:
            throw new RuntimeException();
        }
    }
setSaturation:设置色彩饱和度
源码:
    public void setSaturation(float sat) {
        reset();
        float[] m = mArray;

        final float invSat = 1 - sat;
        final float R = 0.213f * invSat;
        final float G = 0.715f * invSat;
        final float B = 0.072f * invSat;

        m[0] = R + sat; m[1] = G;       m[2] = B;
        m[5] = R;       m[6] = G + sat; m[7] = B;
        m[10] = R;      m[11] = G;      m[12] = B + sat;
    }
通过以上3段代码看出,这3个方法的本质还是去改变ColorMatrix矩阵的数组的值。
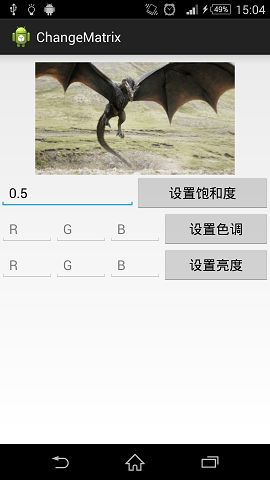
下面用一个例子说明:
布局文件:
<?xml version="1.0" encoding="utf-8"?>
<LinearLayout xmlns:android="http://schemas.android.com/apk/res/android"
    android:layout_width="match_parent"
    android:layout_height="match_parent"
    android:orientation="vertical" >

    <ImageView
        android:id="@+id/imageview"
        android:layout_width="match_parent"
        android:layout_height="150dp"
        android:layout_marginTop="10dp"
        />
  <!-- saturation -->
    <LinearLayout
        android:layout_width="match_parent"
        android:layout_height="wrap_content"
        android:orientation="horizontal" >

        <EditText
            android:id="@+id/et_saturation"
            android:layout_width="0dp"
            android:layout_height="wrap_content"
            android:inputType="numberDecimal"
            android:layout_weight="1"
            android:hint="饱和度"
            />
        <Button
            android:id="@+id/btn_set_saturation"
            android:layout_width="0dp"
            android:layout_height="wrap_content"
            android:layout_weight="1"
            android:onClick="setSaturation"
            android:text="设置饱和度"
             />
    </LinearLayout>

  <!-- rotate -->
    <LinearLayout
        android:layout_width="match_parent"
        android:layout_height="wrap_content"
        android:orientation="horizontal" >

        <EditText
            android:id="@+id/et_red"
            android:layout_width="0dp"
            android:layout_height="wrap_content"
            android:inputType="numberDecimal"
            android:layout_weight="1"
            android:hint="R"
            />
        <EditText
            android:id="@+id/et_green"
            android:layout_width="0dp"
            android:layout_height="wrap_content"
            android:inputType="numberDecimal"
            android:layout_weight="1"
            android:hint="G"
            />
        <EditText
            android:id="@+id/et_blue"
            android:layout_width="0dp"
            android:layout_height="wrap_content"
            android:inputType="numberDecimal"
            android:layout_weight="1"
            android:hint="B"
            />
        <Button
            android:layout_width="0dp"
            android:layout_height="wrap_content"
            android:layout_weight="2"
            android:onClick="setHue"
            android:text="设置色调"
             />
    </LinearLayout>

    <!-- scale -->
        <LinearLayout
        android:layout_width="match_parent"
        android:layout_height="wrap_content"
        android:orientation="horizontal" >

        <EditText
            android:id="@+id/et_redlum"
            android:layout_width="0dp"
            android:layout_height="wrap_content"
            android:inputType="numberDecimal"
            android:layout_weight="1"
            android:hint="R"
            />
        <EditText
            android:id="@+id/et_greenlum"
            android:layout_width="0dp"
            android:layout_height="wrap_content"
            android:inputType="numberDecimal"
            android:layout_weight="1"
            android:hint="G"
            />
        <EditText
            android:id="@+id/et_bluelum"
            android:layout_width="0dp"
            android:layout_height="wrap_content"
            android:inputType="numberDecimal"
            android:layout_weight="1"
            android:hint="B"
            />
        <Button
            android:layout_width="0dp"
            android:layout_height="wrap_content"
            android:layout_weight="2"
            android:onClick="setLum"
            android:text="设置亮度"
             />
    </LinearLayout>
</LinearLayout>
Activity:
public class ChangeMatrix extends Activity {

	private EditText saturation;
	private EditText red;
	private EditText green;
	private EditText blue;
	private EditText redLum;
	private EditText greenLum;
	private EditText blueLum;
	private ImageView imageView;
	private Bitmap originBitmap;

	@Override
	protected void onCreate(Bundle savedInstanceState) {
		super.onCreate(savedInstanceState);
		setContentView(R.layout.activity_change_matrix);
		saturation = (EditText) findViewById(R.id.et_saturation);
		imageView = (ImageView) findViewById(R.id.imageview);
		red = (EditText) findViewById(R.id.et_red);
		green = (EditText) findViewById(R.id.et_green);
		blue = (EditText) findViewById(R.id.et_blue);
		redLum = (EditText) findViewById(R.id.et_redlum);
		greenLum = (EditText) findViewById(R.id.et_greenlum);
		blueLum = (EditText) findViewById(R.id.et_bluelum);
		originBitmap = BitmapFactory.decodeResource(getResources(),
				R.drawable.dragon);
		imageView.setImageBitmap(originBitmap);

	}

	public void setSaturation(View view) {
		float satu = Float.valueOf(handleNullValue(saturation.getText()
				.toString()));
		Bitmap bm = getNewSatuBitmap(satu);
		imageView.setImageBitmap(bm);
	}

	public void setHue(View view) {
		float rHue = Float.valueOf(handleNullValue(red.getText().toString()));
		float gHue = Float.valueOf(handleNullValue(green.getText().toString()));
		float bHue = Float.valueOf(handleNullValue(blue.getText().toString()));
		Bitmap bm = getNewHueBitmap(rHue, gHue, bHue);
		imageView.setImageBitmap(bm);
	}

	public void setLum(View view) {
		float rLum = Float
				.valueOf(handleNullValue(redLum.getText().toString()));
		float gLum = Float.valueOf(handleNullValue(greenLum.getText()
				.toString()));
		float bLum = Float
				.valueOf(handleNullValue(blueLum.getText().toString()));
		Bitmap bm = getNewLumBitmap(rLum, gLum, bLum);
		imageView.setImageBitmap(bm);
	}

	/**
	 * @Description: 设置图片饱和度
	 * @param @param saturation
	 * @param @return
	 * @return Bitmap
	 * @throws
	 */
	private Bitmap getNewSatuBitmap(float saturation) {

		reset();
		Bitmap bmp = Bitmap.createBitmap(originBitmap.getWidth(),
				originBitmap.getHeight(), Bitmap.Config.ARGB_8888);
		Canvas canvas = new Canvas(bmp);
		Paint paint = new Paint(Paint.ANTI_ALIAS_FLAG);

		ColorMatrix saturationMatrix = new ColorMatrix();
		saturationMatrix.setSaturation(saturation);
		paint.setColorFilter(new ColorMatrixColorFilter(saturationMatrix));
		canvas.drawBitmap(originBitmap, 0, 0, paint);
		return bmp;
	}

	/**
	 * @Description: 设置图片色调
	 * @param @param rHue 红色色调
	 * @param @param gHue 绿色色调
	 * @param @param bHue 蓝色色调
	 * @param @return
	 * @return Bitmap
	 * @throws
	 */
	private Bitmap getNewLumBitmap(float rLum, float gLum, float bLum) {
		reset();
		Bitmap bmp = Bitmap.createBitmap(originBitmap.getWidth(),
				originBitmap.getHeight(), Bitmap.Config.ARGB_8888);
		Canvas canvas = new Canvas(bmp);
		Paint paint = new Paint(Paint.ANTI_ALIAS_FLAG);
		ColorMatrix rotateMatrix = new ColorMatrix();
		rotateMatrix.setScale(rLum, gLum, bLum, 1);
		paint.setColorFilter(new ColorMatrixColorFilter(rotateMatrix));
		canvas.drawBitmap(originBitmap, 0, 0, paint);
		return bmp;
	}

	/**
	 * @Description: 设置亮度
	 * @param @param rHue
	 * @param @param gHue
	 * @param @param bHue
	 * @param @return
	 * @return Bitmap
	 * @throws
	 */
	private Bitmap getNewHueBitmap(float rHue, float gHue, float bHue) {
		reset();
		Bitmap bmp = Bitmap.createBitmap(originBitmap.getWidth(),
				originBitmap.getHeight(), Bitmap.Config.ARGB_8888);
		Canvas canvas = new Canvas(bmp);
		Paint paint = new Paint(Paint.ANTI_ALIAS_FLAG);
		ColorMatrix rotateMatrix = new ColorMatrix();
		// 红
		rotateMatrix.setRotate(0, rHue);
		// 绿
		rotateMatrix.setRotate(1, gHue);
		// 蓝
		rotateMatrix.setRotate(2, bHue);
		paint.setColorFilter(new ColorMatrixColorFilter(rotateMatrix));
		canvas.drawBitmap(originBitmap, 0, 0, paint);
		return bmp;
	}

	private void reset() {
		Bitmap bmp = Bitmap.createBitmap(originBitmap.getWidth(),
				originBitmap.getHeight(), Bitmap.Config.ARGB_8888);
		Canvas canvas = new Canvas(bmp);
		Paint paint = new Paint(Paint.ANTI_ALIAS_FLAG);
		ColorMatrix rotateMatrix = new ColorMatrix();
		paint.setColorFilter(new ColorMatrixColorFilter(rotateMatrix));
		canvas.drawBitmap(originBitmap, 0, 0, paint);
	}

	private String handleNullValue(String value) {
		if (TextUtils.isEmpty(value)) {
			return "1";
		}

		return value;
	}
}
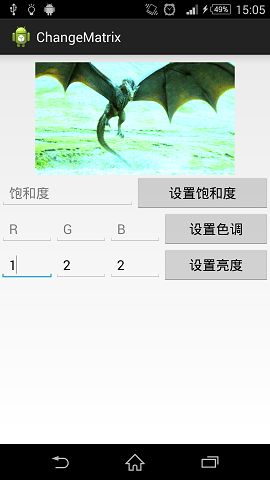
点击按钮后的效果图:


