Android Widget 小部件(四---完结) 使用ListView、GridView、StackView、ViewFlipper展示Widget
官方有话这样说:
A RemoteViews object (and, consequently, an App Widget) can support the following layout classes:
FrameLayoutLinearLayoutRelativeLayout
And the following widget classes:
AnalogClockButtonChronometerImageButtonImageViewProgressBarTextViewViewFlipperListViewGridViewStackViewAdapterViewFlipper
Descendants of these classes are not supported.不支持这些类的后代
接下来的示例说明怎么样实现 使用ListView、GridView、StackView、ViewFlipper创建AppWidget
menifest
<receiver android:name="com.stone.receiver.WidgetSetProvider">
             <intent-filter>
                 <action android:name="android.appwidget.action.APPWIDGET_UPDATE"/>
                 <action android:name="com.stone.action.clickset"/>
                 <action android:name="com.stone.action.clickset.item"/>
             </intent-filter>
             <meta-data android:name="android.appwidget.provider"
                 android:resource="@xml/set_widget_provider"/>
</receiver>
res/xml/set_widget_provider.xml
<?xml version="1.0" encoding="utf-8"?>
<appwidget-provider xmlns:android="http://schemas.android.com/apk/res/android"
    android:minWidth="250dp"
    android:minHeight="180dp"
    android:updatePeriodMillis="5000"
    android:previewImage="@drawable/ic_launcher"
    android:initialLayout="@layout/collections_view_widget"
    android:resizeMode="horizontal|vertical"
    android:autoAdvanceViewId="@id/viewflipper"  >
	<!--
		计算size的公式: (70*n) -30  n为部件所需的大小(占几格)   当前的就是  4x4
		minResizeWidth
    	minResizeHeight   能被调整的最小宽高,若大于minWidth minHeight 则忽略
    	label	选择部件时看到标签
    	icon	选择部件时看到图标
    	updatePeriodMillis	更新时间间隔
    	previewImage	选择部件时 展示的图像  3.0以上使用
    	initialLayout	布局文件
    	resizeMode		调整size模式
    	configure		如果需要在启动前先启动一个Activity进行设置,在这里给出Activity的完整类名
    	autoAdvanceViewId=@id/xx	与集合部件一起使用,指定该集合item自动推进 暂只发现对stackview有效,会自动一段时间推进到下一个

    	集合部件:3.0后才有。set view:ListView、GridView、StackView、AdapterViewFlipper
    	ViewFlipper 为非集合部件
	 -->
</appwidget-provider>
layout/collections_view_widget.xml
<?xml version="1.0" encoding="utf-8"?>
<LinearLayout xmlns:android="http://schemas.android.com/apk/res/android"
    android:layout_width="match_parent"
    android:layout_height="match_parent"
    android:orientation="vertical" >

    <LinearLayout
        android:layout_width="fill_parent"
        android:layout_height="wrap_content" >

        <Button
            android:id="@+id/btn_listview"
            android:layout_width="0dp"
            android:layout_height="wrap_content"
            android:layout_weight="1"
            android:text="listview" />

        <Button
            android:id="@+id/btn_gridview"
            android:layout_width="0dp"
            android:layout_height="wrap_content"
            android:layout_weight="1"
            android:text="gridview" />

        <Button
            android:id="@+id/btn_stackview"
            android:layout_width="0dp"
            android:layout_height="wrap_content"
            android:layout_weight="1"
            android:text="stackview" />

        <Button
            android:id="@+id/btn_viewflipper"
            android:layout_width="0dp"
            android:layout_height="wrap_content"
            android:layout_weight="1"
            android:text="viewflipper" />
    </LinearLayout>

    <FrameLayout
        xmlns:android="http://schemas.android.com/apk/res/android"
        android:layout_width="match_parent"
        android:layout_height="match_parent"
        android:background="#80000000" >
        />

        <ListView
            android:id="@+id/listview"
            android:layout_width="fill_parent"
            android:layout_height="fill_parent" />

        <GridView
            android:id="@+id/gridview"
            android:layout_width="fill_parent"
            android:layout_height="fill_parent"
            android:numColumns="2"
            android:visibility="gone" />

        <StackView
            android:id="@+id/stackview"
            android:layout_width="fill_parent"
            android:layout_height="fill_parent"
            android:visibility="gone" />

        <ViewFlipper
            android:id="@+id/viewflipper"
            android:layout_width="fill_parent"
            android:layout_height="fill_parent"
            android:autoStart="true"
            android:flipInterval="2000"
            android:visibility="gone" >
<!--
autoStart=true  <==>	startFlipping()
flipInterval=2000 <==> How long to wait before flipping to the next view
 -->
            <ImageView
                android:id="@+id/iv1"
                android:layout_width="fill_parent"
                android:layout_height="fill_parent"
                android:background="@drawable/a11"/>
            <ImageView
                android:id="@+id/iv2"
                android:layout_width="fill_parent"
                android:layout_height="fill_parent"
                android:background="@drawable/a2"/>
            <ImageView
                android:id="@+id/iv3"
                android:layout_width="fill_parent"
                android:layout_height="fill_parent"
                android:background="@drawable/a3" />
            <ImageView
                android:id="@+id/iv4"
                android:layout_width="fill_parent"
                android:layout_height="fill_parent"
                android:background="@drawable/a4" />
        </ViewFlipper>

        <TextView
            android:id="@+id/tv_empty"
            android:layout_width="fill_parent"
            android:layout_height="fill_parent"
            android:gravity="center"
            android:text="Empty List"
            android:visibility="gone" />
    </FrameLayout>

</LinearLayout>
集合的数据源 需要 继承 RemoteViewsService
package com.stone.service;

import java.util.ArrayList;
import java.util.List;

import android.app.PendingIntent;
import android.content.Context;
import android.content.Intent;
import android.os.Bundle;
import android.widget.RemoteViews;
import android.widget.RemoteViewsService;

import com.stone.R;
import com.stone.receiver.WidgetSetProvider;

/**
 * 继承自RemoteViewsService 必须重写onGetViewFactory
 * 该服务只是用来 创建 集合widget使用的数据源
 * @author stone
 */
public class WidgetSetService extends RemoteViewsService {

	public WidgetSetService() {

	}

	@Override
	public RemoteViewsFactory onGetViewFactory(Intent intent) {
		return new WidgetFactory(this.getApplicationContext(), intent);
	}


	public class WidgetFactory implements RemoteViewsService.RemoteViewsFactory {
		private static final int mCount = 10;
		private Context mContext;
		private List<String> mWidgetItems = new ArrayList<String>();


		public WidgetFactory(Context context, Intent intent) {
	        mContext = context;
//	        mAppWidgetId = intent.getIntExtra(AppWidgetManager.EXTRA_APPWIDGET_ID,
//	                AppWidgetManager.INVALID_APPWIDGET_ID);
	    }

		@Override
		public void onCreate() {
			for (int i = 0; i < mCount; i++) {
                mWidgetItems.add("item:" + i + "!");
            }
		}

		@Override
		public void onDataSetChanged() {
			/*
			 * appWidgetManager.notifyAppWidgetViewDataChanged(appWidgetIds, R.id.listview);
			 * 使用该通知更新数据源,会调用onDataSetChanged
			 */
			System.out.println("----onDataSetChanged----");
		}

		@Override
		public void onDestroy() {
			mWidgetItems.clear();
		}

		@Override
		public int getCount() {
			return  mCount;
		}

		@Override
		public RemoteViews getViewAt(int position) {
			RemoteViews views = new RemoteViews(mContext.getPackageName(), android.R.layout.simple_list_item_1);
			views.setTextViewText(android.R.id.text1, "item:" + position);
			System.out.println("RemoteViewsService----getViewAt" + position);


			Bundle extras = new Bundle();
            extras.putInt(WidgetSetProvider.EXTRA_ITEM, position);
            Intent fillInIntent = new Intent();
            fillInIntent.putExtras(extras);
            /*
             * android.R.layout.simple_list_item_1 --- id --- text1
             * listview的item click:将fillInIntent发送,
             * fillInIntent它默认的就有action 是provider中使用 setPendingIntentTemplate 设置的action
             */
			views.setOnClickFillInIntent(android.R.id.text1, fillInIntent);

			return views;
		}

		@Override
		public RemoteViews getLoadingView() {
			/* 在更新界面的时候如果耗时就会显示 正在加载... 的默认字样,但是你可以更改这个界面
			 * 如果返回null 显示默认界面
			 * 否则 加载自定义的,返回RemoteViews
			 */
			return null;
		}

		@Override
		public int getViewTypeCount() {
			return 1;
		}

		@Override
		public long getItemId(int position) {
			return position;
		}

		@Override
		public boolean hasStableIds() {
			return false;
		}

	}

}
widgetprovider
package com.stone.receiver;

import com.stone.R;
import com.stone.service.WidgetSetService;

import android.app.PendingIntent;
import android.appwidget.AppWidgetManager;
import android.appwidget.AppWidgetProvider;
import android.content.ComponentName;
import android.content.Context;
import android.content.Intent;
import android.os.Bundle;
import android.text.TextUtils;
import android.text.format.DateUtils;
import android.view.View;
import android.widget.RemoteViews;
import android.widget.Toast;
import android.widget.ViewFlipper;

/**
 * 使用了集合展示AppWidget
 * ListView、GridView、StackView 设置adapter,处理item点击
 * ViewFlipper 在RemoteViews中缺少支持,暂只能在它的布局文件中设置 轮换效果
 * 				对于切换到哪一个子view的item事件不好处理,只能设置一个整体setPendingIntent
 * @author stone
 */
public class WidgetSetProvider extends AppWidgetProvider {
	public final static String CLICK_ACTION = "com.stone.action.clickset";
	public final static String CLICK_ITEM_ACTION = "com.stone.action.clickset.item";
	public final static String EXTRA_ITEM = "extra_item";

	@Override
	public void onReceive(Context context, Intent intent) {
		super.onReceive(context, intent);
		System.out.println(intent.getAction());
		if (TextUtils.equals(CLICK_ACTION, intent.getAction())) {
			int extraType = intent.getIntExtra("view_tag", 0);
			if (extraType > 0) {
				System.out.println("extra:::" + extraType);

				switch (extraType) {
				case 1:
					updateWidget(context, R.id.listview, R.id.gridview, R.id.stackview, R.id.viewflipper);
					break;
				case 2:
					updateWidget(context, R.id.gridview, R.id.listview, R.id.stackview, R.id.viewflipper);
					break;
				case 3:
					updateWidget(context, R.id.stackview, R.id.gridview, R.id.listview, R.id.viewflipper);
					break;
				case 4:
					updateWidget(context, R.id.viewflipper, R.id.gridview, R.id.stackview, R.id.listview);
					break;

				default:
					break;
				}
			}
		} else if (TextUtils.equals(CLICK_ITEM_ACTION, intent.getAction())) {
			Bundle extras = intent.getExtras();
			int position = extras.getInt(WidgetSetProvider.EXTRA_ITEM, -1);
			if (position != -1) {
				System.out.println("--点击了item---" + position);
				System.out.println("");
//				Toast.makeText(context, "click item:" + position, 0).show();
			}
		}
	}

	@Override
	public void onUpdate(Context context, AppWidgetManager appWidgetManager, int[] appWidgetIds) {
		RemoteViews views = new RemoteViews(context.getPackageName(), R.layout.collections_view_widget);

		Intent intent1 = new Intent(CLICK_ACTION);
		intent1.putExtra("view_tag", 1);
		PendingIntent pendingIntent1 = PendingIntent.getBroadcast(context, 101, intent1, 0);
		views.setOnClickPendingIntent(R.id.btn_listview, pendingIntent1);

		Intent intent2 = new Intent(CLICK_ACTION);
		intent2.putExtra("view_tag", 2);
		PendingIntent pendingIntent2 = PendingIntent.getBroadcast(context, 102, intent2, 0);
		views.setOnClickPendingIntent(R.id.btn_gridview, pendingIntent2);

		Intent intent3 = new Intent(CLICK_ACTION);
		intent3.putExtra("view_tag", 3);
		PendingIntent pendingIntent3 = PendingIntent.getBroadcast(context, 103, intent3, 0);
		views.setOnClickPendingIntent(R.id.btn_stackview, pendingIntent3);

		Intent intent4 = new Intent(CLICK_ACTION);
		intent4.putExtra("view_tag", 4);
		PendingIntent pendingIntent4 = PendingIntent.getBroadcast(context, 104, intent4, 0);
		views.setOnClickPendingIntent(R.id.btn_viewflipper, pendingIntent4);

		appWidgetManager.updateAppWidget(appWidgetIds, views);

		System.out.println("setwidget update");
		super.onUpdate(context, appWidgetManager, appWidgetIds);
	}

	@Override
	public void onAppWidgetOptionsChanged(Context context,
			AppWidgetManager appWidgetManager, int appWidgetId,
			Bundle newOptions) {
		super.onAppWidgetOptionsChanged(context, appWidgetManager, appWidgetId,
				newOptions);
	}

	@Override
	public void onDeleted(Context context, int[] appWidgetIds) {
		super.onDeleted(context, appWidgetIds);
	}

	@Override
	public void onEnabled(Context context) {
		super.onEnabled(context);
	}

	@Override
	public void onDisabled(Context context) {
		super.onDisabled(context);
	}

	private void updateWidget(Context context, int visible, int gone1, int gone2, int gone3) {
		//RemoteViews处理异进程中的View
		RemoteViews views = new RemoteViews(context.getPackageName(), R.layout.collections_view_widget);

		views.setViewVisibility(visible, View.VISIBLE);
		views.setViewVisibility(gone1, View.GONE);
		views.setViewVisibility(gone2, View.GONE);
		views.setViewVisibility(gone3, View.GONE);

		if (visible != R.id.viewflipper) {//viewflipper 不是 继承自AbsListView  or  AdapterViewAnimator  的view
			Intent intent = new Intent(context, WidgetSetService.class);
			views.setRemoteAdapter(visible, intent);//设置集合的adapter为intent指定的service
			views.setEmptyView(visible, R.id.tv_empty);//指定集合view为空时显示的view

			Intent toIntent = new Intent(CLICK_ITEM_ACTION);
			PendingIntent pendingIntent = PendingIntent.getBroadcast(context, 200, toIntent, PendingIntent.FLAG_UPDATE_CURRENT);
			/*
			 * setPendingIntentTemplate 设置pendingIntent 模板
			 * setOnClickFillInIntent   可以将fillInIntent 添加到pendingIntent中
			 */
			views.setPendingIntentTemplate(visible, pendingIntent);

		} else if (visible == R.id.viewflipper) {
//			views.setPendingIntentTemplate(R.id.viewflipper, pendingIntentTemplate);
		}

		AppWidgetManager am = AppWidgetManager.getInstance(context);
		int[] appWidgetIds = am.getAppWidgetIds(new ComponentName(context, WidgetSetProvider.class));
		for (int i = 0; i < appWidgetIds.length; i++) {
			am.updateAppWidget(appWidgetIds[i], views); //更新 实例
		}

	}

}
运行的周期函数
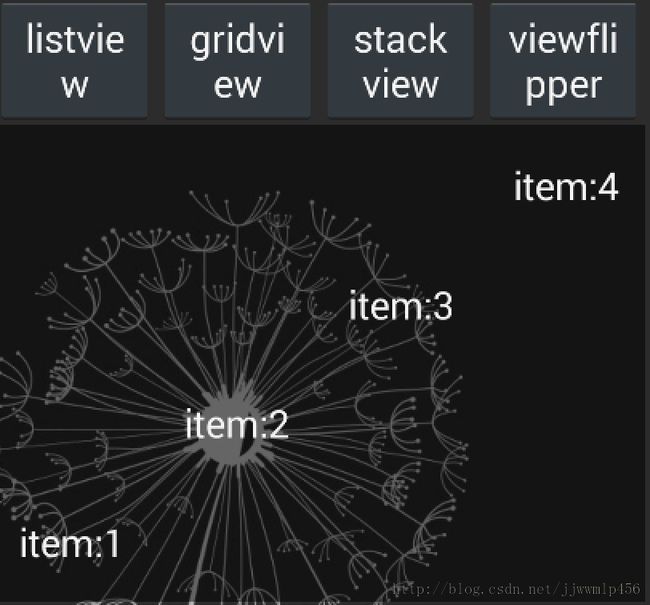
点击stackview的效果图

