Android自定义控件之圆形头像
Android自定义控件之圆形头像
自定义控件也看了很多,但是感觉始终写不出来很牛逼的控件。看来还是自己火候不到位啊!平时也老玩,没有下苦功夫。每当看到爱哥、鸿洋等大牛的博客,仍是我继续努力的方向啊!今天准备做一个自定义控件圆形的ImageView,但是上网看看,发现一位基友已经写过了,但是我还是参照他的谢谢,当做练笔吧!
预备知识点
- Canvas的基本用法,比如绘制圆形:canvas.drawCircle(),绘制Bitmap位图 canvas.drawBitmap
- Paint的基本用法,比如paint.setXfermode的基本使用,了解Mode的效果
需要的基本知识就是这样,其实自定义控件在怎么说,方法也就那么多,关键是根据需求的灵活运用,孙悟空就72变,但是足以对付妖魔千千万。
思路分析
首先我们有一张图,我们在xml布局文件中设置控件显示的大小,一般情况下,他俩是不肯能大小相等的,所以我们就必须控制这张图片的哪些内容进行显示,这部分内容是我们控制进行处理,我们控制可以显示去掉两边的部分,也可以将整张图片进行压缩显示整张图片,后面我们都可以进行尝试。其次,我们要确定我们如何得到圆形,方法是利用setXfermode的设置进行裁剪得到。基本的要点说清楚了,我们就开始实现吧!
资源图效果:

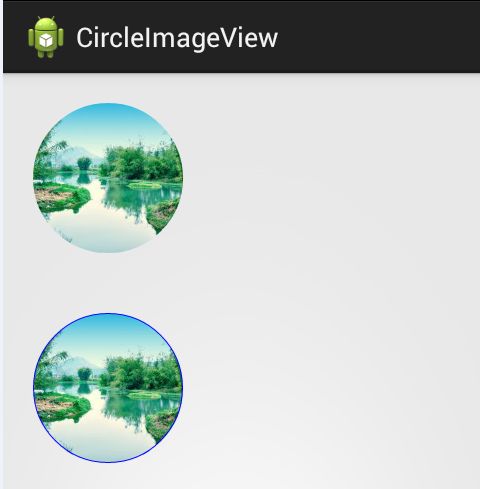
效果图
步骤
1、创建工程CircleImageView,新建类CircleImageView继承ImageView,这样我们就开始开发了。重写构造函数,并在构造函数中进行初始化的工作,同时重写onMeasure方法。
 public class CircleImageView extends ImageView {
        // 控件默认长、宽
        private int defaultWidth = 100;
        private int defaultHeight = 100;
        private Paint paint;
        public CircleImageView(Context context, AttributeSet attrs) {
            super(context, attrs);
            paint = new Paint();
            paint.setAntiAlias(true);
            paint.setFilterBitmap(true);
            paint.setDither(true);
        }

        @Override
        protected void onMeasure(int widthMeasureSpec, int heightMeasureSpec) {
            int widthSize = MeasureSpec.getSize(widthMeasureSpec);
            int widthMode = MeasureSpec.getMode(widthMeasureSpec);
            int heightSize = MeasureSpec.getSize(heightMeasureSpec);
            int heightMode = MeasureSpec.getMode(heightMeasureSpec);
            if(widthMode == MeasureSpec.AT_MOST || heightMode == MeasureSpec.AT_MOST){
                widthSize = (int) (100 * getResources().getDisplayMetrics().density);
                heightSize = (int) (100 * getResources().getDisplayMetrics().density);
            }
            setMeasuredDimension(widthSize, heightSize);
        }
    }
我们初始化我们的画笔paint对象,并进行了一些属性设置,同时定义了控件的默认长宽,我们重写onMeasure方法,为了防止控件设置为wrap_content时的显示问题,我们统一处理为100dp的大小。
2、重写onDraw方法,进行我们图片的处理逻辑和绘制。这样就了所有的处理工作,我直接贴出所有代码。
public class CircleImageView extends ImageView {
        // 控件默认长、宽
        private int defaultWidth = 100;
        private int defaultHeight = 100;
        private Paint paint;
        public CircleImageView(Context context, AttributeSet attrs) {
            super(context, attrs);
            paint = new Paint();
            paint.setAntiAlias(true);
            paint.setFilterBitmap(true);
            paint.setDither(true);
        }

        @Override
        protected void onMeasure(int widthMeasureSpec, int heightMeasureSpec) {
            int widthSize = MeasureSpec.getSize(widthMeasureSpec);
            int widthMode = MeasureSpec.getMode(widthMeasureSpec);
            int heightSize = MeasureSpec.getSize(heightMeasureSpec);
            int heightMode = MeasureSpec.getMode(heightMeasureSpec);
            if(widthMode == MeasureSpec.AT_MOST || heightMode == MeasureSpec.AT_MOST){
                widthSize = (int) (100 * getResources().getDisplayMetrics().density);
                heightSize = (int) (100 * getResources().getDisplayMetrics().density);
            }
            setMeasuredDimension(widthSize, heightSize);
        }

        @Override
        protected void onDraw(Canvas canvas) {
            Drawable drawable = getDrawable() ;
            if (drawable == null) {
                return;
            }
            if (getWidth() == 0 || getHeight() == 0) {
                return;
            }
            this.measure(0, 0);
            if (drawable.getClass() == NinePatchDrawable.class)
                return;
            Bitmap b = ((BitmapDrawable) drawable).getBitmap();
            Bitmap bitmap = b.copy(Bitmap.Config.ARGB_8888, true);
            defaultWidth = getWidth();
            defaultHeight = getHeight();
            //计算显示圆形的半径,为保证圆形,取图片的长宽小的一半作为圆形
            int radius = (defaultWidth < defaultHeight ? defaultWidth : defaultHeight) / 2;
            //获取我们处理后的圆形图片
            Bitmap roundBitmap = getCroppedRoundBitmap(bitmap, radius);
            //绘制图片进行显示
            canvas.drawBitmap(roundBitmap, defaultWidth / 2 - radius, defaultHeight / 2 - radius, null);
        }

        /** * 获取裁剪后的圆形图片 * @param radius半径 */
        public Bitmap getCroppedRoundBitmap(Bitmap bmp, int radius) {
            Bitmap scaledSrcBmp;
            int diameter = radius * 2;
            //对图片进行处理,获取我们需要的中央部分
            Bitmap squareBitmap = getCenterBitmap(bmp);
            //将图片缩放到需要的圆形比例大小
            if (squareBitmap.getWidth() != diameter || squareBitmap.getHeight() != diameter) {
                scaledSrcBmp = Bitmap.createScaledBitmap(squareBitmap, diameter,diameter, true);
            } else {
                scaledSrcBmp = squareBitmap;
            }
            //创建一个我们输出的对应
            Bitmap output = Bitmap.createBitmap(scaledSrcBmp.getWidth(),
                    scaledSrcBmp.getHeight(),
                    Config.ARGB_8888);
            //在output上进行绘画
            Canvas canvas = new Canvas(output);
            //创建裁剪的矩形
            Rect rect = new Rect(0, 0, scaledSrcBmp.getWidth(),scaledSrcBmp.getHeight());
            //绘制dest目标区域
            canvas.drawCircle(scaledSrcBmp.getWidth() / 2,
                    scaledSrcBmp.getHeight() / 2,
                    scaledSrcBmp.getWidth() / 2,
                    paint);
            //设置xfermode模式
            paint.setXfermode(new PorterDuffXfermode(Mode.SRC_IN));
            //绘制src源区域
            canvas.drawBitmap(scaledSrcBmp, rect, rect, paint);
            bmp.recycle();
            squareBitmap.recycle();
            scaledSrcBmp.recycle();
            return output;
        }

        /** * 截图图片 * @param bitmap * 图片资源的Bitmap * @return */
        private Bitmap getCenterBitmap(Bitmap bitmap){
            // 为了防止图片宽高不相等,造成圆形图片变形,因此截取长方形中处于中间位置最大的正方形图片
            int bmpWidth = bitmap.getWidth();
            int bmpHeight = bitmap.getHeight();
            int squareWidth = 0, squareHeight = 0;
            int x = 0, y = 0;
            Bitmap squareBitmap;
            if (bmpHeight > bmpWidth) {// 高大于宽
                squareWidth = squareHeight = bmpWidth;
                x = 0;
                y = (bmpHeight - bmpWidth) / 2;
                // 截取正方形图片 ,从(bmpHeight - bmpWidth) / 2处开始截取
                squareBitmap = Bitmap.createBitmap(bitmap, x, y, squareWidth, squareHeight);
            } else if (bmpHeight < bmpWidth) {// 宽大于高
                squareWidth = squareHeight = bmpHeight;
                x = (bmpWidth - bmpHeight) / 2;
                y = 0;
                squareBitmap = Bitmap.createBitmap(bitmap, x, y, squareWidth,squareHeight);
            } else {
                squareBitmap = bitmap;
            }
            return squareBitmap;
        }
    }
代码中的注释已经很详细了,我们先说说我们图片展示内容处理代码,即getCenterBitmap函数的功能。我们知道图片的大小不外乎三种情况:宽>高,宽<高,宽=高。
(1)、宽>高:
(2)、宽<高:
这部分的代码原理就是上面描述的这样,所以我们的代码就是纯粹的实现我们想要的效果,当然我们也可以根据自己的需求进行变换处理。
其次就是大家对
paint.setXfermode(new PorterDuffXfermode(Mode.SRC_IN));的使用理解,只要懂的理解就应该没问题,是不是很简单。
这样一个简单的自定义控件就基本完成了,是不是很nice。
如何添加给我们的圆形控件添加上边框?
前面我们已经实现了圆形控件的展示,那么我们如果想给我们的圆形控件添加边框怎么实现呢?这就需要利用到我们的自定义属性的相关知识。让我们一些来实现看。当然,上面的CircleImageView类是我们继续开发的基础,我们可以直接copy里面的代码出来新建一个类:CircleImageViewWithBorder。
1、我们在res/values目录下创建名称为attrs的资源文件,添加我们的自定义属性。
<?xml version="1.0" encoding="utf-8"?>
    <resources>
         <declare-styleable name="CircleImageView">
            <attr name="border_size" format="dimension" />
            <attr name="border_color" format="color" />
        </declare-styleable>
    </resources>
在xml文件中使用自定义属性,注意,需要添加命名空间
xmlns:dsw="http://schemas.android.com/apk/res/com.dsw.circleimageview"
mainactivity中的布局文件
<LinearLayout xmlns:android="http://schemas.android.com/apk/res/android"
        xmlns:dsw="http://schemas.android.com/apk/res/com.dsw.circleimageview"
        xmlns:tools="http://schemas.android.com/tools"
        android:layout_width="match_parent"
        android:layout_height="match_parent"
        android:orientation="vertical"
        tools:context="com.dsw.circleimageview.MainActivity" >

        <com.dsw.circleimageview.CircleImageView
            android:layout_width="100dp"
            android:layout_height="100dp"
            android:layout_margin="20dp"
            android:src="@drawable/test"/>

        <com.dsw.circleimageview.CircleImageViewWithBorder
            android:layout_width="100dp"
            android:layout_height="100dp"
            android:layout_margin="20dp"
            android:src="@drawable/test"
            dsw:border_color="#0000ff"
            dsw:border_size="1dp"
            />
    </LinearLayout>
2、新增成员变量,边框的宽度和颜色,以及获取自定义属性的获取。
private Context mContext;
    private int defaultColor = 0xFFFFFFFF;
    // 边框的颜色
    private int mBordeColor = 0;
    //边框的宽度
    private int mBorderWidth = 0;
    /* * 获取自定义属性 */
    private void setCustomAttributes(AttributeSet attrs) {
        TypedArray typeArray = mContext.obtainStyledAttributes(attrs,R.styleable.CircleImageView);
        mBorderWidth = typeArray.getDimensionPixelSize(R.styleable.CircleImageView_border_size, 0);
        mBordeColor = typeArray.getColor(R.styleable.CircleImageView_border_color,defaultColor);
        typeArray.recycle();
    }
3、我们已经获取了我们设置的属性,注意此时,由于已经有了边框,所以绘制圆的半径必然会变化,我们就需要重新进行计算我们的半径,然后绘制出这个圆就可以了。我们知道,我们采用的大小是与我们设定大小的矩形相切的最大圆,所以原来的半径计算已经包含了边框的宽度,我们只要减去即可。
//整除情况下的半径
        int radiusNomal = (defaultWidth < defaultHeight ? defaultWidth : defaultHeight) / 2;
        //去掉边框的宽度后,图片展示的半径
        int radius = radiusNomal -mBorderWidth/2;
        //绘制边框的半径
        int radiusBorder = radius;
        //绘制边框圆
        drawCircleBorder(canvas,radiusBorder,mBordeColor);


        /** * 边缘画圆 */
        private void drawCircleBorder(Canvas canvas, int radius, int color) {
            Paint paint = new Paint();
            /* 去锯齿 */
            paint.setAntiAlias(true);
            paint.setFilterBitmap(true);
            paint.setDither(true);
            paint.setColor(color);
            /* 设置paint的 style 为STROKE:空心 */
            paint.setStyle(Paint.Style.STROKE);
            /* 设置paint的外框宽度 */
            paint.setStrokeWidth(mBorderWidth);
            canvas.drawCircle(defaultWidth / 2, defaultHeight / 2, radius, paint);
} 总结
我们开篇的时候说过,我们现在展示的是切图,是我们自己抽取的原图中的中央部分,那么如果要获取原图呢?我们只需要将getCenterBitmap方法中的处理去掉,然后返回原图即可。
 private Bitmap getCenterBitmap(Bitmap bitmap){
        return bitmap;
      }
效果图:
我们通过setXfermode方法进行裁剪,其实canvas类中已经有一个clip方法,我们只要指定路径同样可以进行裁剪,网上也有例子,有兴趣可以看下。欢迎留言探讨
源码下载
参考文档:
Android圆形图片–自定义控件
android 实现圆形imageView,Circle imageView.
========================================
作者:mr_dsw 欢迎转载,与人分享是进步的源泉!
转载请保留地址:http://blog.csdn.net/mr_dsw

