HealthKit开发教程Swift版:起步
(原文:HealthKit Tutorial with Swift: Getting Started 作者:Ernesto García 译者:Mr_cyz )
HealthKit是iOS 8中的新的API,它提供了一种优雅的方式来获取和存储用户的健康数据。
在本篇HealthKit教程中,你将会创建一个简单地记录用户信息的app。在此过程中,你会学到许多关于HealthKit的知识,例如:
-
怎么样向用户请求允许来获得HealthKit的数据
-
怎么样读取信息然后将其格式化展示在屏幕上
-
怎么样将数据写回HealthKit。
准备好进行一次精彩的HealthKit之旅了吗?继续往下读吧!
注意:要想完成这次教程,你应该有一个可用的iOS开发者账号,如果没有的话,你将无法让HealthKit工作,也没有访问HealthKit Store的权限。
开始
你将创建一款简单地应用,获取使用HealthKit的许可,然后读写HealthKit的数据。这里为你准备了一款起始项目,该起始项目中已经创建好了所有的用户交互界面,你只需要将注意力集中于HealthKit功能即可。
现在下载这个初始项目,然后在Xcode中打开。
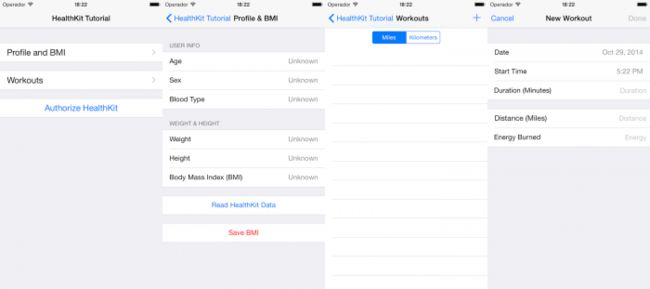
编译并且运行这个工程,你会看到这款应用的内部结构:读写用户锻炼信息(Workout)与身体数据采样的信息(Quantity samples)。
接下来,你将按照如下顺序完善这款应用:
-
获取使用HealthKit的许可
-
读取用户的个人特征信息(characteristic)
-
读取并保存用户的数据采样信息(quantity sample)
-
读取并保存用户的锻炼、健身信息(workout)
在这之前,你必须先更改这个项目的Bundle Identifier,然后选择你的开发团队Team。
在项目导航栏中选择我们的项目HKTutorial,在Target栏中选择HKTutorial。然后选择General菜单,将Bundle Identifier改为你自己的名字或者是域名。
然后,在Team组合框中选择与你的开发者账号关联的开发团队。
到目前为止一切顺利!
授权
为了使用HealthKit,你必须为HealthKit授权。
依然是在Target栏中,打开Capabilities菜单,将HealthKit这一部分的开关设为ON的状态,如屏幕截图中显示那样:
等待Xcode做好相关的配置,一旦Xcode完成配置,你的授权工作就完成了。这很简单,不是吗?
许可(Permissions)
记住,你的应用永远不会自动获取健康数据——你需要获得许可。这就是接下来你要做的事情。
首先,打开HealthManager.swift,看一下,你会发现一个空的类。
在这里你将添加你的这个工程所需要的HealthKit相关的代码。它将是其他类与HealthKit交互的入口。一个好消息是,你已经在一些必要的控制器中有这个类的一个实例了,所以不需要再创建其他的实例了。
导入HealthKit框架,依然是在HealthManager.swift中,在顶部注释的下面加上这一行:
|
1
|
import HealthKit
|
HealthKit框架的核心是HKHealthStore类,因此你也需要这个类的一个实例,在HealthManager中加入这一行:
|
1
|
let healthKitStore:HKHealthStore = HKHealthStore()
|
既然你已经创建好了HKHealthStore类的实例,下一步就是获得许可使用它了。
还记得吗?用户是可以掌控他们的数据并决定哪一部分可以被你记录追踪的。这意味着你并不是去一次性请求HealthKit Store的全局许可,而是去获取某一特定的类型的许可,是你的应用需要从Store中读写的那一部分。
所有目标均继承自HKObjectType类,该类提供了方便的方法来创建子类。
你只需要调用一个方法,传入一个代表特定种类的请求的常量即可,下面列出了这些方便的方法,覆盖了上面提到过的每一种类别。这里不需要在Xcode中做任何事,只需要看一看,学习一下:
|
1
2
3
4
5
|
class func quantityTypeForIdentifier(identifier: String!) -> HKQuantityType!
// to get a Quantity Type
class func categoryTypeForIdentifier(identifier: String!) -> HKCategoryType!
// to get a Category Type
class func characteristicTypeForIdentifier(identifier: String!) -> HKCharacteristicType!
// to get a Characteristic type
class func correlationTypeForIdentifier(identifier: String!) -> HKCorrelationType!
// to get a CorrelationType
class func workoutType() -> HKWorkoutType!
// to get a Workout type
|
在这些方法中使用到的标识符必须是在HealthKit中预定义的常量,例如HKQuantityTypeIdentifierHeight是数据采样信息种类中的身高测量,HKCharacteristicTypeIdentifierBloodType是个人特征种类中的血液类型。
锻炼信息不需要任何标识符,因为它并没有子类别。
现在回到编码上来,打开HealthManager.swift,将下面这个方法添加到HealthManager中
|
1
2
3
4
5
6
7
8
9
10
11
12
13
14
15
16
17
18
19
20
21
22
23
24
25
26
27
28
29
30
31
32
33
34
35
36
37
38
39
40
|
func authorizeHealthKit(completion: ((success:Bool, error:NSError!) -> Void)!)
{
// 1. Set the types you want to read from HK Store
let healthKitTypesToRead = NSSet(array:[
HKObjectType.characteristicTypeForIdentifier(HKCharacteristicTypeIdentifierDateOfBirth),
HKObjectType.characteristicTypeForIdentifier(HKCharacteristicTypeIdentifierBloodType),
HKObjectType.characteristicTypeForIdentifier(HKCharacteristicTypeIdentifierBiologicalSex),
HKObjectType.quantityTypeForIdentifier(HKQuantityTypeIdentifierBodyMass),
HKObjectType.quantityTypeForIdentifier(HKQuantityTypeIdentifierHeight),
HKObjectType.workoutType()
])
// 2. Set the types you want to write to HK Store
let healthKitTypesToWrite = NSSet(array:[
HKObjectType.quantityTypeForIdentifier(HKQuantityTypeIdentifierBodyMassIndex),
HKObjectType.quantityTypeForIdentifier(HKQuantityTypeIdentifierActiveEnergyBurned),
HKObjectType.quantityTypeForIdentifier(HKQuantityTypeIdentifierDistanceWalkingRunning),
HKQuantityType.workoutType()
])
// 3. If the store is not available (for instance, iPad) return an error and don't go on.
if
!HKHealthStore.isHealthDataAvailable()
{
let error = NSError(domain:
"com.raywenderlich.tutorials.healthkit"
, code: 2, userInfo: [NSLocalizedDescriptionKey:
"HealthKit is not available in this Device"
])
if
( completion != nil )
{
completion(success:
false
, error:error)
}
return
;
}
// 4. Request HealthKit authorization
healthKitStore.requestAuthorizationToShareTypes(healthKitTypesToWrite, readTypes: healthKitTypesToRead) { (success, error) -> Void
in
if
( completion != nil )
{
completion(success:success,error:error)
}
}
}
|
让我们回顾一下上面的代码,一步一步来:
-
你创建了一个NSSet对象,里面存有本篇教程中你将需要用到的从Health Stroe中读取的所有的类型:个人特征(血液类型、性别、出生日期)、数据采样信息(身体质量、身高)以及锻炼与健身的信息。
-
你创建了另一个NSSet对象,里面有你需要向Store写入的信息的所有类型(锻炼与健身的信息、BMI、能量消耗、运动距离)。
-
这里你检查HealthKit是否可用,如果不可用就返回一条错误信息。对于一个通用的app来说这是必不可少的,因为某些设备上HealthKit可能并不可用。在本文写作时,iPad上就无法使用HealthKit。
-
发出具体的请求许可。这里调用了requestAuthorizationToShareTypes:readTypes方法并将之前定义好的读取和写入的种类作为参数传了进去。
既然你的代码知道怎么样去请求许可,你需要为你的app提供一种方法来回调。
我们的起始项目中已经有一个“Authorize HealthKit”按钮来做这件事,它会在MasterViewController中调用authorizeHealthKit()方法。那里听起来像是一个非常好从你的app收到反馈的地方。
打开MasterViewController.swift,找到authorizeHealthKit()然后将下面这一行:
|
1
|
println(
"TODO: Request HealthKit authorization"
)
|
替换为:
|
1
2
3
4
5
6
7
8
9
10
11
12
|
healthManager.authorizeHealthKit { (authorized, error) -> Void
in
if
authorized {
println(
"HealthKit authorization received."
)
}
else
{
println(
"HealthKit authorization denied!"
)
if
error != nil {
println(
"\(error)"
)
}
}
}
|
这段代码是从authorizeHealthKit发来的请求许可的回调,在控制台上用一段信息展示了请求结果。
编译然后运行,在主视图中点击“Authorize HealthKit”按钮,你将会看到这个场景弹出:
将所有的开关打开,然后点击Done按钮,你将会在Xcode中看到如下信息:
|
1
|
HealthKit authorization received.
|
太棒了,你的应用已经成功连接到Store了,准备更深入到HealthKit的世界中吧!
个人特征与采样信息(Characteristics and Samples)
在这一部分,你将会学习到:
-
怎么样读取用户的个人特征信息
-
怎么样读写不同种类的数据采样信息
所有有趣的事都发生在ProfileViewController,在这里你会读到用户的特征(生日、年龄、血液类型)并且查询身高和体重数据。
在那之后,你将会用这些数据进行一次计算(在这里,BMI代表Body Mass Index,身体质量指数)。并且将计算出来的数据保存到Store中。
注意:身体质量指数(BMI)被广泛地应用于表示身体肥胖程度,由一个人的身高和体重经过一个公式计算而来,详情请点击这里。
读取特征信息
在你读取用户的特征信息之前,你需要确保在HealthKit Store中是有信息存在的,因此你需要先填充一些数据。
打开在你的设备或者模拟器上的Health应用,选择Health Data栏,然后在列表中选择Me,然后点击Edit,添加生日、性别和血液类型的信息。
随便输入一些信息,甚至是你耍点小聪明,填上以前状态下的信息或者是Kitty的信息也没问题。
你下一步的任务是搭建框架然后读入这些信息。
返回到Xcode,打开HealthManager.swift,将下面的方法加到HealthManager类的底部。
|
1
2
3
4
5
6
7
8
9
10
11
12
13
14
15
16
17
18
19
20
21
22
23
24
25
26
27
28
29
30
31
|
func readProfile() -> ( age:Int?, biologicalsex:HKBiologicalSexObject?, bloodtype:HKBloodTypeObject?)
{
var
error:NSError?
var
age:Int?
// 1. Request birthday and calculate age
if
let birthDay = healthKitStore.dateOfBirthWithError(&error)
{
let today = NSDate()
let calendar = NSCalendar.currentCalendar()
let differenceComponents = NSCalendar.currentCalendar().components(.YearCalendarUnit, fromDate: birthDay, toDate: today, options: NSCalendarOptions(0) )
age = differenceComponents.year
}
if
error != nil {
println(
"Error reading Birthday: \(error)"
)
}
// 2. Read biological sex
var
biologicalSex:HKBiologicalSexObject? = healthKitStore.biologicalSexWithError(&error);
if
error != nil {
println(
"Error reading Biological Sex: \(error)"
)
}
// 3. Read blood type
var
bloodType:HKBloodTypeObject? = healthKitStore.bloodTypeWithError(&error);
if
error != nil {
println(
"Error reading Blood Type: \(error)"
)
}
// 4. Return the information read in a tuple
return
(age, biologicalSex, bloodType)
}
|
该方法从Store中读入用户的特性信息,以一个元组的形式返回,它的工作方式是:
-
调用dateOfBirthWithError()来从HKHealthStore中读取生日,下一行进行日历计算来确定年份。
-
biologicalSexWithError()来确定性别。
-
血液类型是从bloodTypeWithError()中读入的。
-
最后,所有的信息以元组的形式返回。
如果你现在编译并运行,你无法从UI上看出个人特征的数据有任何改变,因为你至今都没有为这个应用打开Store以及共享数据的入口。
打开ProfileViewController.swift并找到updateProfileInfo()。
当你点击按钮“Read HealthKit Data”时你需要调用这个方法,因此将下面这一行:
|
1
|
println(
"TODO: update profile Information"
)
|
替换为:
|
1
2
3
4
5
|
let profile = healthManager?.readProfile()
ageLabel.text = profile?.age == nil ? kUnknownString : String(profile!.age!)
biologicalSexLabel.text = biologicalSexLiteral(profile?.biologicalsex?.biologicalSex)
bloodTypeLabel.text = bloodTypeLiteral(profile?.bloodtype?.bloodType)
|
这段代码调用了你刚刚创建好的readProfile()方法,然后在UI方面将文本放到了合适的Label中。
有趣的是,biologicalSexLiteral和bloodTypeLiteral并不是Healthk的方法,它们仅仅是两个便捷方法——还记得我提过吗?——基于血液类型和性别的数值来返回一个字符串。
现在你的应用中,特征信息与Store已经可以互相交互了,现在编译然后运行你的app。
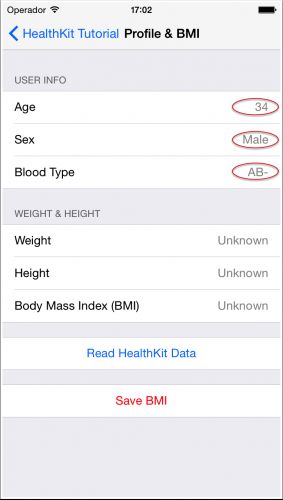
前往Profile & BMI视图,点击“Read HealthKit Data”,你会看到tableView中得数据展示了你刚才在Health应用中输入的数据。
太棒了!你成功地从HealthKit Store中读到了用户的特征信息。
查询采样信息
现在你讲读取用户的身高和体重,然后基于这些数据计算BMI数值,最后一并展示到视图中。
要从Store中读取特征之外的信息你需要使用一条查询。查询的基类是HKQuery,这是一个抽象类,能够实现每一种查询目标。为了读取身体素质信息,你需要创建一条HKSampleQuery。
要创建一条查询,你需要:
-
指明你需要查询的信息的种类(例如:身高或者体重)
-
一个可选的NSPredicate来指明查询条件(例如起止日期),以及一个NSSortDescriptors数组,来告诉Store怎么样将结果排序。
一旦你有了一条查询,就可以调用HKHealthStore的executeQuery()方法来获得结果。
注意:如果你对Core Data熟悉,你可能会注意到一些共同点:一个HKSampleQuery非常类似于NSFetchResult来查询实体类型,也是由你提供断言和排序描述,然后让对象上下文去执行查询并获得结果。
你需要在一个普通的方法中发起一段查询,来获取所有数据采样信息种类的最近一部分的信息,这包括了身高和体重,因为你想展示的是最近刚刚测量得到的结果。
打开HealthManager.swift然后将下面的方法添加到HealthManager类中:
|
1
2
3
4
5
6
7
8
9
10
11
12
13
14
15
16
17
18
19
20
21
22
23
24
25
26
27
28
29
30
31
32
33
|
func readMostRecentSample(sampleType:HKSampleType , completion: ((HKSample!, NSError!) -> Void)!)
{
// 1. Build the Predicate
let past = NSDate.distantPast() as NSDate
let now = NSDate()
let mostRecentPredicate = HKQuery.predicateForSamplesWithStartDate(past, endDate:now, options: .None)
// 2. Build the sort descriptor to return the samples in descending order
let sortDescriptor = NSSortDescriptor(key:HKSampleSortIdentifierStartDate, ascending:
false
)
// 3. we want to limit the number of samples returned by the query to just 1 (the most recent)
let limit = 1
// 4. Build samples query
let sampleQuery = HKSampleQuery(sampleType: sampleType, predicate: mostRecentPredicate, limit: limit, sortDescriptors: [sortDescriptor])
{ (sampleQuery, results, error ) -> Void
in
if
let queryError = error {
completion(nil,error)
return
;
}
// Get the first sample
let mostRecentSample = results.first as? HKQuantitySample
// Execute the completion closure
if
completion != nil {
completion(mostRecentSample,nil)
}
}
// 5. Execute the Query
self.healthKitStore.executeQuery(sampleQuery)
}
|
要得到最近的信息,你构建了一段查询,指明排序方式为按日期降序。此时最接近的应该是查询返回结果的第一条。
由于(大多数情况下)你只需要第一条信息,你使用limit来限制返回信息的数量为1.这相比较于返回全部的结果然后从中舍弃而言节省了时间和资源。
让我们深入到查询的内部工作中去一探究竟:
-
这里使用predicateForSamplesWithStartDate(_:endDate:options)来创建了一个日期并基于该日期创建一个谓词。注意:这里通过日期作为过滤条件只是一个示范,并不是必须要用这样的谓词,而且这个谓词是可以被设置为nil的。
-
创建排序描述符,表明返回的结果按照开始日期降序排序。
-
因为你只需要最新的数据,将limit限制为1.
-
构建查询对象,传入查询类型、谓词、限制以及排序描述符。当查询完成之后,将调用completion闭包并返回读入的数据。
-
最后,执行该查询。
现在你需要在UI中调用这个方法,打开ProfileViewController.swift将下面属性的声明添加到ProfileViewController中:
|
1
|
var
height, weight:HKQuantitySample?
|
你将使用这两个HKQuantitySample类型的属性来从HealthStore中获得身高和体重的数据。
现在,找到updateWeight方法,将下面这一行:
|
1
|
println(
"TODO: update Weight"
)
|
替换为:
|
1
2
3
4
5
6
7
8
9
10
11
12
13
14
15
16
17
18
19
20
21
22
23
24
25
26
27
28
|
// 1. Construct an HKSampleType for weight
let sampleType = HKSampleType.quantityTypeForIdentifier(HKQuantityTypeIdentifierBodyMass)
// 2. Call the method to read the most recent weight sample
self.healthManager?.readMostRecentSample(sampleType, completion: { (mostRecentWeight, error) -> Void
in
if
( error != nil )
{
println(
"Error reading weight from HealthKit Store: \(error.localizedDescription)"
)
return
;
}
var
weightLocalizedString = self.kUnknownString;
// 3. Format the weight to display it on the screen
self.weight = mostRecentWeight as? HKQuantitySample;
if
let kilograms = self.weight?.quantity.doubleValueForUnit(HKUnit.gramUnitWithMetricPrefix(.Kilo)) {
let weightFormatter = NSMassFormatter()
weightFormatter.forPersonMassUse =
true
;
weightLocalizedString = weightFormatter.stringFromKilograms(kilograms)
}
// 4. Update UI in the main thread
dispatch_async(dispatch_get_main_queue(), { () -> Void
in
self.weightLabel.text = weightLocalizedString
self.updateBMI()
});
});
|
让我们一段一段地分析:
-
首先你指明了希望通过quantityTypeForIdentifier(从HKSample中)查询的数据采样信息的类型,然后将与体重类型相关联的标识符HKQuantityTypeIdentifierBodyMass传入。
-
然后,使用这些类型作为参数来调用你刚刚在HealthManager中定义的方法,通过该方法返回体重类型的信息。
-
在completion闭包中,使用doubleValueForUnit来得到千克为单位的体重数值,然后使用NSMassFormatter将该值转换为本地化的字符串。
-
在主线程中更新UI界面,展示体重信息。HealthKit使用内部单独的一个线程,因此,确保所有更新UI的操作都在主线程上进行是非常重要的。同时你调用了一个方法叫做updateBMI——这是包含在初始项目中的一个方法,来计算并展示BMI(身体质量指数)。
那个新的NSMassFormater是什么?
你会在你刚刚添加上去的代码中发现这个新的类,尽管它不是HealthKit的一部分,但却十分有关联。iOS8提供了这个以及其他的格式转换器,例如图片方面的NSLengthFormatter和NSEnergyFormatter。它们将数量转换为字符串,并把用户所处位置也考虑在内。
当你使用它们的时候,你不需要自己本地化字符串或者配置当前位置的单位转换。转换器会来处理这些细节。
例如,你正在使用千克单位,即时你的系统不是公制配置的,转换器也会自动将其转换为合适的单位。
现在,你需要为身高做同样的事,找到方法updateHeight(),将下面这行:
|
1
|
println(
"TODO: update Height"
)
|
替换为:
|
1
2
3
4
5
6
7
8
9
10
11
12
13
14
15
16
17
18
19
20
21
22
23
24
25
26
27
28
|
// 1. Construct an HKSampleType for Height
let sampleType = HKSampleType.quantityTypeForIdentifier(HKQuantityTypeIdentifierHeight)
// 2. Call the method to read the most recent Height sample
self.healthManager?.readMostRecentSample(sampleType, completion: { (mostRecentHeight, error) -> Void
in
if
( error != nil )
{
println(
"Error reading height from HealthKit Store: \(error.localizedDescription)"
)
return
;
}
var
heightLocalizedString = self.kUnknownString;
self.height = mostRecentHeight as? HKQuantitySample;
// 3. Format the height to display it on the screen
if
let meters = self.height?.quantity.doubleValueForUnit(HKUnit.meterUnit()) {
let heightFormatter = NSLengthFormatter()
heightFormatter.forPersonHeightUse =
true
;
heightLocalizedString = heightFormatter.stringFromMeters(meters);
}
// 4. Update UI. HealthKit use an internal queue. We make sure that we interact with the UI in the main thread
dispatch_async(dispatch_get_main_queue(), { () -> Void
in
self.heightLabel.text = heightLocalizedString
self.updateBMI()
});
})
|
正如你所看到的,这段代码几乎与读取体重时的代码一致,但是有两个值得注意的不同点:
-
首先,身高类型是由与身高数据类型相关联的标识符HKQuantityTypeIdentifierHeight来构建的,以此来允许你读取身高方面的数据。
-
第二,这里使用了NSLengthFormatter来获取对应身高数值的本地化的字符串。NSLengthFormatter本身就是用来获取本地化的长度的字符串。
现在你将用你刚刚从HealthKit Store中读取到的身高和体重来计算BMI(身体质量指数)并且将这些数据展示到屏幕上。打开ProfileViewController.swift并找到updateBMI()方法。
将下面这一行:
|
1
|
println(
"TODO: update BMI"
)
|
替换为:
|
1
2
3
4
5
6
7
8
9
10
11
12
|
if
weight != nil && height != nil {
// 1. Get the weight and height values from the samples read from HealthKit
let weightInKilograms = weight!.quantity.doubleValueForUnit(HKUnit.gramUnitWithMetricPrefix(.Kilo))
let heightInMeters = height!.quantity.doubleValueForUnit(HKUnit.meterUnit())
// 2. Call the method to calculate the BMI
bmi = calculateBMIWithWeightInKilograms(weightInKilograms, heightInMeters: heightInMeters)
}
// 3. Show the calculated BMI
var
bmiString = kUnknownString
if
bmi != nil {
bmiLabel.text = NSString(format:
"%.02f"
, bmi!)
}
|
这段代码做了什么呢?具体来说:
-
使用方法doubleValueForUnits()来获得身高和体重的double类型的数据,也是在这里你指明你想要的单位。注意:HKUnit提供了一种方法来构建所有类型的单位,这里你用克来转换体重,用米来转换身高,你必须十分小心,确保使用了一致的单位。因为如果要求的单位与数据的类型不相匹配的话,会抛出一个异常。例如,想把体重数值转换为距离单位是不会起作用的。
-
通过调用calculateBMIWithWeightInKilograms()来计算BMI,这是初始项目中附带的一个工具方法,通过身高和体重来计算BMI。
-
在合适的Label中展示BMI数值。因为BMI仅仅是一个数字,你不需要任何转换器来转换它。
注意:如果你没有在HealthKit Store中添加一些供app读入的数据的话,你会被绊住的。如果你还没有做,你至少应该添加一些身高和体重的数据。
现在,编译并运行app,前往Profile & BMI界面,点击“Read Health Data”,如果你已经在Health应用中添加了一些身高和体重的数据,那么你会看到类似如下输出:
酷!你刚刚从HealthKit Stroe中读到了你的第一份数据采样的信息并且使用它们计算了BMI。
保存数据
在这一部分,你将学到如何将数据保存到HealthKit Store。你的测试数据将是上一部分中你计算出来的BMI数值。
打开HealthManager.swift,添加下面的方法:
|
1
2
3
4
5
6
7
8
9
10
11
12
13
14
15
16
|
func saveBMISample(bmi:Double, date:NSDate ) {
// 1. Create a BMI Sample
let bmiType = HKQuantityType.quantityTypeForIdentifier(HKQuantityTypeIdentifierBodyMassIndex)
let bmiQuantity = HKQuantity(unit: HKUnit.countUnit(), doubleValue: bmi)
let bmiSample = HKQuantitySample(type: bmiType, quantity: bmiQuantity, startDate: date, endDate: date)
// 2. Save the sample in the store
healthKitStore.saveObject(bmiSample, withCompletion: { (success, error) -> Void
in
if
( error != nil ) {
println(
"Error saving BMI sample: \(error.localizedDescription)"
)
}
else
{
println(
"BMI sample saved successfully!"
)
}
})
}
|
下面是这段代码所做的事情:
-
使用HKQuantitySample创建一个采样的对象,为了创建一条采样,你需要:
-
一个身体素质类型的对象,例如likeHKQuantityType,使用合适的数据类型来初始化,本例中使用的是HKQuantityTypeIdentifierBodyMassIndex。
-
一个身体素质的对象,例如likeHKQuantity,通过传入bmi数值和单位来初始化。本例中,由于BMI数值是一个纯量的数值,没有单位,因此你需要使用countUnit
-
起止日期,本例中两者都是当前时间。
-
-
调用HKHealthStore的方法saveObject()将数据保存到HealthKit Store
现在你将在控制器中使用该方法来保存BMI数据,打开ProfileViewController.swift并找到saveBMI().
将下面这一行:
|
1
|
println(
"TODO: save BMI sample"
)
|
替换为:
|
1
2
3
4
5
6
7
|
// Save BMI value with current BMI value
if
bmi != nil {
healthManager?.saveBMISample(bmi!, date: NSDate())
}
else
{
println(
"There is no BMI data to save"
)
}
|
十分简单——这里调用了你刚刚创建的方法,并传入了BMI数值和当前时间。
编译并运行,导航到Profile视图并点击”Read Health Data”来读取信息,计算BMI数值并展示结果。接下来,点击”Save BMI”来保存计算好的数值。如果一切运行正常,你将在Xcode控制台中看到如下信息:
|
1
|
BMI sample saved successfully!
|
做得漂亮!数据被保存了。你可以通过Health应用确定一下数据是否真的在HealthKit Store中。打开Health应用,导航到”Health Data”栏,前往”Body Measurements”然后前往”Body Mass Index”。
如果你看到类似如上的信息,那你就成功了。这意味着你计算好的BMI已经在那里,为用户、为Health应用的检查、以及为其他第三方应用都准备好了~
何去何从?
这里是目前为止的示例工程。
!重要!:如果你想使用上面的示例工程,在使用HealthKit之前需要进行一些设置,因为该工程绑定了一个示例用Bundle ID,你需要将其修改为你自己的Bundle ID,选择你的开发团队,然后将Target栏中Capabilities菜单下的HealthKit的开关由OFF变为ON。
详见上述“开始”部分和“授权与许可”部分。
恭喜你,你已经用HealthKit完成了一些亲子动手做的实验,你现在已经知道怎么样获取许可,读取个人特征信息、读写采样数据了。
如果你想了解更多,请转向该篇HealthKit系列教程的下一部分(中译版),你将学到一个更复杂类型的数据的更多内容:锻炼与健身的信息(workout)。
(本文为CocoaChina组织翻译,本译文权利归译者所有,未经允许禁止转载。)


