javaee学习之路(二十四)Strusts
一、为什么要学习struts
1、struts是MVC设计模式的具体实现,使用struts使MVC的结构更加清晰
2、Taglib是Struts的标记库,灵活运运用,能大大提高开发效率
3、简单的信息编辑
4、高效的后台验证
5、增加了代码的可维护性,重用性
6、用Struts并不一定是为了减少工作量,她的作用是使逻辑处理与页面显示分开,编程思路更加清晰
二、
三、

四、
例1、Struts的简单原理实现
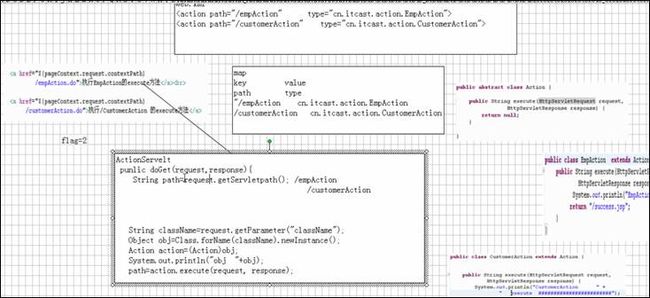

第一步、导包,并配置工程的web.xml
…….
 <!-- ActionServle是struts的中央控制器,所有的请求只要是*.do的格式,都要走struts的中央控制器 在struts中只有一个ActionServlet,他是单实例多线程运行 -->
  <servlet>
    <servlet-name>action</servlet-name>
    <servlet-class>org.apache.struts.action.ActionServlet</servlet-class>
    <!-- ActionServlet启动时加载struts内置文件 protected String config = "/WEB-INF/struts-config.xml"; -->
    <init-param>
       <!-- 这个参数的名字是固定的 -->
       <param-name>config</param-name>
       <!-- 配置文件的名字是随意的 -->
       <param-value>/WEB-INF/struts-config.xml</param-value>
    </init-param>
    <!-- 设置ActionServlet的启动顺序,数值越小启动越靠前 -->
    <load-on-startup>0</load-on-startup>
  </servlet>
  <servlet-mapping>
     <servlet-name>action</servlet-name>
     <url-pattern>*.do</url-pattern>
  </servlet-mapping>
  <welcome-file-list>
    <welcome-file>index.jsp</welcome-file>
  </welcome-file-list>
</web-app>
第二步、test.jsp
<%@ page language="java" import="java.util.*" pageEncoding="UTF-8" contentType="text/html;charset=UTF-8"%>
<!DOCTYPE HTML PUBLIC "-//W3C//DTD HTML 4.01 Transitional//EN">
<html>
  <body>
    <a href="${pageContext.request.contextPath}/empAction.do">执行的是EmpAction的excute方法</a><br/>
    <a href="${pageContext.request.contextPath}/CustomerAction.do">执行的是CustomerAction的excute方法</a>
  </body>
</html>
第三步、在WEB-INF目录下建立struts-config.xml
<?xml version="1.0" encoding="UTF-8"?>
<!--配置的方法: 1.在struts的目录下打开E:JAVA工具\struts-1.3.8-all\struts-1.3.8\apps 2.将里面随意一个文件的后缀名改为.zip,然后解压 3.在解压后的文件中找到WEB-INF目录下找到struts-config.xml文件 4.拷贝 -->
<!DOCTYPE struts-config PUBLIC "-//Apache Software Foundation//DTD Struts Configuration 1.3//EN" "http://struts.apache.org/dtds/struts-config_1_3.dtd">
 <struts-config>
    <action-mappings>
       <action path="/empAction" type="cn.itcast.action.EmpAction"></action>
       <action path="/CustomerAction" type="cn.itcast.action.CustomerAction"></action>
    </action-mappings>
</struts-config>
第四步、CustomerAction.java
package cn.itcast.action;
public class CustomerAction extends Action {
    @Override
    public ActionForward execute(ActionMapping mapping, ActionForm form,
            HttpServletRequest request, HttpServletResponse response)
            throws Exception {
        System.out.println("CustomerAction*********************");
        return null;
    }
}
第五步、EmpAction.java
package cn.itcast.action;
//在struts中,所有的action类都要继承Action
public class EmpAction extends Action {
    @Override
    public ActionForward execute(ActionMapping mapping, ActionForm form,
            HttpServletRequest request, HttpServletResponse response)
            throws Exception {
        System.out.println("EmpAction***************");
        return null;
    }
}
第六步、运行程序http://localhost:8080/day22Struts01/test.jsp
点击:执行的是EmpAction的excute方法 就会在控制台打印出:EmpAction***************
点击:执行的是CustomerAction的excute方法就会在控制台打印出:CustomerAction*********************
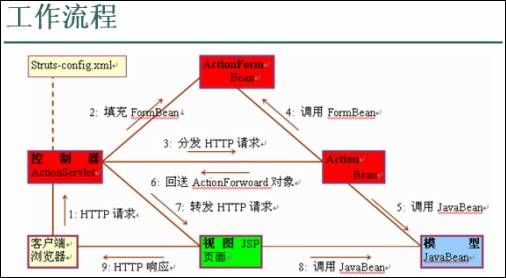
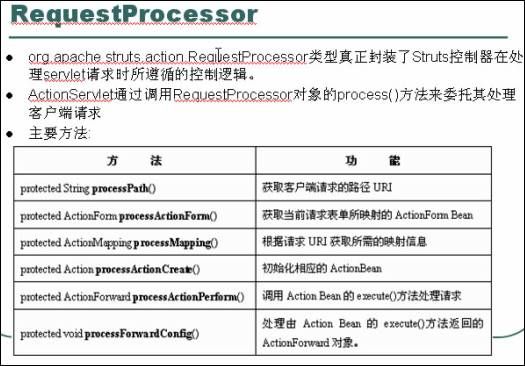
Struts执行流程:
启动服务器时做的工作:
* 服务器启动时,根据web.xml文件的配置信息实例化一个ActionServlet对象
* ActionServlet加载struts-config.xml文件,将读取到的信息放置到内存中
客户端发出请求,例如请求路径:/empAction.do(ActionServlet要求*.do的格式,这样才能走ActionServlet)
ActionServlet解析请求路径/empAction
ActonServlet根据解析后的请求路径/empAction在Struts-config.xml文件中查找,该路径所对应的path属性。
和对应的type属性,并取出type属性的属性值。
ActionServlet 创建type指定类的实例(cn.itcast.action.EmpAction),上溯到Action类型,调用execute方法
开发人员:
1、 定义请求的路径 *.do(即配置web.xml文件)
2、 配置struts-config.xml文件
3、 定义XxxActiong extends Action 重写excute方法
例2、视图层增加表单。

Struts含有表单的执行流程:
1. 启动服务器时做的工作:
* 服务器启动时,根据web.xml文件的配置信息实例化一个ActionServlet对象
* ActionServlet加载struts-config.xml文件,将读取到的信息放置到内存中
2. 客户端发出请求,例如请求路径:/login.do(ActionServlet要求*.do的格式,这样才能走ActionServlet)
3. ActionServlet解析请求路径/loginAction
4. ActonServlet根据解析后的请求路径/loginAction在Struts-config.xml文件中查找,该路径所对应的path属性等。
4.1 ActionServlet 根据action中name的属性值,找到封装表单数据的javaBean(LoginForm)
4.2 ActionServlet把表单的数据封装到javabean
4.3 ActionServlet将struts-config.xml文件中的<action-mappings>标签下的<action name=””…..></action>标签的属性和属性内容封装到ActionMapping对象中(对象名:mapping 在LoginAction.jsp的execute方法中)
4.4 ActionServlet根据path获取到type属性值,并创建type指定类的实例(cn.itcast.web.action.LoginAction), 上溯到Action类型,
5 LoginAction的实例调用execute方法(4.3产生ActionMapping对象,4.2产生ActionForm对象,请求对象,响应对象)
6 在重写的execute开发人员处理********************
7 ActionServlet根据execute方法返回的ActionForward对象,获取path属性值,转发或者重定向

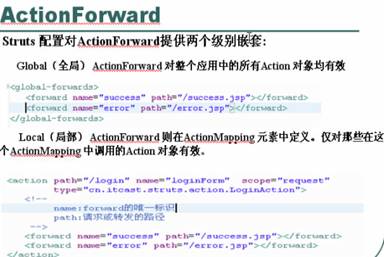
例2、详解ActionForward
第一步、web.xml
<?xml version="1.0" encoding="UTF-8"?>
<web-app version="2.5" xmlns="http://java.sun.com/xml/ns/javaee" xmlns:xsi="http://www.w3.org/2001/XMLSchema-instance" xsi:schemaLocation="http://java.sun.com/xml/ns/javaee http://java.sun.com/xml/ns/javaee/web-app_2_5.xsd">
<servlet>
    <servlet-name>action</servlet-name>
    <servlet-class>org.apache.struts.action.ActionServlet</servlet-class>
    <!-- ActionServlet启动时加载struts内置文件 protected String config = "/WEB-INF/struts-config.xml"; -->
    <init-param>
       <!-- 这个参数的名字是固定的 -->
       <param-name>config</param-name>
       <!-- 配置文件的名字是随意的 -->
       <param-value>/WEB-INF/struts-config.xml</param-value>
    </init-param>

    <!-- 设置ActionServlet的启动顺序,数值越小启动越靠前 -->
    <load-on-startup>0</load-on-startup>
  </servlet>


  <servlet-mapping>
     <servlet-name>action</servlet-name>
     <url-pattern>*.do</url-pattern>
  </servlet-mapping>

  <welcome-file-list>
    <welcome-file>index.jsp</welcome-file>
  </welcome-file-list>
</web-app>
第二步、index.jsp
<%@ page language="java" import="java.util.*" pageEncoding="UTF-8"%>
<!DOCTYPE HTML PUBLIC "-//W3C//DTD HTML 4.01 Transitional//EN">
<html>
  <head>
  </head>
  <body>
    <form action="${pageContext.request.contextPath}/login.do" method="post">
      用户名:<input type="text" name="username"/><br/>
    密码:<input type="password" name="password"/> <br/>
    <input type="submit" value="登录">
    <input type="reset" value="重置">
    </form>
  </body>
</html>
第三步、LoginForm.java
package cn.itcast.web.form;

import org.apache.struts.action.ActionForm;
/* * 1.struts中的javabean必须继承ActionForm * 2.该javabean用于封装index.jsp页面的表单 * 3.此类中的属性名称必须和页面的name属性相同,才能使用struts自动封装机制 */
public class LoginForm extends ActionForm{
    //<input type="text" name="username"/>
    private String username;
    //<input type="password" name="password"/>
    private String password;
    public String getUsername() {
        return username;
    }
    public void setUsername(String username) {
        this.username = username;
    }
    public String getPassword() {
        return password;
    }
    public void setPassword(String password) {
        this.password = password;
    }
}
第四步、struts-config.xml
<?xml version="1.0" encoding="UTF-8"?>
<!--配置的方法: 1.在struts的目录下打开E:JAVA工具\struts-1.3.8-all\struts-1.3.8\apps 2.将里面随意一个文件的后缀名改为.zip,然后解压 3.在解压后的文件中找到WEB-INF目录下找到struts-config.xml文件 4.拷贝 -->
<!DOCTYPE struts-config PUBLIC "-//Apache Software Foundation//DTD Struts Configuration 1.3//EN" "http://struts.apache.org/dtds/struts-config_1_3.dtd">
 <struts-config>

 <form-beans>
      <!-- form-bean:用于配置封装表单数据的javabean type属性:javabean的完整类名 name属性:formBean标签的唯一标示 -->
      <form-bean name="loginForm" type="cn.itcast.web.form.LoginForm"></form-bean>
    </form-beans>

 <!-- 配置ActionForward全局转发 -->
    <global-forwards>
       <forward name="success" path="/success1.jsp"></forward>
       <forward name="error" path="/error1.jsp"></forward>
    </global-forwards>


    <action-mappings>
    <!-- path属性:表示action标签的唯一标示,唯一入口 name属性:在formbean标签中已经配置好的name的属性值,表示此次请求用 name属性的值指定的<form-bean>封装表单数据,封装表单的数据, 由struts的底层actionServlet自己完成 -->
<action path="/login" name="loginForm" scope="request" type="cn.itcast.web.action.LoginAction">
          <!-- forward标签定义要转向的路径 name属性:forward标签的唯一标示(自定义) path属性:要转向的路径 redirect属性:控制请求的方式 true:重定向 false:转发(默认值) 重定向的话就取不到request.setAttribute()当中设置的属性值!!! -->
          <forward name="success" path="/success.jsp" redirect="false"></forward>
          <forward name="error" path="/error.jsp" redirect="true"></forward>

       </action>
    </action-mappings>
 </struts-config>
第五步、LoginAction.java
package cn.itcast.web.action;
public class LoginAction extends Action {
    @Override
    /* * 1.第一个参数ActionMapping mapping是指封装了struts-config.xml文件中的<action> * 标签的属性、属性值和子标签的javabean,所以有mapping.getXxx();Xxx为<action-mapping>中属性名 * 2.第二个参数 ActionForm form:封装表单数据的javabean * 3.此方法的返回值ActionForward表示的是封装了struts-config.xml文件中<action> * 标签下面<forward name..path..>标签属性和属性值的javabean(setName(),getName()...) */
    public ActionForward execute(ActionMapping mapping, ActionForm form,
            HttpServletRequest request, HttpServletResponse response)
            throws Exception {
/****************************************************************/
        System.out.println(form);//cn.itcast.web.form.LoginForm@646cf9
        LoginForm loginForm=(LoginForm)form;
        System.out.println(loginForm.getUsername());
        System.out.println(loginForm.getPassword());
        System.out.println("LoginAction************");
/****************************************************************/
        String username=request.getParameter("username");
        String password=request.getParameter("password");
        System.out.println(username);
        System.out.println(password);
/****************************************************************/
        //1.获取请求路径(struts-config.xml文件中<action>中的path属性值)
        String path=mapping.getPath();
        //2.获取struts-config.xml文件中<action>中的name属性值
        String sloginForm=mapping.getName();
        //3.获取struts-config.xml文件中<action>中的type属性值
        String sType=mapping.getPath();
        System.out.println(path+":"+sloginForm+":"+sType);
        //4.获取获取struts-config.xml文件中<action>子标签<forward name="success">中的path属性值
        String successPath=mapping.findForward("success").getPath();// /success.jsp
/****************************************************************/
        //如果用户名是aa,转到成功页面
        if("aa".equals(loginForm.getUsername().trim())){
            request.setAttribute("Message", "处理成功");
            return mapping.findForward("success");//返回封装了转发路径的ActionForward对象
        }else{
            //其他的转到失败页面
            request.setAttribute("Message", "处理失败!");
            return new ActionForward("/error2.jsp");//不去查找配置文件中的数据进行转发(不推荐) }
    }
}
第六步、
<%@ page language="java" import="java.util.*" pageEncoding="UTF-8" contentType="text/html;charset=UTF-8"%>
<!DOCTYPE HTML PUBLIC "-//W3C//DTD HTML 4.01 Transitional//EN">
<html>
  <head>
  </head>
  <body>
   成功页面!!!! <br>
   <h1>${Message}</h1>
  </body>
</html>
第七步、
……
  <body>
    失败页面!!! <br>
       <h1>${Message}</h1>
  ……
第八步、
……
  <body>
   成功页面11111111111111!!!! <br>
   <h1>${Message}</h1>
 ……
第九步、
……
  <body>
    失败页面11111111!!! <br>
       <h1>${Message}</h1>
  ……
第十步、http://localhost:8080/day22Struts02/运行
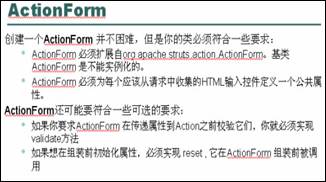
ActionForm总结:
1 可以配置全局的actionForward
<global-forwards>
             <forward name="success" path="/success1.jsp"></forward>
             <forward name="error" path="/error1.jsp"></forward>
</global-forwards>
2 配置局部的ActionForward此时应该配置在<action>标签中
<action path="/login" name="loginForm" scope="request" type="cn.itcast.web.action.LoginAction">
                  <!-- forward标签定义要转向的路径 name属性:forward标签的唯一标示(自定义) path属性:要转向的路径 redirect属性:控制请求的方式 true:重定向 false:转发(默认值) 重定向的话就取不到request.setAttribute()当中设置的属性值!!! -->
          <forward name="success" path="/success.jsp" redirect="false"></forward>
          <forward name="error" path="/error.jsp" redirect="true"></forward>
       </action>
3 当两者共存时,<action>中配置的优先


ActionForm对象:
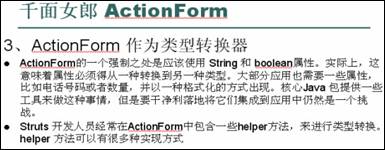
三、ActionForm的风情
1.ActionForm和动态DynaActionForm
2. 动态DynaActionForm
3、实例:用户登录
第一步、
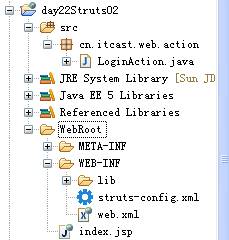
第二步、index.jsp
……
  <body>
    <form action="${pageContext.request.contextPath}/login.do" method="post">
      用户名:<input type="text" name="username"/><br/>
    密码:<input type="password" name="password"/> <br/>
    <input type="submit" value="登录">
    <input type="reset" value="重置">
   ……
第三步、struts-config.xml
<?xml version="1.0" encoding="UTF-8"?>
<!DOCTYPE struts-config PUBLIC "-//Apache Software Foundation//DTD Struts Configuration 1.3//EN" "http://struts.apache.org/dtds/struts-config_1_3.dtd">
 <struts-config>
 <form-beans>
 <!-- 配置动态的ActionForm type的类型永远是:org.apache.struts.action.DynaActionForm -->
      <form-bean name="loginForm" type="org.apache.struts.action.DynaActionForm">
      <!-- 配置动态ActionForm中的属性 name:属性的名称 type:属性的类型 initial:属性的初始化值 -->
            <form-property name="username" type="java.lang.String" initial="John"/>
            <form-property name="password" type="java.lang.String" initial="123"/>
      </form-bean>
 </form-beans>
    <action-mappings>
       <action path="/login" name="loginForm" scope="request" type="cn.itcast.web.action.LoginAction">

          <forward name="success" path="/success.jsp" redirect="false"></forward>
          <forward name="error" path="/error.jsp" redirect="true"></forward>
       </action>
    </action-mappings>
 </struts-config>
第四步、
package cn.itcast.web.action;
public class LoginAction extends Action {
    public ActionForward execute(ActionMapping mapping, ActionForm form,
            HttpServletRequest request, HttpServletResponse response)
            throws Exception {
        System.out.println(form);
        //DynaActionForm[dynaClass=loginForm,username=fandong,password=123]
        //Map<key,value>
        DynaActionForm dynaActionForm=(DynaActionForm)form;
        //输出用户名和密码
        String username = (String)dynaActionForm.get("username");
        String password=dynaActionForm.getString("password");
        System.out.println(username+":"+password);//fandong:123
        return null;
    }
}
4.ActionForm Bean的使用范围(重点)

4.1 例子程序:
4.2
第O步、LoginForm.java(全是String类型的属性)
package cn.itcast.web.form;
public class LoginForm extends ActionForm{
    private String username;
    private String password;
/** * 第二个执行 * @return */
    public String getUsername() {
        return username;
    }
    public void setUsername(String username) {
        this.username = username;
    }
    public String getPassword() {
        return password;
    }
    public void setPassword(String password) {
        this.password = password;
    }
    /** * 第一个执行:初始化JavaBean的属性 */
    @Override
    public void reset(ActionMapping mapping, HttpServletRequest request) {
        this.setUsername(null);
        this.setPassword(null);
    }
/** * 第三个执行:验证formBean中的数据是否正确,表单的数据全用String接收,接收到以后验证 */ public ActionErrors validate(ActionMapping mapping,
            HttpServletRequest request) {
        return null;
    }
}
第一步、struts-config.xml
<?xml version="1.0" encoding="UTF-8"?>
<!DOCTYPE struts-config PUBLIC "-//Apache Software Foundation//DTD Struts Configuration 1.3//EN" "http://struts.apache.org/dtds/struts-config_1_3.dtd">
 <struts-config>
     <form-beans>
      <form-bean name="loginForm" type="cn.itcast.web.form.LoginForm"></form-bean>
    </form-beans>
    <action-mappings>
    <!-- Scope的取值有两个:session request -->
       <action path="/login" name="loginForm" scope="request" attribute="t" type="cn.itcast.web.action.LoginAction">
          <forward name="success" path="/success.jsp" redirect="false"></forward>
          <forward name="error" path="/error.jsp" redirect="true"></forward>
       </action>
       <!-- 通过struts的中央控制器,但不做其他的事情,直接使用如下的代码即可(转发) -->
       <action path="/test" forward="/a.jsp"></action>
    </action-mappings>
 </struts-config>
第二步、LoginAction.java
package cn.itcast.web.action;
public class LoginAction extends Action {
    public ActionForward execute(ActionMapping mapping, ActionForm form,
            HttpServletRequest request, HttpServletResponse response)
            throws Exception {
        //输出用户名和密码
        //不能利用form获取用户名,不能利用request的四个方法取值
// request.getParameter(name);
// request.getAttributeNames(name);
// request.getParameterValues(name);
// request.getParameterMap();
        //<action path="/login" name="loginForm" scope="request"
        LoginForm loginForm=(LoginForm)request.getAttribute("loginForm");
        if(loginForm!=null){
            System.out.println(loginForm.getUsername());
            System.out.println(loginForm.getPassword());
        }else{
            System.out.println("loginForm==null");
        }
        return null;
    }
}
第三步、index.jsp
……
  <body>
    <form action="${pageContext.request.contextPath}/login.do" method="post">
      用户名:<input type="text" name="username"/><br/>
    密码:<input type="password" name="password"/> <br/>
    <input type="submit" value="登录">
    <input type="reset" value="重置">
    </form>
    <a href="${pageContext.request.contextPath}/test.do">a.jsp</a>
  </body>
</html>
第四步、a.jsp
……
  <body>
    a.jsp<br>
  </body>
……
第五步、运行并验证

则在控制台打印出:fandong 123
第四步、
1.将struts-config.xml中改为:
<action path="/login" name="loginForm" scope="request" attribute="t" ..则在控制台打印出:loginForm==null
2.再将LoginForm loginForm=(LoginForm)request.getAttribute("loginForm");改为:
LoginForm loginForm=(LoginForm)request.getAttribute("t");则在控制台打印出:fandong 123
总结:
* <action path="/login" name="loginForm" scope="request" attribute="t" ..
* struts中<action>中attribute属性的值
     * 如果设置attribute属性的值:
         mapping.getAttribute() 获取的值是attribute属性的值
     * 如果没有设置attribute属性的值:
         mapping.getAttribute() 获取的值是name属性的值
     * 如果没有设置name属性的值:
         mapping.getAttribute() 获取的值是null
底层代码为:
public String getAttribute() {
        if (this.attribute == null) {
            return (this.name);
        } else {
            return (this.attribute);
        }
    }
attribute的作用:是将ActionForm放置到作用域中的key
request.setAttribute(“attribute的值”,ActionForm的实例);
* 处理ActionForm Bean的基本步骤:
详解:
1) 是否在<action>中配置了name属性
2) 验证表单中的name=”username”等是否在javabean中有对应的属性
3) 检查表单的使用<action path="/login" name="loginForm" scope="request"/>
if(mapping.getAttrbute()==null){
//表示action中没有name属性,没有name属性就不封装表单的信息到javabean
return null;
}else{
ActionForm formBean=(ActionForm)request.getAttribute();
//在作用域中找到了formBean,直接返回使用
If(formBean!=null){
return forBean;
}
//在作用域中没有找到formBean,创建新的实例,放置到作用域中,返回
if(formBean==null){
ActionForm a =new ActionForm();
Request.setAttribute(mapping.getAttribute(),a);
}
}
<action>中的属性:scope有两个属性值:request.,Session(默认值)
4)调用Bean实例的reset方法重置其状态,相当于初始化FormBean
….
五、Action

(1)、dispatcherAction(分发请求的Action)
例4、dispatcherAction分发请求
第一步、web.xml
<?xml version="1.0" encoding="UTF-8"?>
<web-app version="2.5" xmlns="http://java.sun.com/xml/ns/javaee" xmlns:xsi="http://www.w3.org/2001/XMLSchema-instance" xsi:schemaLocation="http://java.sun.com/xml/ns/javaee http://java.sun.com/xml/ns/javaee/web-app_2_5.xsd">
<servlet>
    <servlet-name>action</servlet-name>
    <servlet-class>org.apache.struts.action.ActionServlet</servlet-class>
    <init-param>
       <param-name>config</param-name>
       <param-value>/WEB-INF/struts-config.xml</param-value>
    </init-param>
    <load-on-startup>0</load-on-startup>
  </servlet>
  <servlet-mapping>
     <servlet-name>action</servlet-name>
     <url-pattern>*.do</url-pattern>
  </servlet-mapping>
  <welcome-file-list>
    <welcome-file>index.jsp</welcome-file>
  </welcome-file-list>
</web-app>
第二步、index.jsp
<%@ page language="java" import="java.util.*" pageEncoding="UTF-8"%>
<!DOCTYPE HTML PUBLIC "-//W3C//DTD HTML 4.01 Transitional//EN">
<html>
  <head>
  </head>
  <body>
    <a href="${pageContext.request.contextPath}/empAction.do?method=save">添加员工信息</a><br/>
    <a href="${pageContext.request.contextPath}/empAction.do?method=delete">删除员工信息</a><br/>
    <a href="${pageContext.request.contextPath}/empAction.do?method=update">修改员工信息</a><br/>
  </body>
</html>
第三步、struts-config.xml
<?xml version="1.0" encoding="UTF-8"?>
<!DOCTYPE struts-config PUBLIC "-//Apache Software Foundation//DTD Struts Configuration 1.3//EN" "http://struts.apache.org/dtds/struts-config_1_3.dtd">
 <struts-config>
     <action-mappings>
     <!-- <a href="${pageContext.request.contextPath}/empAction?method=save">添加员工信息</a><br/> parameter:表示method的值就是调用EmpAction中方法的名称 -->
          <action path="/empAction" type="cn.itcast.web.action.EmpAction" parameter="method"></action>
     </action-mappings>
 </struts-config>
第四步、
package cn.itcast.web.action;
/* * 增加新的方法,要求 * * 新增的方法跟execute()方法的返回类型相同 * * 新增的方法跟execute()方法的参数类型相同 * * 只是方法名不相同 */
public class EmpAction extends DispatchAction {
public ActionForward save(ActionMapping mapping, ActionForm form,
HttpServletRequest request, HttpServletResponse response) throws Exception {
        System.out.println("执行save方法");
        return null;
    }
    public ActionForward delete(ActionMapping mapping, ActionForm form,
            HttpServletRequest request, HttpServletResponse response) throws Exception {
        System.out.println("执行delete方法");
        return null;
    }
    public ActionForward update(ActionMapping mapping, ActionForm form,
            HttpServletRequest request, HttpServletResponse response) throws Exception {
        System.out.println("执行update方法");
        return null;
    }
}
第五步、
http://localhost:8080/day22Struts04/
点击超链接,分别有不同响应!!!!
第六步、在EmpAction.java中重写execute方法如下:
public ActionForward execute(ActionMapping mapping, ActionForm form,
            HttpServletRequest request, HttpServletResponse response) throws Exception {
        System.out.println("执行execute方法");
        return null;
    }
第七步、在点击超链接,会发现,都只会执行execute方法,这种情况下怎样去执行各自的方法呢
将EmpAction.java改为如下:
package cn.itcast.web.action;
public class EmpAction extends DispatchAction {
    @Override
    public ActionForward execute(ActionMapping mapping, ActionForm form,
            HttpServletRequest request, HttpServletResponse response) throws Exception {
        System.out.println("执行execute方法");
        //利用反射机制
        String methodParams = mapping.getParameter();//method
        // <a href="${pageContext.request.contextPath}/empAction.do?method=save">
        String methodName = request.getParameter("method");
        //获取方法的封装类对象
        Class[] paramsType={ActionMapping.class,ActionForm.class,HttpServletRequest.class,HttpServletResponse.class};
        Method method = this.getClass().getMethod(methodName, paramsType);
        Object[] params={mapping,form,request,response};
        //调用this对象的底层方法
        Object obj = method.invoke(this, params);
        return (ActionForward)obj;

    }
    public ActionForward save(ActionMapping mapping, ActionForm form,
            HttpServletRequest request, HttpServletResponse response)
            throws Exception {
        System.out.println("执行save方法");
        return null;
    }
    public ActionForward delete(ActionMapping mapping, ActionForm form,
            HttpServletRequest request, HttpServletResponse response)
            throws Exception {
        System.out.println("执行delete方法");
        return null;
    }
    public ActionForward update(ActionMapping mapping, ActionForm form,
            HttpServletRequest request, HttpServletResponse response)
            throws Exception {
        System.out.println("执行update方法");
        return null;
    }
}
第八步、测试
http://localhost:8080/day22Struts05/
点击添加员工信息 则会在控制台打印出:
执行execute方法
执行save方法
第七步中最好采用以下处理方式:
定义两个Action: BaseAtion , EmpAction
1. BaseAction.java
package cn.itcast.web.action;
public class BaseAction extends DispatchAction { @Override public ActionForward execute(ActionMapping mapping, ActionForm form, HttpServletRequest request, HttpServletResponse response){ System.out.println("执行execute方法"); try{ //利用反射机制 String methodParams = mapping.getParameter();//method // <a href="${pageContext.request.contextPath}/empAction.do?method=save"> String methodName = request.getParameter("method");
            //获取方法的封装类对象
            Class[] paramsType={ActionMapping.class,ActionForm.class,HttpServletRequest.class,HttpServletResponse.class};
            Method method = this.getClass().getMethod(methodName, paramsType);
            Object[] params={mapping,form,request,response};
            //调用this对象的底层方法
            Object obj = method.invoke(this, params);

            return (ActionForward)obj;
        }catch(Exception e){ e.printStackTrace(); request.setAttribute("errorInfo", e.getMessage()); return mapping.findForward("error"); }
    }
}- EmpAction.java
package cn.itcast.web.action;
public class EmpAction extends BaseAction {
    public ActionForward save(ActionMapping mapping, ActionForm form,
            HttpServletRequest request, HttpServletResponse response)
            throws Exception {
        System.out.println("执行save方法");
        return null;
    }
    public ActionForward delete(ActionMapping mapping, ActionForm form,
            HttpServletRequest request, HttpServletResponse response)
            throws Exception {
        System.out.println("执行delete方法");
        if(true){
            throw new Exception("执行delete方法失败");
        }
        return null;
    }
    public ActionForward update(ActionMapping mapping, ActionForm form,
            HttpServletRequest request, HttpServletResponse response)
            throws Exception {
        System.out.println("执行update方法");
        return null;
    }
}- struts-config.xml
<?xml version="1.0" encoding="UTF-8"?>
<!DOCTYPE struts-config PUBLIC "-//Apache Software Foundation//DTD Struts Configuration 1.3//EN" "http://struts.apache.org/dtds/struts-config_1_3.dtd">
 <struts-config>
     <form-beans>
     </form-beans>
      <global-forwards>
         <forward name="error" path="/error.jsp" redirect="false"></forward>

      </global-forwards>
      <action-mappings>
          <action path="/empAction" type="cn.itcast.web.action.EmpAction" parameter="method"></action>
     </action-mappings>
</struts-config> - error.jsp
<%@ page language="java" import="java.util.*" pageEncoding="UTF-8"%>
<!DOCTYPE HTML PUBLIC "-//W3C//DTD HTML 4.01 Transitional//EN">
<html>
  <head>
    <title>My JSP 'error.jsp' starting page</title>
  </head>
  <body>
    <h2>${errorInfo}</h2>
  </body>
</html>