使用Kotlin开发Android应用(II):创建新工程
使用Kotlin开发Android应用(II):创建新工程
@author ASCE1885的 Github 简书 微博 CSDN
原文链接
在基本了解什么是Kotlin以及Kotlin可以做什么之后,接下来就到了配置Android Studio并使用Kotlin开发Android apps的时候了。首次配置Android Studio需要几个步骤,而有些Gradle配置是每个新建工程都要重新配置的。
在本系列文章中,我将创建一个精简版的Bandhook,这是我以前写的一个app,它的基本功能是连接一个音乐rest API,并返回关于某个乐队的信息。可以到Github上面的Bandhook-Kotlin查看源代码。
创建新工程并下载Kotlin插件
使用Android Studio创建一个具有一个activity的基本的Android工程,就跟你为普通工程创建的方式一样:
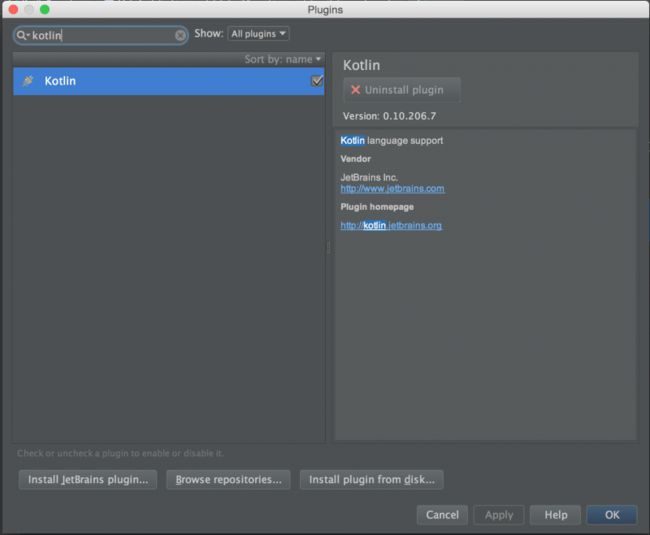
创建好了之后,你首先要做的就是下载Kotlin插件。打开Android Studio的首选项的搜索插件面板,使用搜索功能查询Kotlin插件,安装完成并重启IDE即可。
在应用的build.gradle文件中添加Kotlin插件依赖
由于我们的主Module要使用Kotlin,因此需要在工程的根build.gradle文件中新增Kotlin插件的依赖:
buildscript { repositories { jcenter() }
    dependencies { classpath 'com.android.tools.build:gradle:1.1.3' classpath 'org.jetbrains.kotlin:kotlin-gradle-plugin:0.11.91' }
}
配置module的build.gradle文件
首先,应用Kotlin插件:
apply plugin: 'com.android.application'
apply plugin: 'kotlin-android'
然后,添加Kotlin函数库到工程的依赖中:
dependencies {
    compile fileTree(dir: 'libs', include: ['*.jar'])
    compile 'org.jetbrains.kotlin:kotlin-stdlib:0.11.91'
}
最后,你需要在sources目录中添加下一个步骤我们要创建的Kotlin文件夹:
android {
    compileSdkVersion 22
    buildToolsVersion "22.0.0"

    ...

    sourceSets {
        main.java.srcDirs += 'src/main/kotlin'
    }
}
Alternatively, you can skip this step, and after doing next ones, use this Android Studio action:
或者你可以跳过这一步骤,并在完成下一个步骤之后,像下面这样操作Android Studio:
我更倾向于手动配置以便更好的组织Gradle文件,但第二种选择会简单一点。
创建Kotlin目录
It will be easier if you change the project visualization from ‘Android’ to ‘Project’. Go to ‘app->src->main’ and create a folder called ‘kotlin’:
首先将你的工程可视化界面从‘Android’切换到‘Project’,找到’app->src->main’目录,单击右键创建一个命名为‘kotlin’的目录。
将Java activity转换为kotlin文件
Kotlin plugin can convert from java to kotlin classes. We can convert our current activity to a Kotlin class very easily from ‘Code’ menu, by choosing ‘Convert Java File to Kotlin File’:
Kotlin插件能够将java类转换成kotlin类。通过选择’Code’菜单里面的‘Convert Java File to Kotlin File’选项,我们可以把当前的activity转换成Kotlin类:
IDE will suggest to move new file to the Kotlin folder. Click on ‘Move File’ (or move it manually if you don´t see the option).
You will get a very similar code translated to Kotlin. I suggest taking a look until you understand the differences:
IDE会建议将新的文件移动到Kotlin目录中。单击’Move File’按钮(如果你没有看到这个选项,那么也可以手动移动它)。
转换完成之后,你将会看到一个翻译成Kotlin语言的类似的代码片段。我建议你仔细研读直到看出这两者的区别:
public class MainActivity : ActionBarActivity() {

    override fun onCreate(savedInstanceState: Bundle?) {
        super.onCreate(savedInstanceState)
        setContentView(R.layout.activity_main)
    }


    override fun onCreateOptionsMenu(menu: Menu): Boolean {
        // Inflate the menu; this adds items to the action bar if it is present.
        getMenuInflater().inflate(R.menu.menu_main, menu)
        return true
    }

    override fun onOptionsItemSelected(item: MenuItem): Boolean {
        // Handle action bar item clicks here. The action bar will
        // automatically handle clicks on the Home/Up button, so long
        // as you specify a parent activity in AndroidManifest.xml.
        val id = item.getItemId()

        //noinspection SimplifiableIfStatement
        if (id == R.id.action_settings) {
            return true
        }

        return super.onOptionsItemSelected(item)
    }
}
主要的区别
通过前面的代码,我们可以看出有一些明显的区别,我们将在下一篇文章中进一步讨论:
- 继承的时候使用冒号(:)而不是使用extends关键字
- 显式的使用‘override’关键字:在Java中我们使用@override注解使得代码更简洁,但Kotlin并不强制我们使用。
- 使用‘fun’来声明函数:Kotlin是一种面向对象的函数式语言,因此类似Scala等语言,Java方法将会使用函数来代表。
- 函数参数使用不同的命名法:参数类型和名字顺序是反过来的,中间以冒号(:)分隔。
- 分号(;)是可选的:我们不需要以分号结束当前行,当然如果想要的话也可以。但如果我们不用加分号的话,将节省很多时间,并使代码更简洁。
- 其他细节:在第一篇文章中,我提到了‘?’符号。这表示被修饰的参数可以为空,判空的处理相比Java是不一样的。
总结
虽然我们能够预期到使用一门新语言将会有很大不同,但Kotlin是JetBrains团队创建的用于弥补Java语言缺失的特性,它容易学习并与Java可互操作。由于Android Studip也是基于JetBrains的产品,因此很容易在这个IDE里面集成并使用Kotlin语言。
下一篇文章将介绍使用Kotlin语言开发Android应用时的一些贴士和技巧。
文末摄影鉴赏


