@IBDesignable和@IBInspectable
近期一直在看苹果公司提供的两本swift官方教程电子书,一部是《The Swift Programming Language》,还有一部是《Using Swift With Cocoa and Objective-C》。昨天正好看到第二部电子书的“Writing Swift Classes with Objective-C Behavior”这一节,当中讲述了关于实时渲染这一技术。
以下是摘抄的当中一段内容:
“Live Rendering
You can use two different attributes—@IBDesignable and @IBInspectable—to enable live, interactive custom view design in Interface Builder. When you create a custom view that inherits from the UIView class or the NSView class, you can add the @IBDesignable attribute just before the class declaration. After you add the custom view to Interface Builder (by setting the custom class of the view in the inspector pane), Interface Builder renders your view in the canvas.

You can also add the @IBInspectable attribute to properties with types compatible with user defined runtime attributes. After you add your custom view to Interface Builder, you can edit these properties in the inspector.

SWIFT

@IBDesignable
class MyCustomView: UIView {
    @IBInspectable var textColor: UIColor
    @IBInspectable var iconHeight: CGFloat
    /* ... */
}
”

摘录来自: Apple Inc. “Using Swift with Cocoa and Objective-C”。 iBooks. https://itunes.apple.com/cn/book/using-swift-cocoa-objective/id888894773?mt=11
其大意就是说。能够将自己定义的代码实时渲染到Interface Builder中。
而它们之间的桥梁就是通过两个指令来完毕。即@IBDesignable和@IBInspectable。我们通过@IBDesignable告诉Interface Builder这个类能够实时渲染到界面中,可是这个类必须是UIView或者NSView的子类。通过@IBInspectable能够定义动态属性,就可以在attribute inspector面板中可视化改动属性值。
话不多说,以下举一个简单的样例,这个样例自己定义一个UIView的子类,该子类拥有一个UIButton。
import UIKit

@IBDesignable
class MyCustomView: UIView {

    @IBInspectable var buttonTitleColor: UIColor!         //  button title color
    @IBInspectable var buttonTitle: String!               //  button title
    @IBInspectable var buttonFrame: CGRect!               //  button frame

    var myButton: UIButton!

    override init(frame: CGRect) {
        // init stored properties
        buttonTitleColor = UIColor.redColor()
        buttonTitle = "button title"
        buttonFrame = CGRectMake(0, 0, 100, 50)

        myButton = UIButton(frame: buttonFrame)
        myButton.setTitleColor(buttonTitleColor, forState: .Normal)
        myButton.setTitle(buttonTitle, forState: .Normal)

        // call super initializer
        super.init(frame: frame)

        // add button to self
        addSubview(myButton)

    }

    required init(coder aDecoder: NSCoder) {
        // init stored properties
        buttonTitleColor = UIColor.redColor()
        buttonTitle = "button title"
        buttonFrame = CGRectMake(0, 0, 100, 50)

        myButton = UIButton(frame: buttonFrame)
        myButton.setTitleColor(buttonTitleColor, forState: .Normal)
        myButton.setTitle(buttonTitle, forState: .Normal)

        // call super initializer
        super.init(coder: aDecoder)

        // add button to self
        addSubview(myButton)
    }

    override func layoutSubviews() {
        // refresh button state through attribute inspector
        myButton.setTitleColor(buttonTitleColor, forState: .Normal)
        myButton.setTitle(buttonTitle, forState: .Normal)
    }

}
上图:
从图中能够看到,代码实时渲染到IB中了。
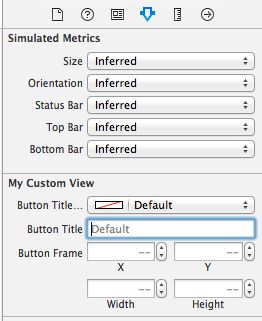
另外,我们在attribute inspector中也能够看到,由指令@IBInspectable声明的属性也出如今了面板中,通过改动这些值能够动态改变界面的效果(须要实现layoutSubviews方法)
详细project一览:
